LOLBeans Level Editor Documentation
LOLBeans Level Editor Documentation
End sliding if player speed is below
End sliding if player vertical speed is above
Assign property values from Variables
Moving in a straight line, alternate movement
Moving in a straight line, alternate movement, with easeInOutQuad
Saving, sharing and loading levels
Downloading the .lol level file
Navigation
Use the W,A,S,D keys and the mouse to fly around the scene. Use the Q,E keys to fly up and down.
Level Structure
This section lists the basic blocks that make up the typical LOLBeans level.
Player spawn points
Player spawns are where the player will initially appear inside the level.
⚠️Any level needs at least 3 player spawn points (and even 30 for competitive/elimination levels)
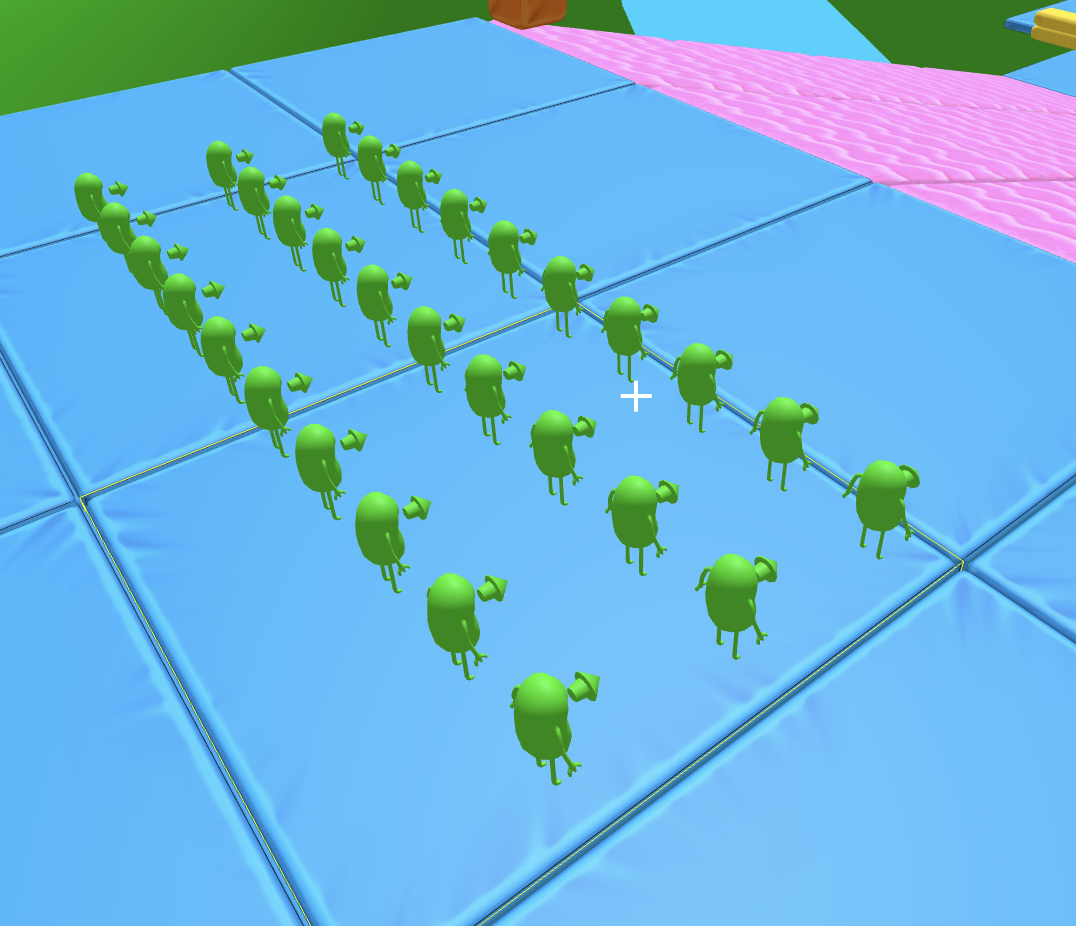
Spawns can be associated with a checkpoint or a teleport, or nothing
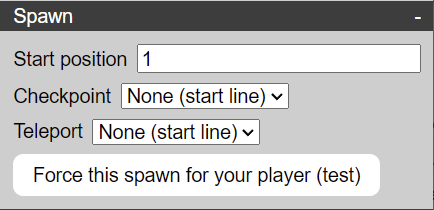
If a spawn is associated with nothing, it will be used for initial spawn. The start position will be used for competitive/elimination levels and players will randomly be given a spawn at the start of every round. The spawns will be sorted according to start position and will be filled in order.
If a spawn is associated with a checkpoint, it will be used when a player is killed and after the player has crossed the checkpoint area. If multiple spawns are associated with a checkpoint, one will be randomly chosen every time.
If a spawn is associated with a teleport, it will be used when a player touches the teleport trigger. If multiple spawns are associated with a teleport, one will be randomly chosen every time.
Checkpoint area
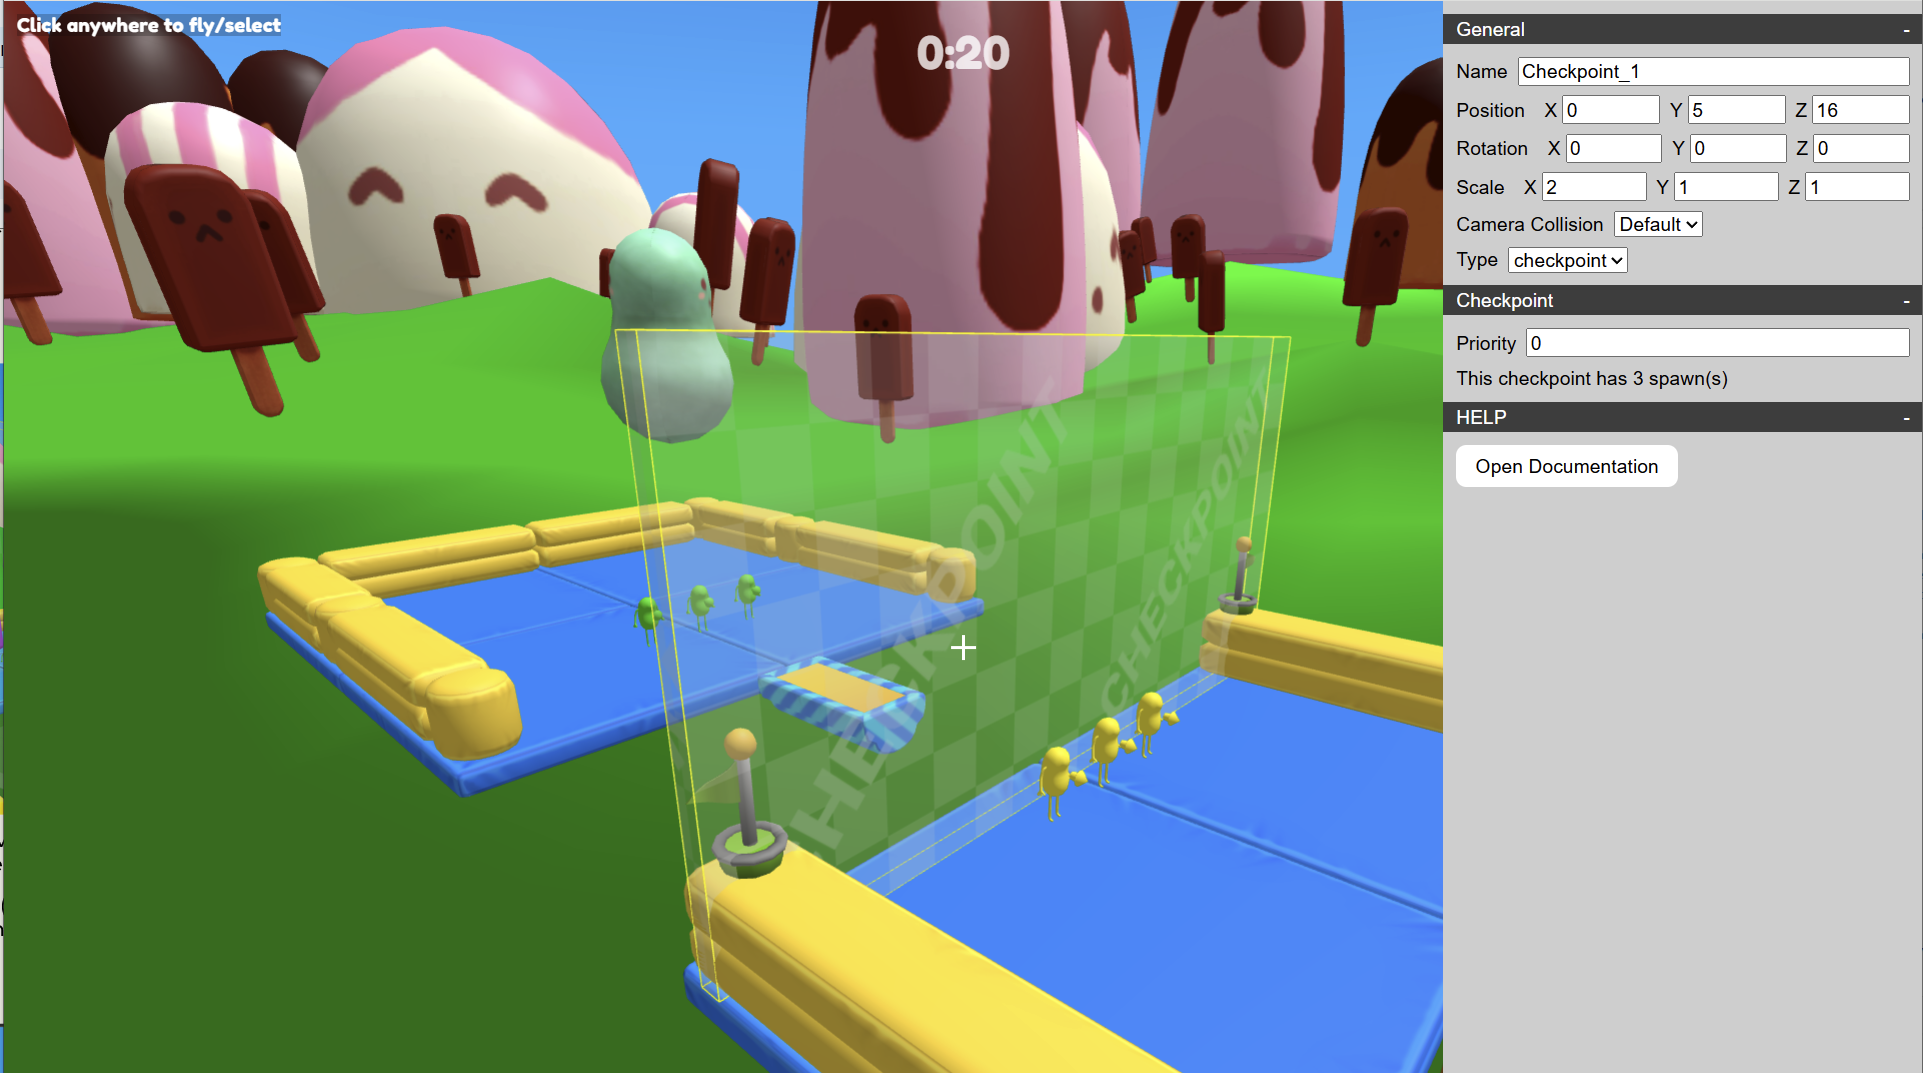
When designing a level you will want to avoid players always respawning at the beginning of the level even after passing a series of obstacles.
Once a player enters (or rather collides with) a checkpoint area their new respawn destination will be one of the player spawn points that have this area assigned in their properties.
A checkpoint will be ignored if their priority is lower than the priority of the last checkpoint entered by the player. This is especially useful for tower-like levels where the player can fall or go way backwards, and collide with a previous checkpoint on the path.
Finish area
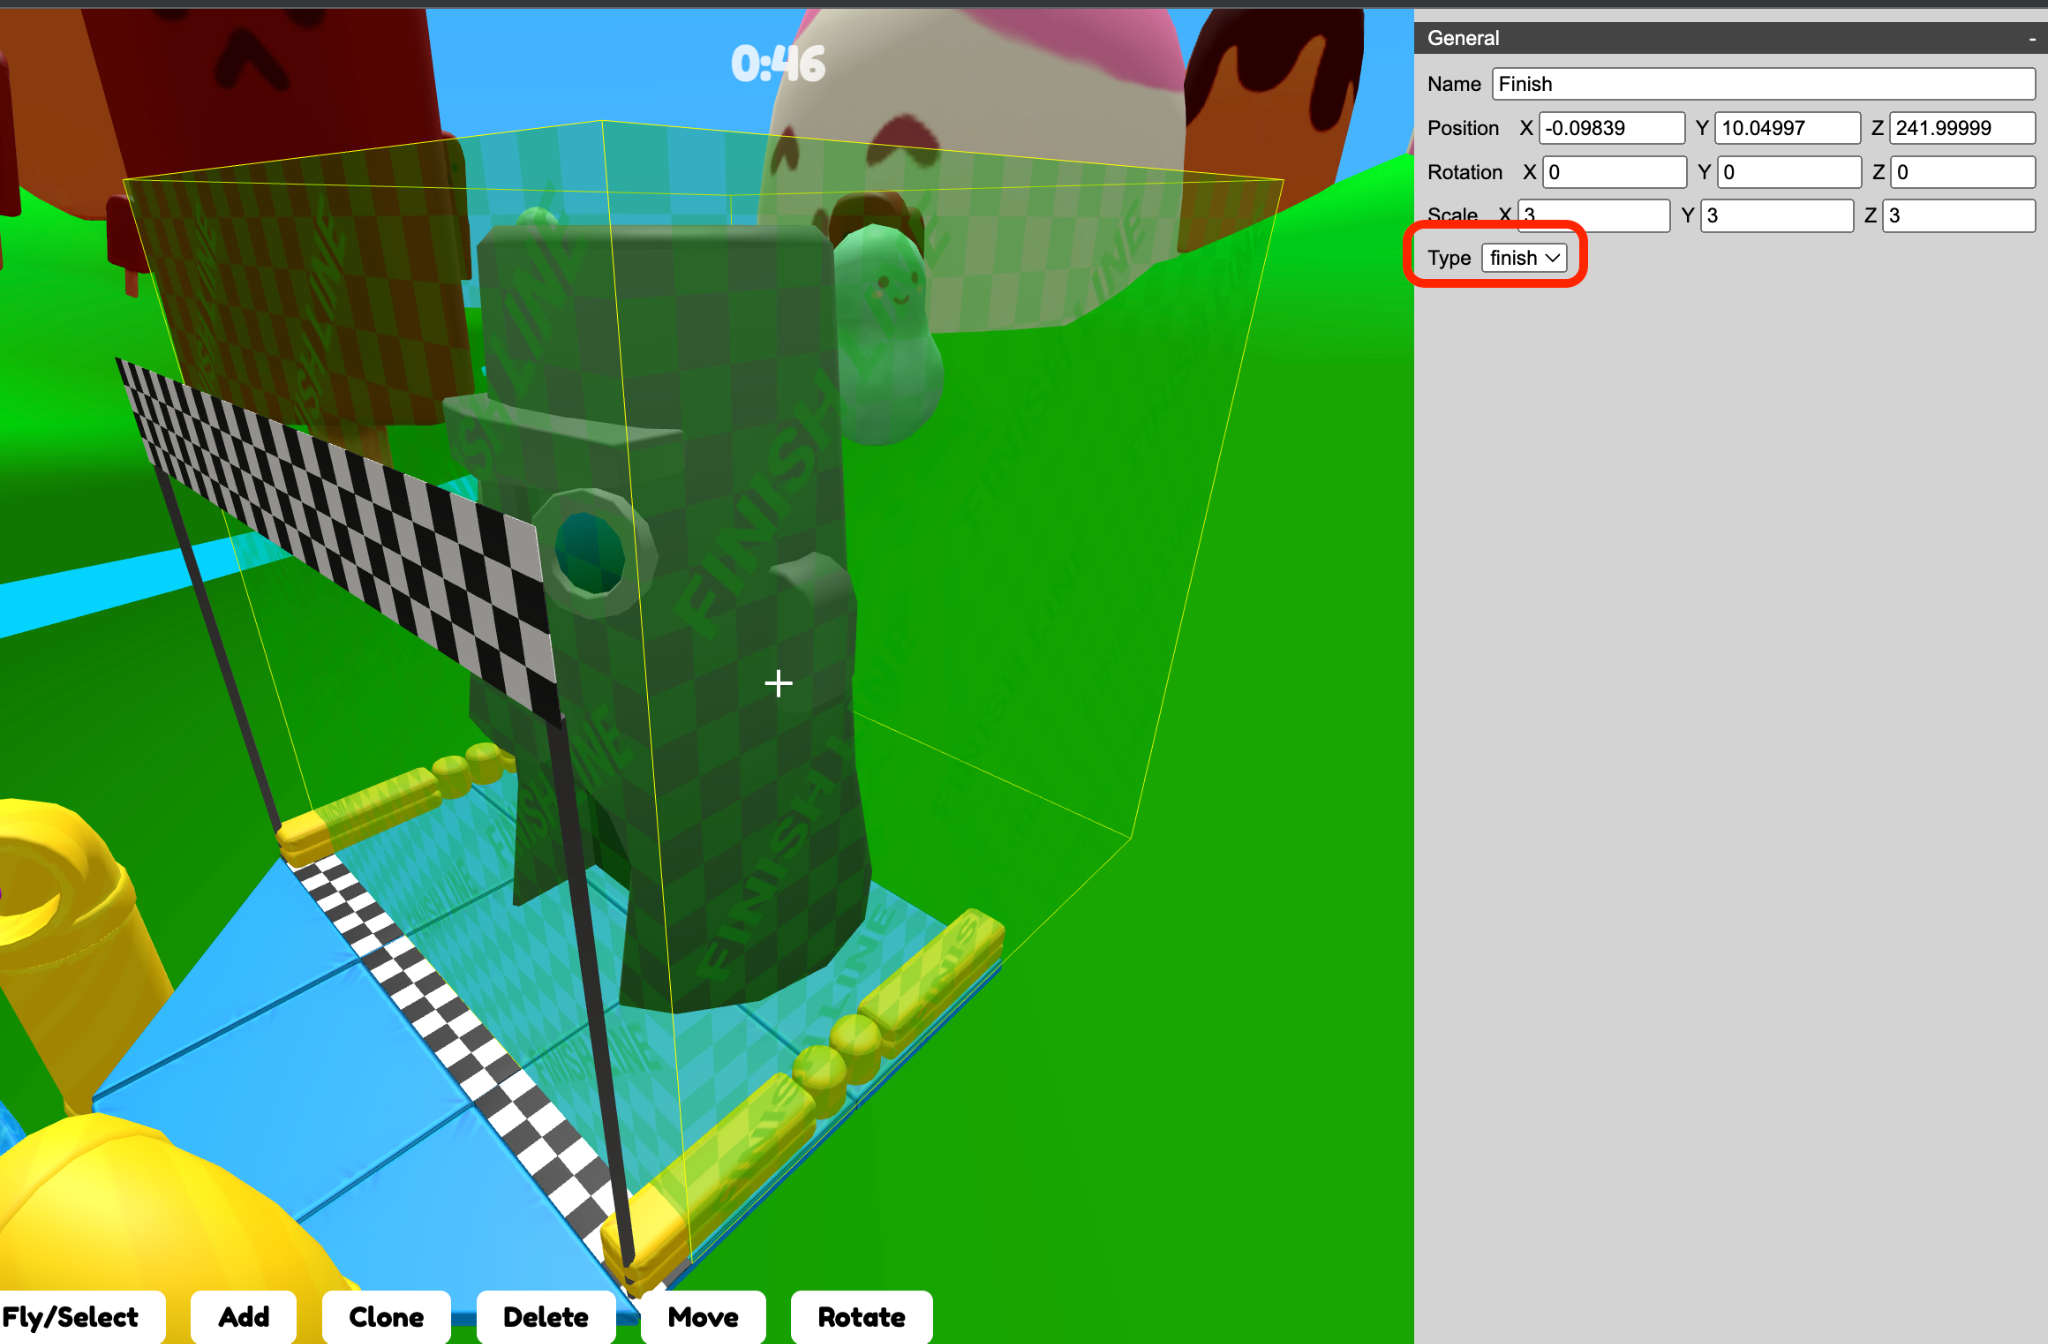
The finish area is the area where the race ends in a LOLBeans race round.
Once a player’s bean enters (collides with) the area they will be de-spawned (removed from the level).
In a real LOLBeans match players qualify for the next round by touching this invisible box.
💡When designing the finish for your level keep in mind that the finish area block will not be visible for the players. Don’t forget to use blocks such as the checkered panel to indicate to the players where the finish is.
Kill zone
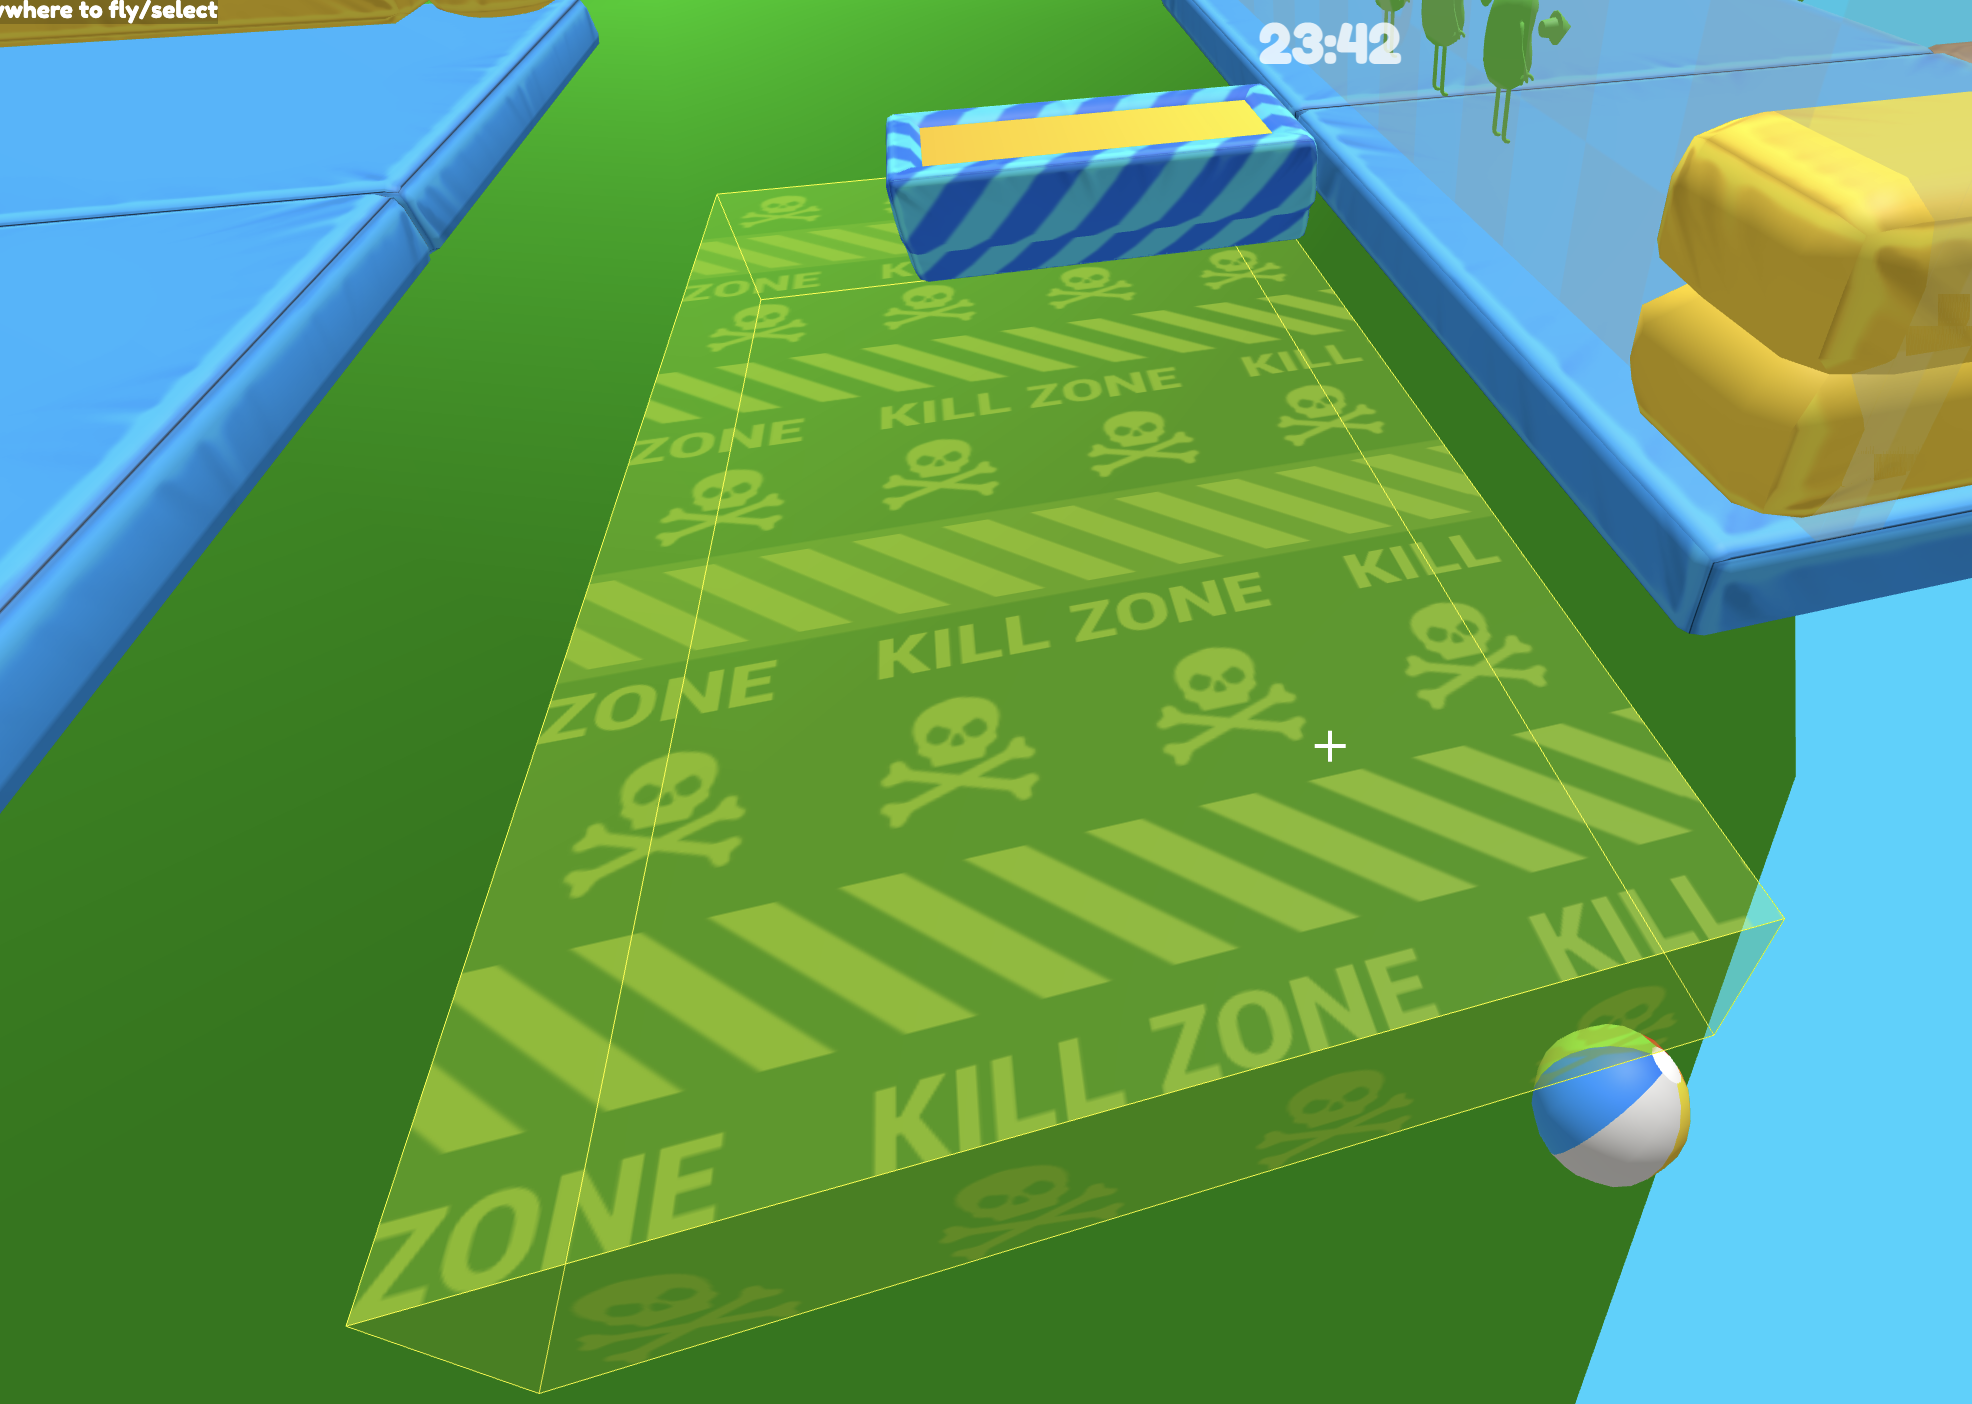
Kill zones are blocks with properties that are pre-set to kill any player (and dynamic object) colliding with them.
By default kill zones (like checkpoint and finish areas) are set to be invisible during play.
Kill zones are most often used to shorten the time between the moment a player falls into the void and their respawning.
Static blocks
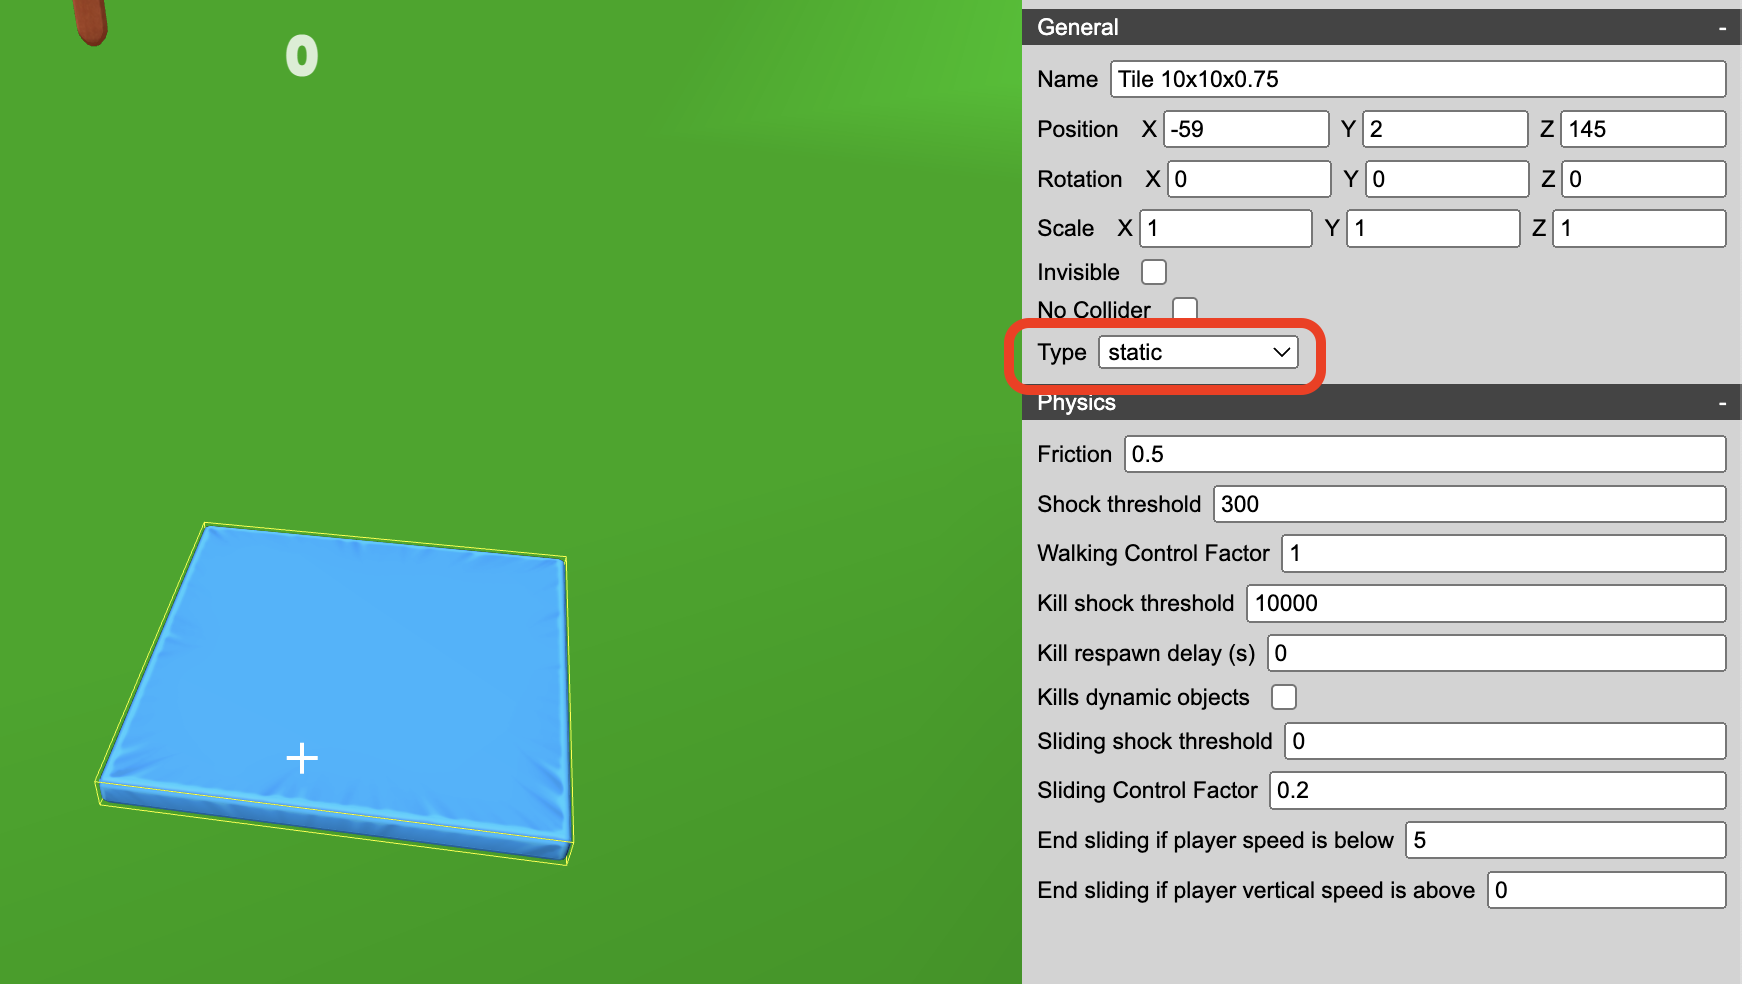
Static blocks are any blocks that will remain in position during play (as opposed to kinematic and dynamic).
Most of the time you will use static blocks to create surfaces for the players to walk or to slide on, to block their path or to prevent them from falling off the stage.
Kinematic blocks
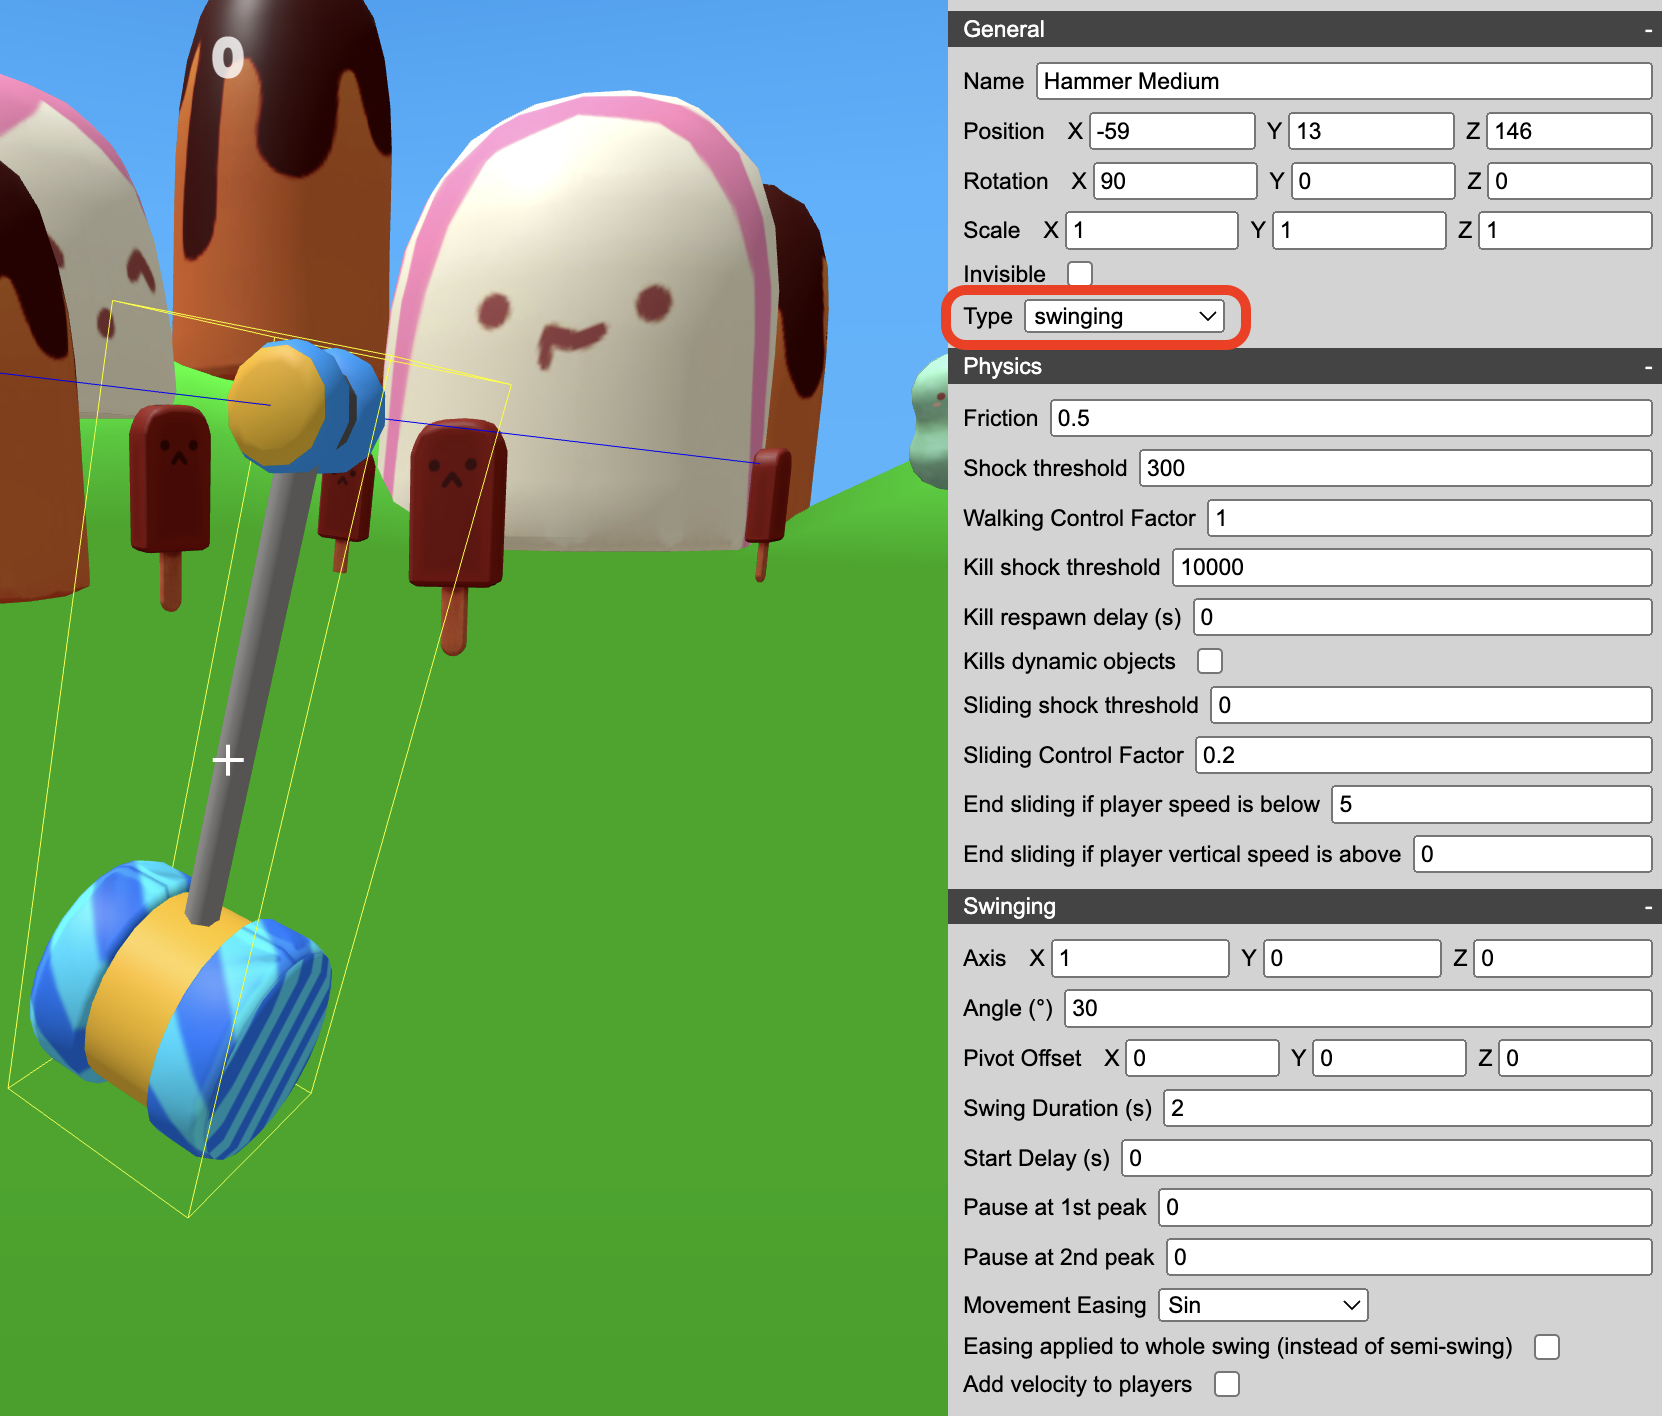
Kinematic blocks move following a scripted behavior (translation, rotation, swing) defined in the parameters panel.
These blocks are generally used to design moving obstacles like lifts, rotating platforms and swinging hammers.
The types of kinematic blocks are:
Moving
Move in a straight line from their original position to a destination offset position
Rotating
Rotate with a speed defined in degrees per second and a rotation center defined by the pivot parameters.
Swinging
Oscillate between two peaks with a defined angle offset based on their initial rotation (note that the angle between two peaks is twice the angle between the default position and each peak). The rotational center of the swing is defined by the pivot parameters.
Follow-Path
Follows a list of points you can edit individually. Each point is placed according to an offset from the previous point, and you can also edit the easing and duration from the previous point. To add a stop, set up a zero offset with the desired duration. You can optionally set a specific rotation for each point and a different easing for the rotation change.
Programmatic
Allows you to set the position and rotation from mathematical formulas. See Programmatic objects.
Dynamic blocks
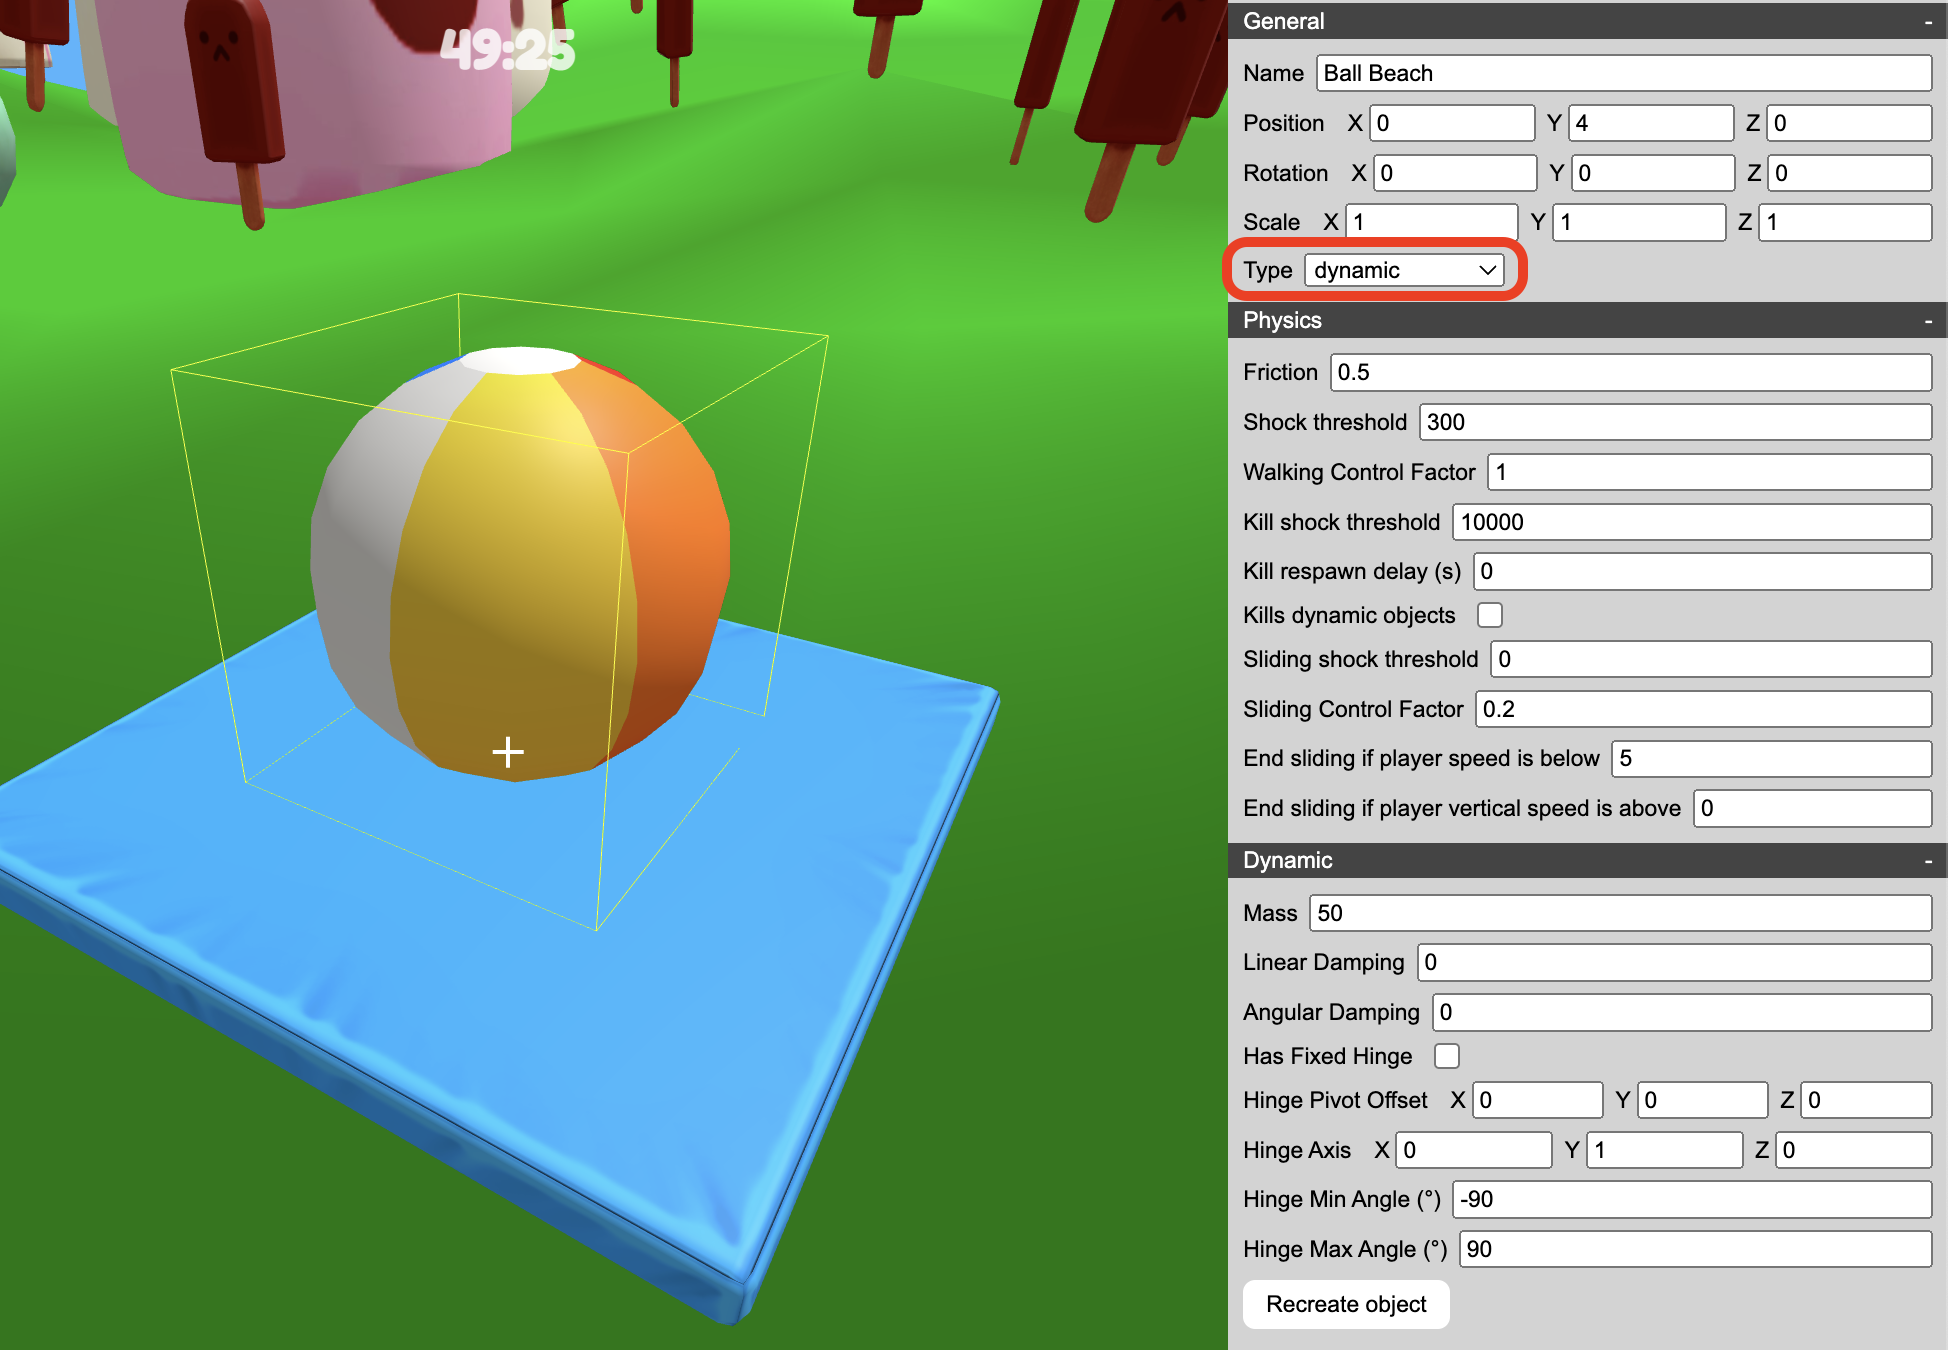
Dynamic blocks' positional properties are affected by the world’s physics (collisions with other objects, gravity, friction, etc…).
Dynamic blocks are often used to design two-way interactional obstacles where players will be affected by and will in turn affect the dynamic object: the typical example are balls that can knock back a player or be pushed by the players.
LOLBeans editor also supports hinged dynamic blocks thanks to the “Has Fixed Hinged” parameter. With hinged blocks you can create elements such as revolving doors.
💡You can spawn certain dynamic objects using the Object Spawner block, for example when you want to create a cannon shooting balls.
Object spawner

Object spawners generate dynamic objects at a fixed interval, they can be used to create cannons shooting balls or to spawn cubes that the players can push around.
You can set the initial velocity and other properties of the spawned objects in the properties panel, the direction in which the dynamic objects will be shot depends of the spawner’s gizmo orientation (the direction the purple arrow points towards)
⚠️Be careful when setting the object spawner parameters: generating too many dynamic objects can impact performance considerably, making objects too big can clog up the editor’s view.
💡Make sure you don’t place an object spawner within another element’s collider or too close to it as this may cause unwanted collisions that alter the objects’ trajectory. When you want a ball to come out of another object (a cannon for example), tick the object’s “No Collider” parameter.
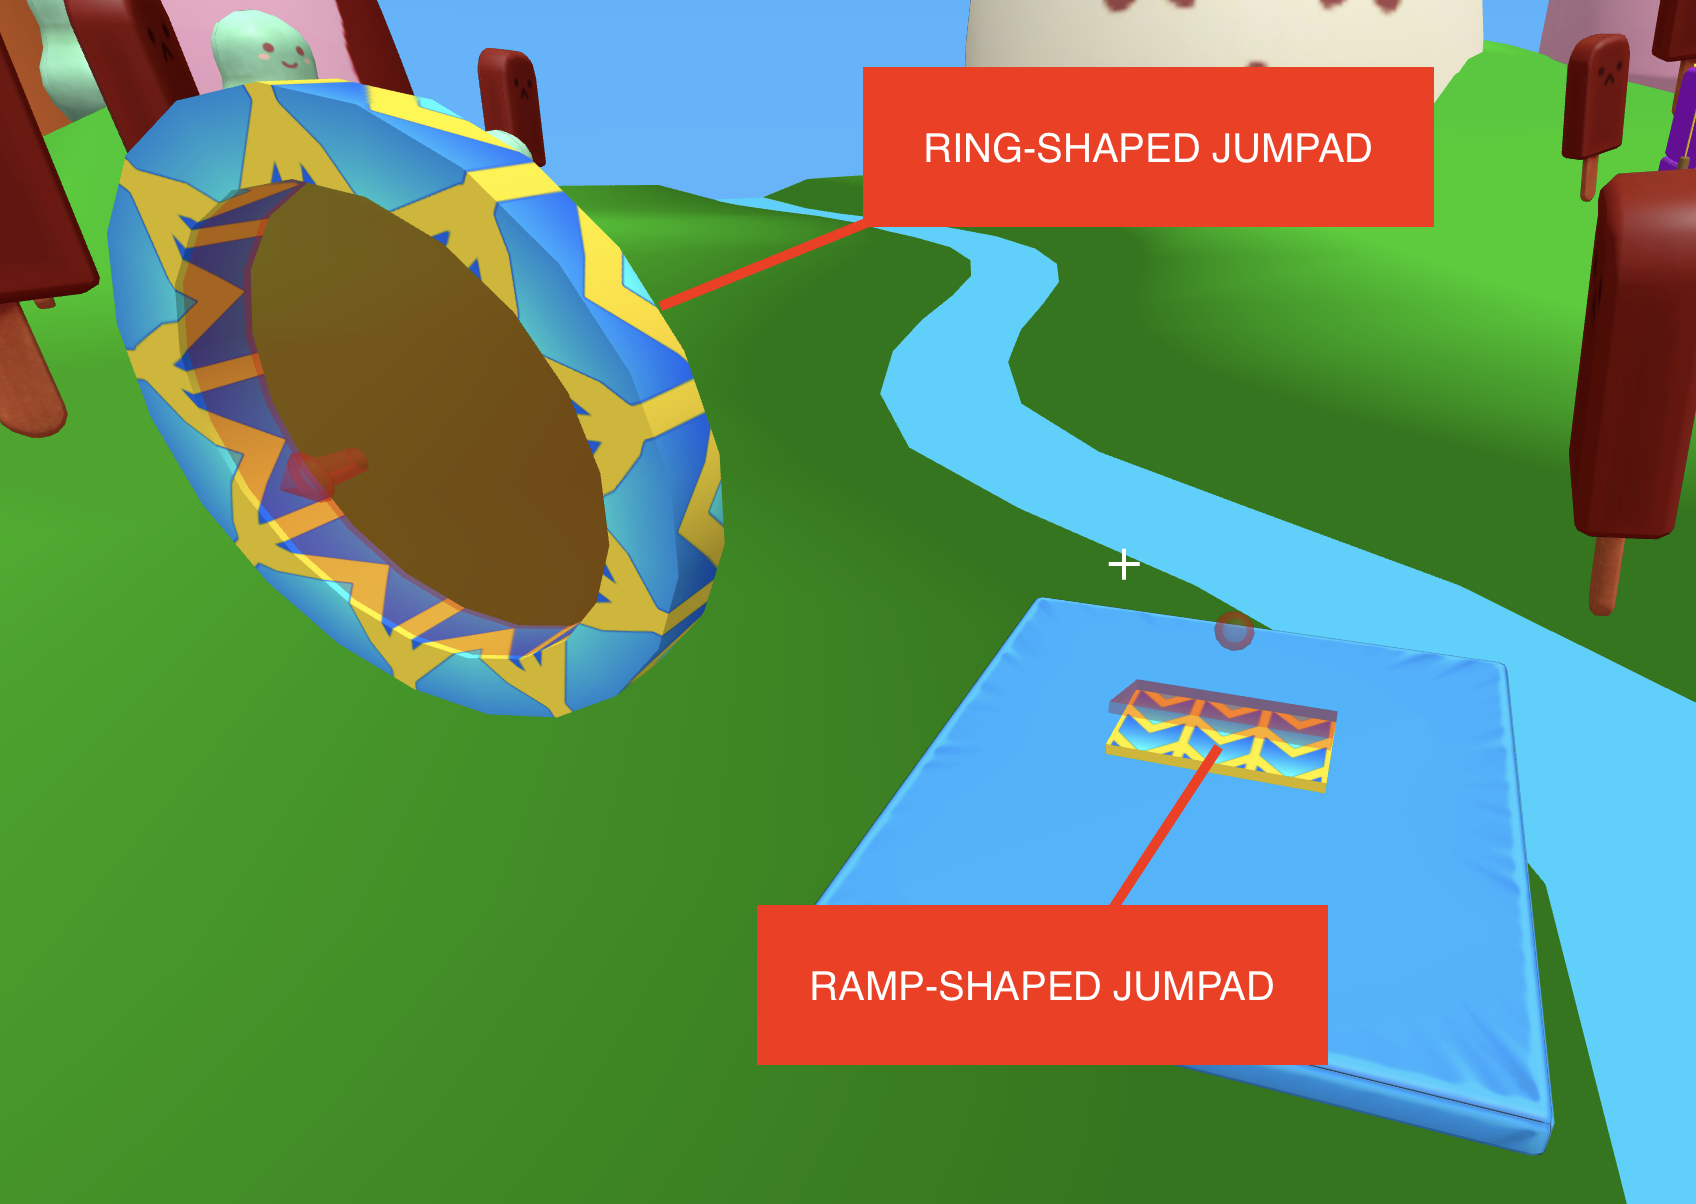
Jumpads
Jumpads (or jump-pads) are blocks that accelerate the players in a given direction upon triggering (often by walking over them).
Jumpads are usually composed of two elements:
- Pad
- Trigger
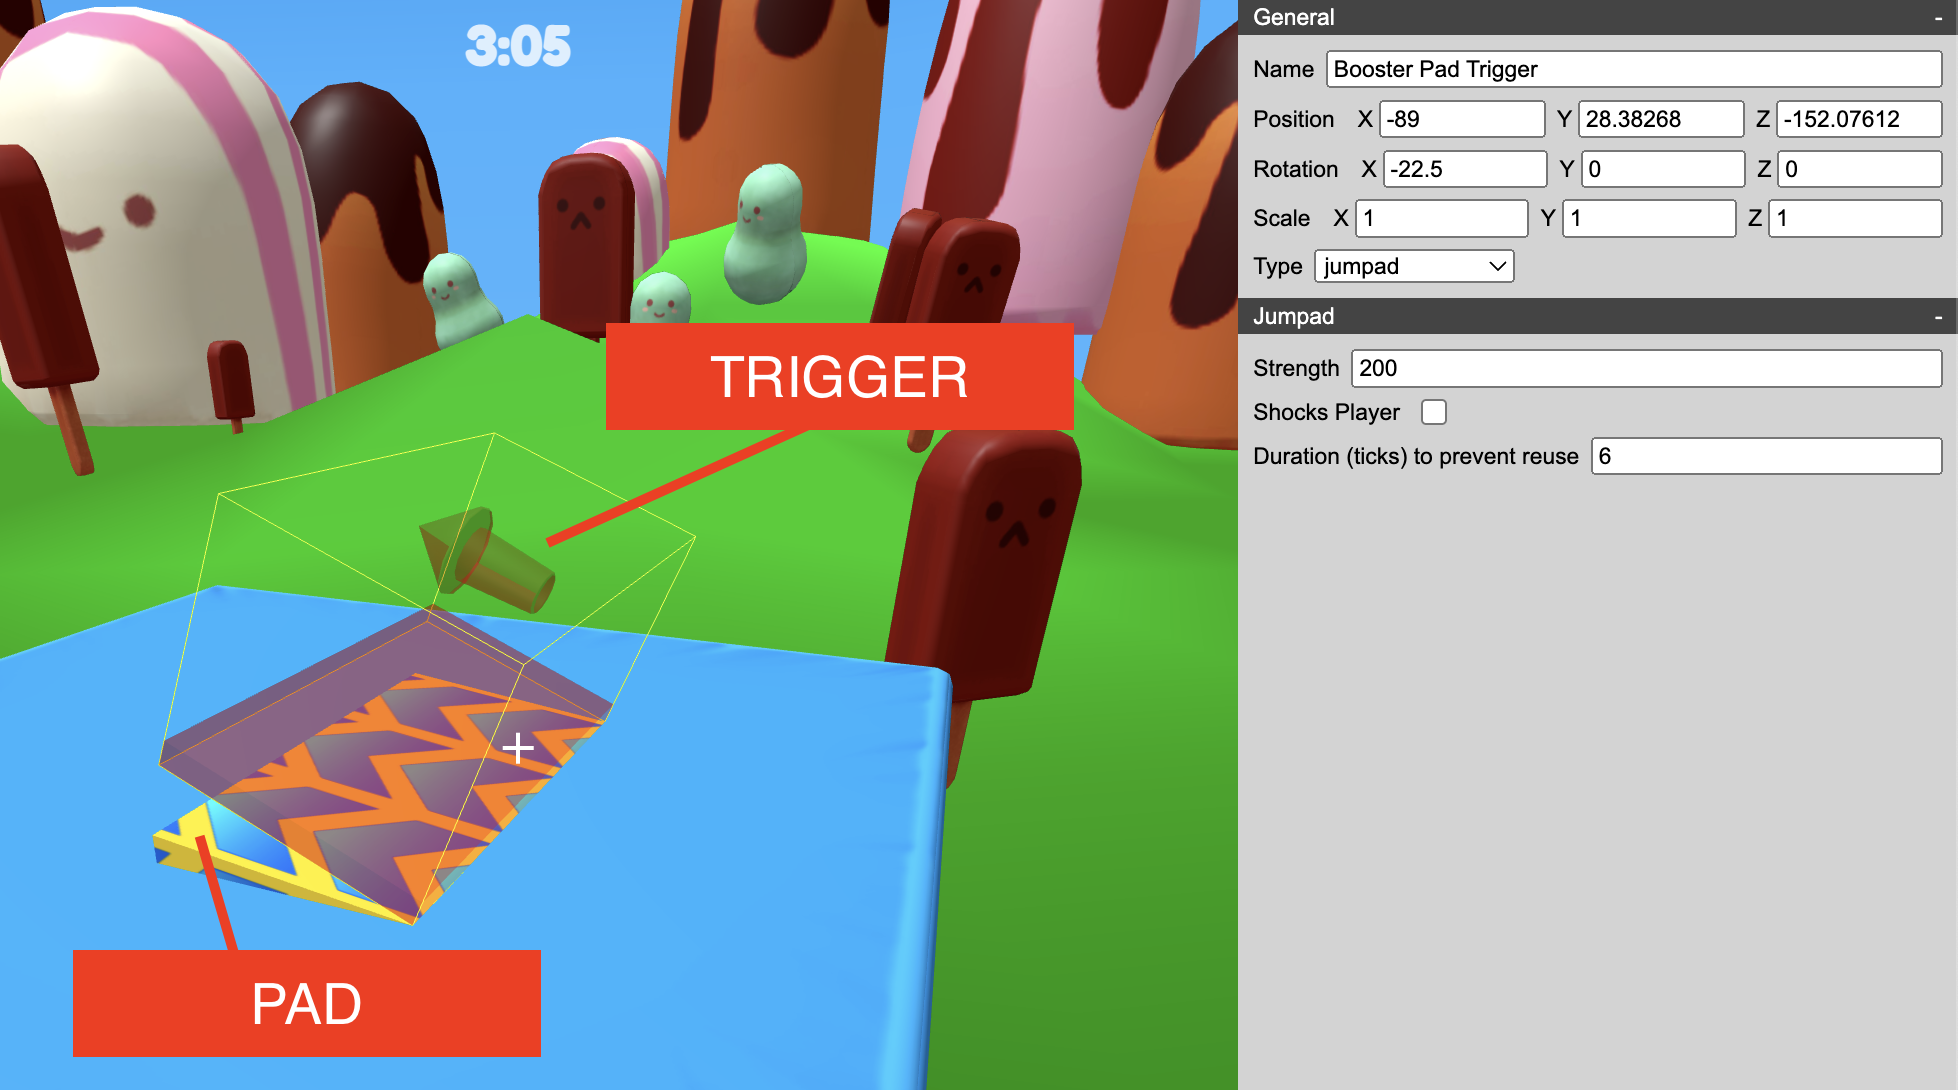
Pad
The pad is the visual element you will use to suggest to the players where they have to move to in order to get accelerated by the jumpad, this element is not intended to have any special effects by itself, in fact sometimes you may even want to disable collisions to avoid interfering with the velocity applied to the player by the trigger.
The pads provided in the editor have animated textures to suggest the direction of travel, but in theory any block can work as a pad provided its aspect is suggestive of its function.
Trigger
The trigger is the element that once collided with will accelerate the player with the strength specified in the properties panel.
Note that the actual collider of the trigger doesn’t include the arrow whose purpose is only to indicate the direction of the impulse applied to the player.
💡Remember: you cannot make a jumpad without a “trigger”, on the other hand you can make “invisible jumpads” if you omit the “pad” part of the jumpad
💡Jumpads come in various shapes and sizes, choose the one that fits your level design.
Moving Jumpads
Moving jumpads have the same functionality as regular jumpads, but are also kinematic blocks.
A moving jumpad parameters can be set to move in a straight line from the initial position to an arbitrary offset.
💡Creating a complete moving jumpad will require you to set the “type” property of the “pad” block to “moving” and set the “trigger” block to type: “jumpad-moving”. Most times the parameters for moving offsets and timing should be identical for the two parts of the jumpad.
Teleports
Teleports are blocks that allow players to be teleported anywhere instantly or with a short transition delay.
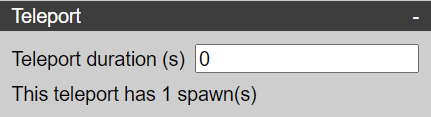
Teleports are usually composed of two elements, similar to the jumpads
- Decor
- Trigger
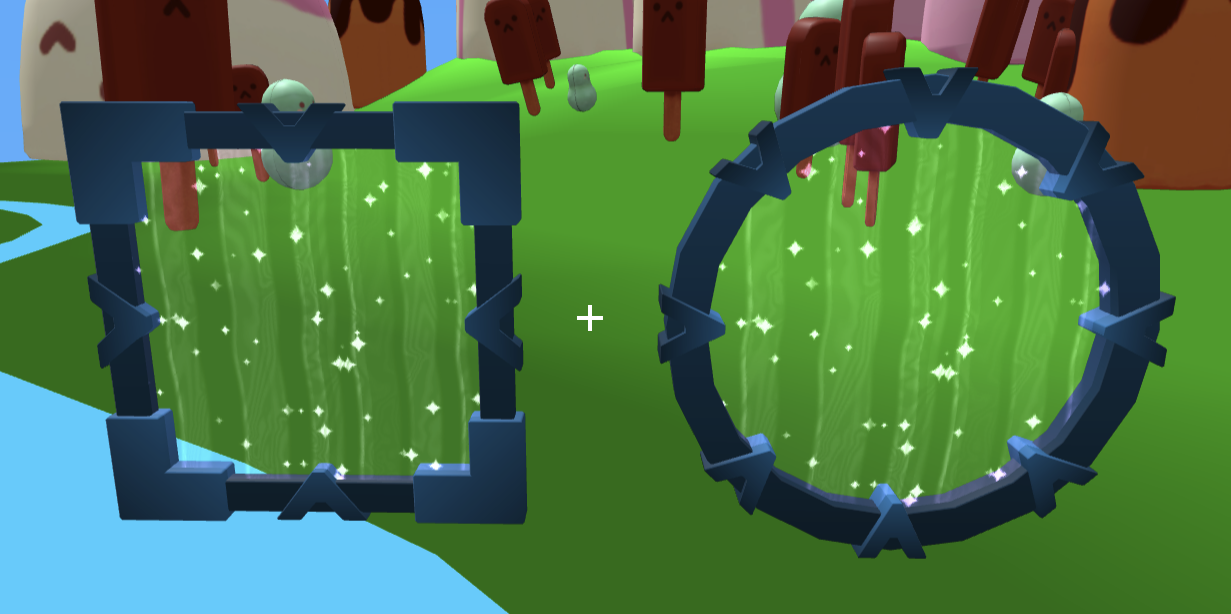
Unlike the jumpad trigger, the teleport trigger is visible and is animated.
Player spawns need to be created for the teleport destination, see section about Player spawn points.
Player physics
Player states
The player (or bean character) can have the following states during gameplay
Idle (standing still) | The player isn’t moving, its collider has a default friction value of 2 (this is intended to reduce involuntary sliding from gravity) |
Walking | The player is walking on a block with the bottom of its pill collider touching a block underneath. Its collider friction in this state has a value of 1. |
Flying | The player is moving through the air / not touching a block with the bottom of its collider. Its collider friction in this state is 0 |
Shocked | The player has collided with a block with a force superior to the block’s Shock threshold. The bean’s pill-collider is not vertically constrained anymore and can roll and tumble out of control, directional inputs will be ignored during this time and the user won’t be able to affect the bean’s velocity. |
Killed | The player has either fallen off the world boundaries or been killed by colliding with a block with a force superior to the Kill shock threshold. The default respawn delay is 1 second. |
Sliding | The player enters this state after a collision with a block that has a force superior to the value in Sliding shock threshold. If player speed goes below the value of the parameter End sliding if player speed is below, above the value of the parameter End sliding if player vertical speed is above, if the player enters a shocked state or if the player stops colliding with the block they exit the Sliding state. |
Physical properties
Height | 1.75 | |
Radius | 0.5 | |
Mass | 16 | |
Ground horizontal impulse | 30 | |
Air horizontal impulse | 3.5 | |
Max horizontal ground speed | 10 | Applied only while a directional key is down |
Max horizontal air speed | 10 | Applied only while a directional key is down |
Sliding horizontal impulse | 30 | |
Idle friction | 2 | |
Walking friction | 1 | |
Flying friction | 0 |
Editor Interface
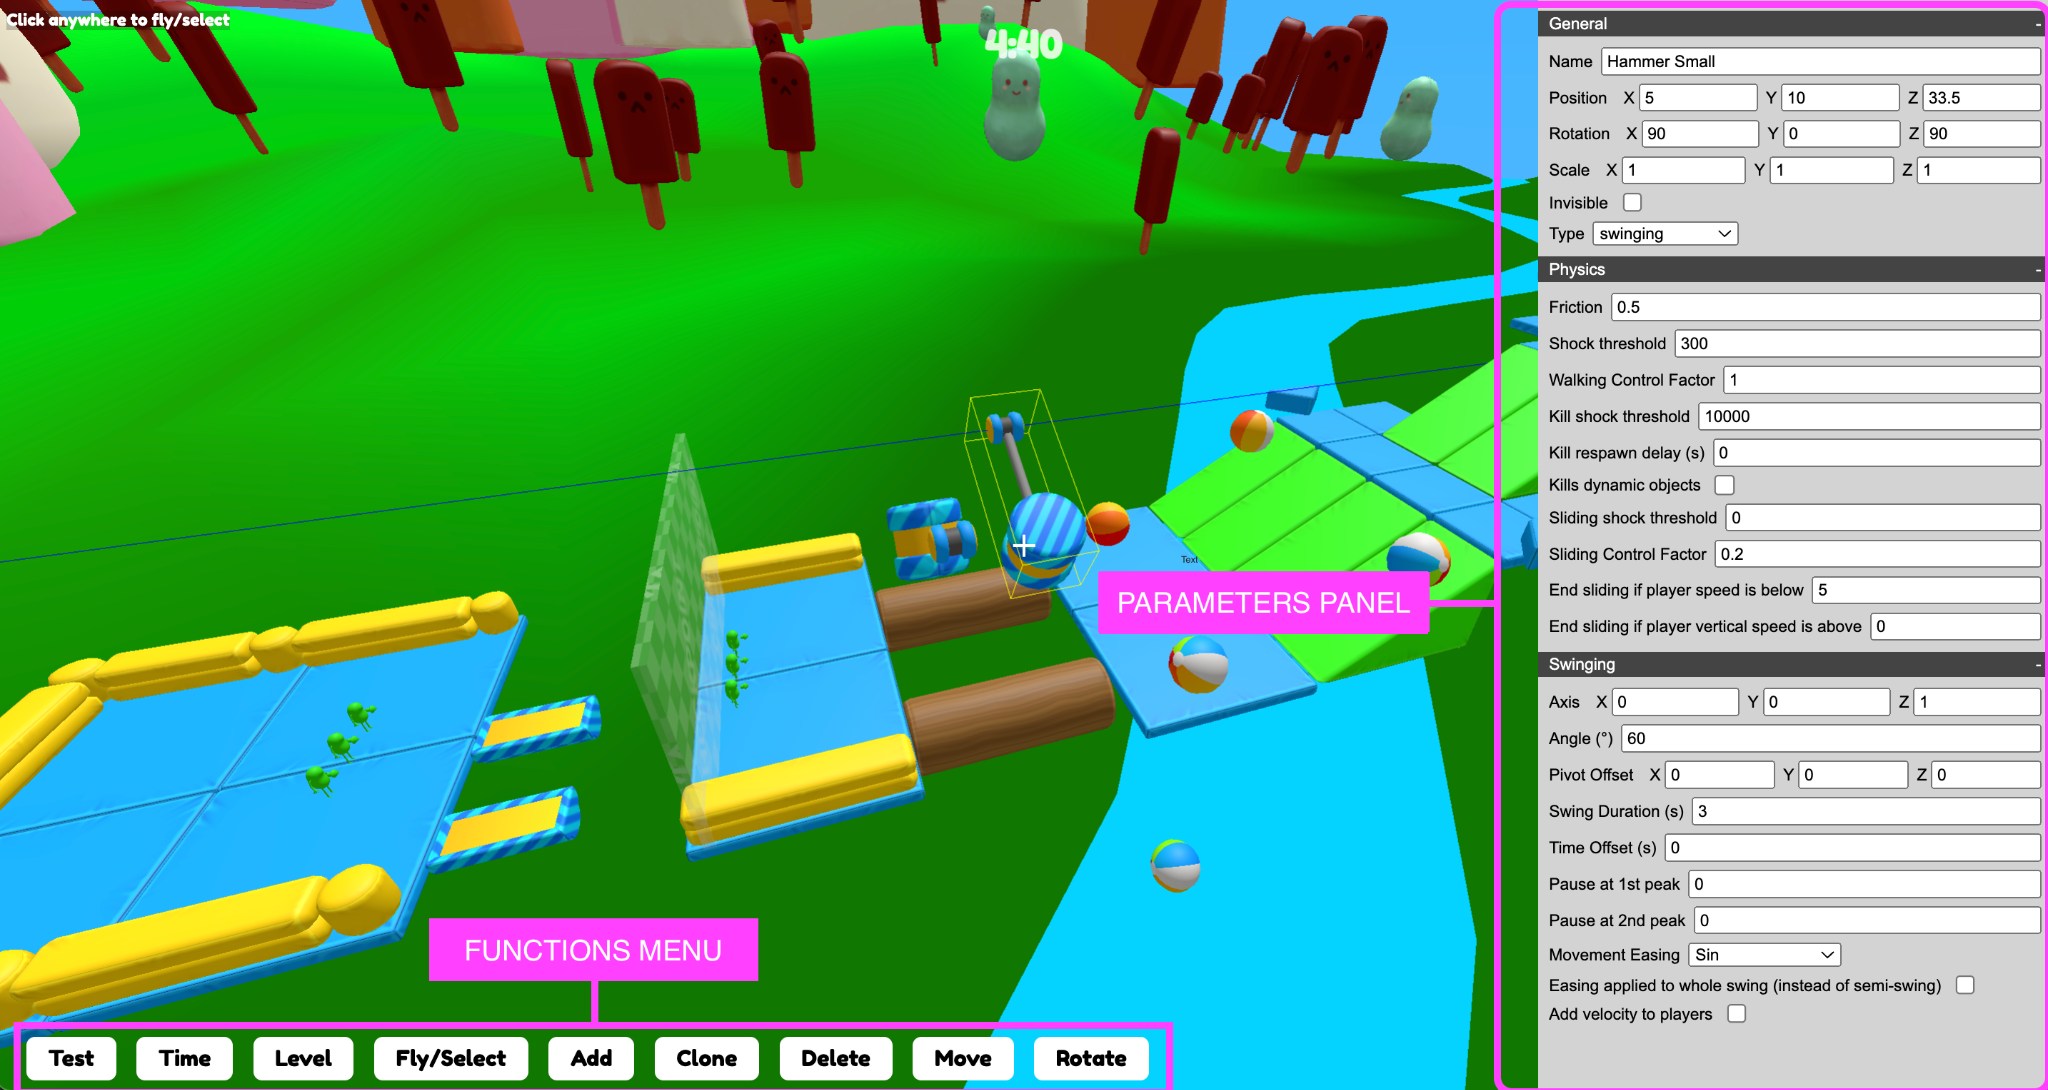
Functions menu
These are the buttons located at the bottom of the screen.
TEST: spawn in the scene to test your map (you need to have at least on spawn point to start with)
TIME: pausing time will pause the time and freeze in time all kinematic objects in the scene, and pause object spawners. Resetting time will rewind the time to zero and reset the kinematic objects to their initial positions. Resuming time will unfreeze all kinematic objects and resume the timer.
LEVEL: save and load levels from this drop down-menu. See saving maps, loading maps, sharing maps.
FLY/SELECT: resume flying around the map
MULTI-SELECT: allows selecting multiple blocks, then cloning, moving, rotating them or creating a group for later use. Groups can be selected, imported/exported from/to a file.
ADD: add a new block to the scene
CLONE: create a copy of the currently selected block, after clicking once you can move around to place it where needed.
DELETE: removes the currently selected block from the scene, ⚠️WARNING: this cannot be undone.
MOVE: move the currently selected block, use the navigational controls to move to the desired destination.
ROTATE: rotate the currently selected block by the selected amount of degrees on the X,Y or Z axes.
Parameters panel
The panel on the right side of the editor view displays the parameters of the block that is currently selected.
This panel is context-sensitive and will display different sections and options depending on the type of block that is currently selected.
General
The General section of the parameters contains block properties that are common to most blocks (with certain exceptions)
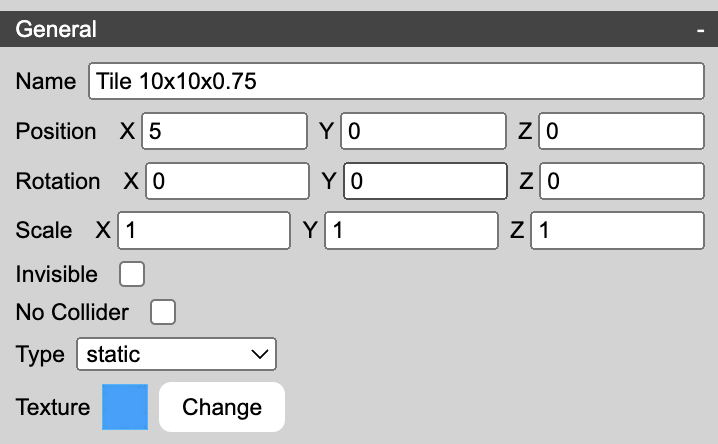
NAME: | The name of the selected block, you can change this to anything suitable. Default names will often inform you of the dimensions of a block in world units. | ||||||||||||
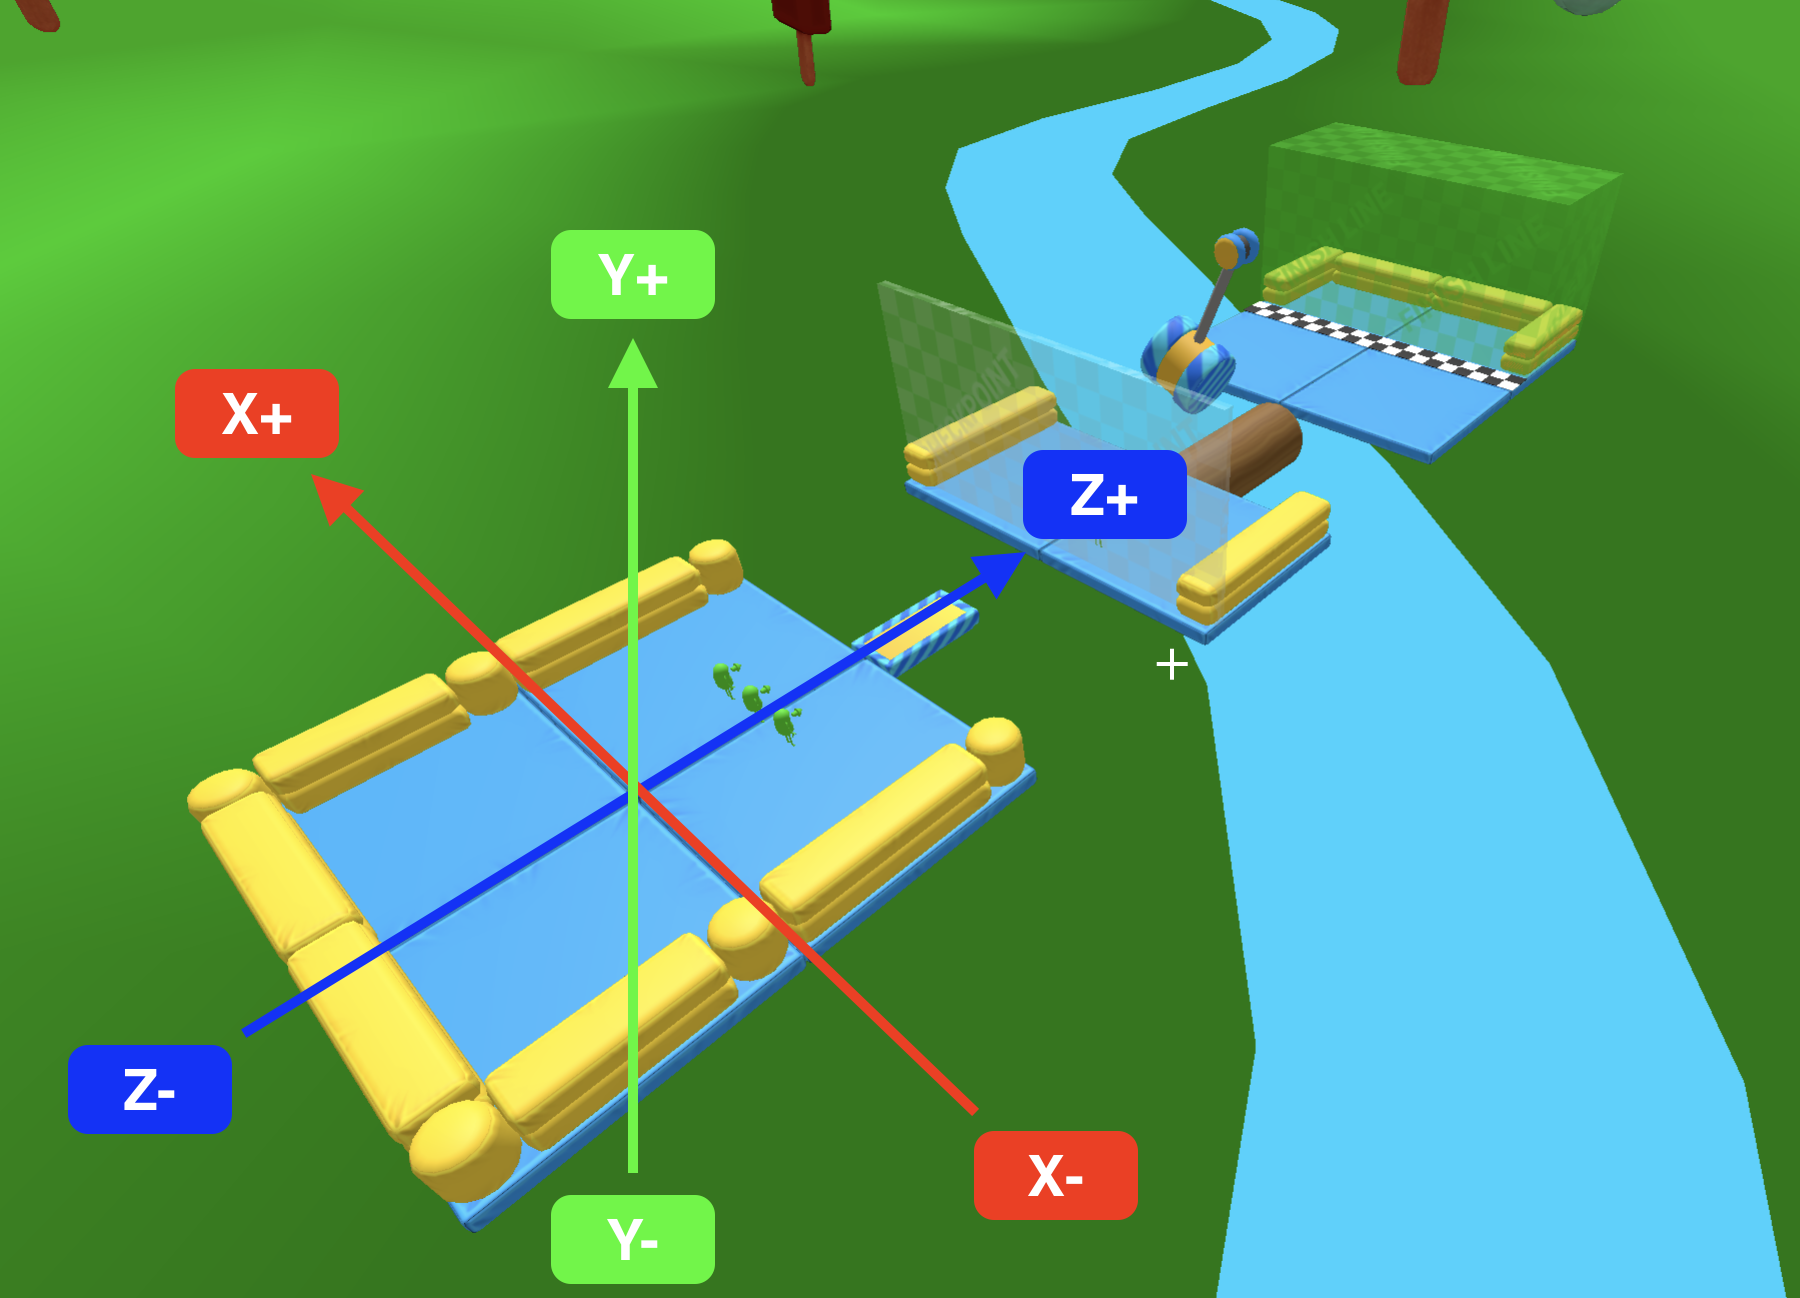
POSITION: | The world coordinates (X, Y, Z) representing the position of the selected block. 💡Remember: the direction of travel in a standard race level is Z+, ensure that when you start paving your level towards the finish line you add blocks that have increasingly higher Z values. The convention for the coordinates system in relation to the race traveling direction is as follows: X: positive values are to the left when facing the finish, negative values to the right. Y: positive values are upwards, negative values downwards. Z: positive values are towards the finish, negative values are away from it. Note: exceptions to this rule are maps featuring looping paths with altered gravity. 💡Remember: positions are calculated based on each block’s origin, but the origin’s position relative to the geometry is specific to each block. For example: flat tiles have their origin centered on the top face, while hammers have their origin placed where at the end of the hammer’s handle (where you’d expect the rotational pivot to be) ⚠️Careful: if you enter values that are too low or too high you might end up being unable to find the block, this could leave stray elements outside the skydome. | ||||||||||||
ROTATION: | Rotation is defined in degrees, positive values are counter-clockwise, negative values are clockwise.. 💡Remember: rotation directions are relative to the local coordinate system of the block. If you are having a hard time turning a block to the desired angle, check what the values on the other axes are (certain blocks have rotations that are altered by default to the most commonly used orientation) | ||||||||||||
SCALE: | Scale is defined in units: 0.5 indicates a scale of half the default size of a block, 2 indicates a scale of twice the default size of a block, 1 indicates the default size of a block. 💡Remember: scale doesn’t represent measurements in world units, it is relative to the default size of a block. Different blocks of the same scale will more often than not have very different sizes in world units. | ||||||||||||
INVISIBLE: | The invisible flag can be activated (ticked) to make the block invisible to the players in-game. This is commonly used to add invisible colliders to replace the default colliders of another block. Some blocks have this flag ticked by default (the kill zone block for example) | ||||||||||||
NO COLLIDER: | The no collider flag can be activated (ticked) to remove the default physical collider of the block, rendering it purely visual. In practice this means that players and dynamic objects can pass through the block without any alterations to the physical forces applied to them. No-collider elements have various uses, for example:
| ||||||||||||
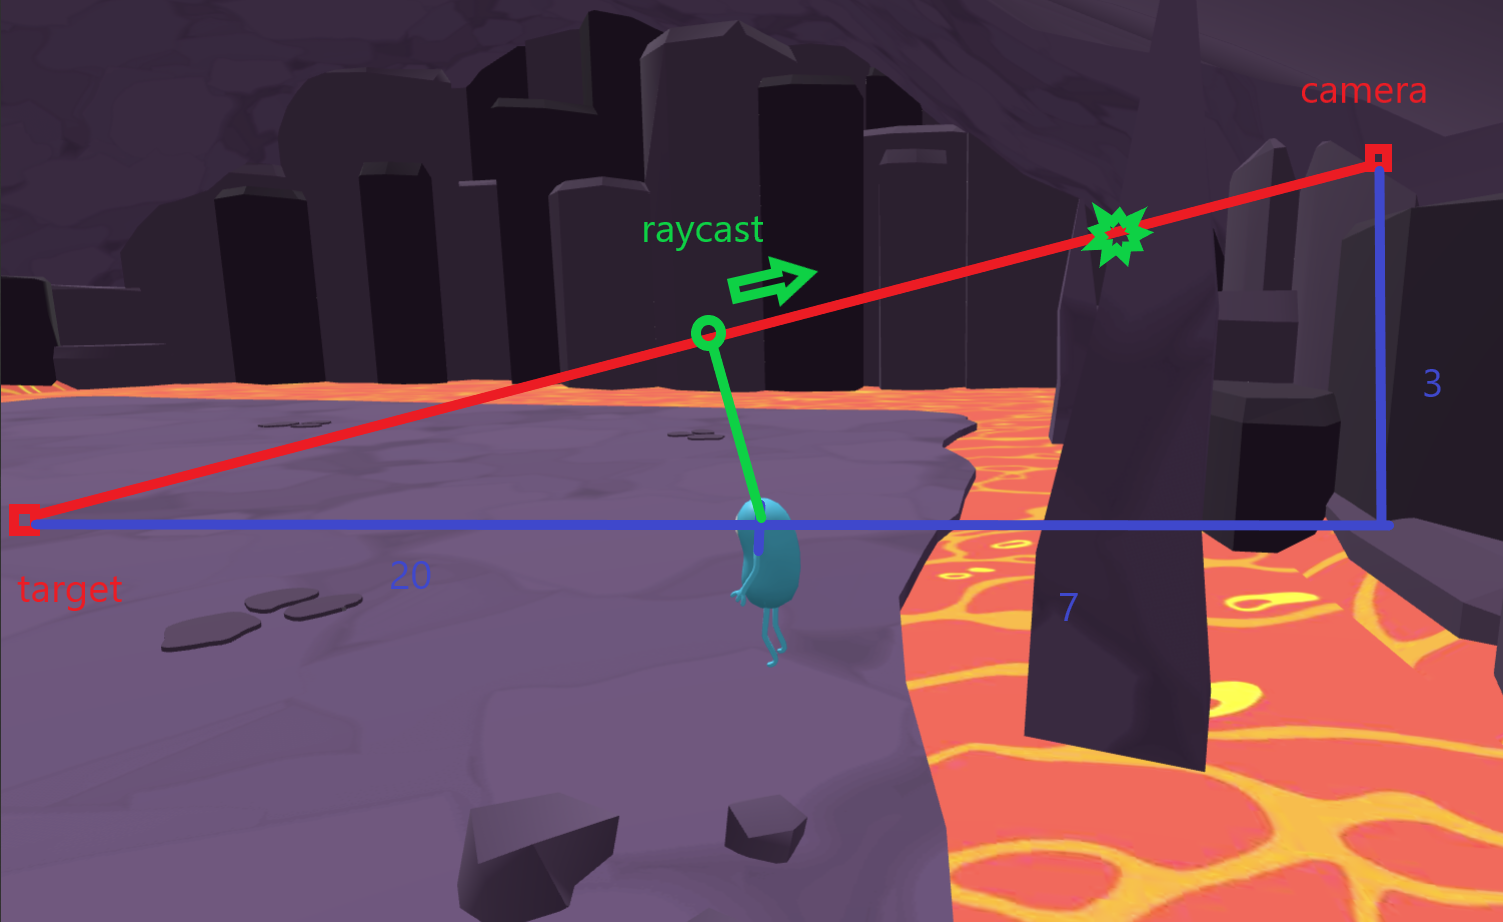
CAMERA COLLISION | Camera collision is the process of detecting objects which are occluding the view. This is done with raycasting. When an object is on the camera viewline, the camera is moved closer (zoom-in). The only exception is for kinematic objects which are usually constantly moving, and would zoom the camera in and out too frequently. The camera collision property allows you to alter the behavior, by specifying that the camera collision should:
| ||||||||||||
TYPE: | This drop-down menu allows you to select what type you want to assign to the currently selected block. The selected type will determine the properties and behavior of the block:
|
Physics
The physics panel houses parameters that will affect how blocks behave in the physical world of the game engine.
Changing these parameters will affect the interactions between the players and the environment.
Friction
Friction is the force resisting the relative motion of elements (static blocks, dynamic blocks, player colliders) sliding against each other.
This parameter will affect how easy it is for the player collider to gain speed when moving while in contact with a block’s surface, the lower the value the less resistance the pill collider of the player will face when sliding across a surface, the higher the value the more the resistance.
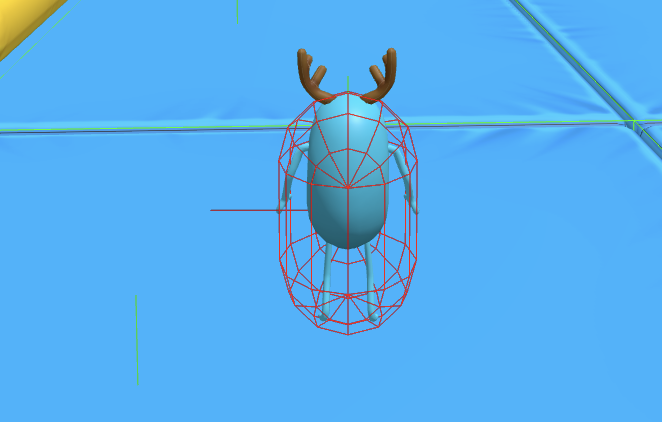
When moving around with the directional keys, a force / impulse is applied to the pill collider (seen above in red) in that direction.
The player gains more or less speed (or can even remain still) depending on the friction parameter of the block in contact, the angle between contact points normals, the vector of the directional force and its mass (the default player mass is set at a value of 16).
Simply put: imagine that when you use the directional movement keys you are pushing a vertically-constrained pill across a surface.
When on flat ground the pill touches the block underneath with the lower tip, when on a sloped surface it will touch the block underneath with a point on the lower dome of the pill.
Default friction values of the player collider in different states:
Idle (standing still) | 2 |
Moving while in contact with a block | 1 |
Moving while in the air | 0 |
An increased default friction for the idle state prevents the bean from sliding unintentionally due to gravity (up to a certain point) on certain sloped surfaces.
Friction is a tricky parameter to work with, especially when trying to use it to slow down player movement as it either tends to stop movement completely or be insufficient (consider that players can simply jump to avoid surface friction altogether).
💡Friction tips:
- Set it to a very low value to simulate slippery surfaces (like ice), a value of 0.001 works well.
- When designing slippery slopes where the player is supposed to slide in a controlled manner adjust the “sliding shock threshold” and the “sliding control factor” parameters
- Friction values higher than the default 0.5 can be used to limit the effects of unintended slipping from moving or narrow platforms.
Shock threshold
This parameters determines the minimum collision force that will cause the player to enter the “shocked state” (see player states) and lose control of their bean for a time.
The lower this value the easier for the player to topple over and lose control when colliding with the block in question.
💡Shock threshold tips:
- Use a low value for this parameter when creating ball cannons (object spawners) that are supposed to topple the player when they are hit by a ball or other projectile.
- Set this parameter to a very low value (even 0) when you want players to completely lose control when colliding with a surface, for example in the case of an extremely slippery slope.
Walking control factor
This parameter affects the acceleration of the player while in contact with the block, multiplying the default movement impulse by the specified factor.
Values lower than 1 reduce the directional impulse of the player, while values higher than 1 increase it.
💡Remember: players could avoid the effects of this parameter by jumping constantly
Kill shock threshold
Determines the minimum collision force that will cause the player to be killed and respawn at the last checkpoint (or at the initial spawn point).
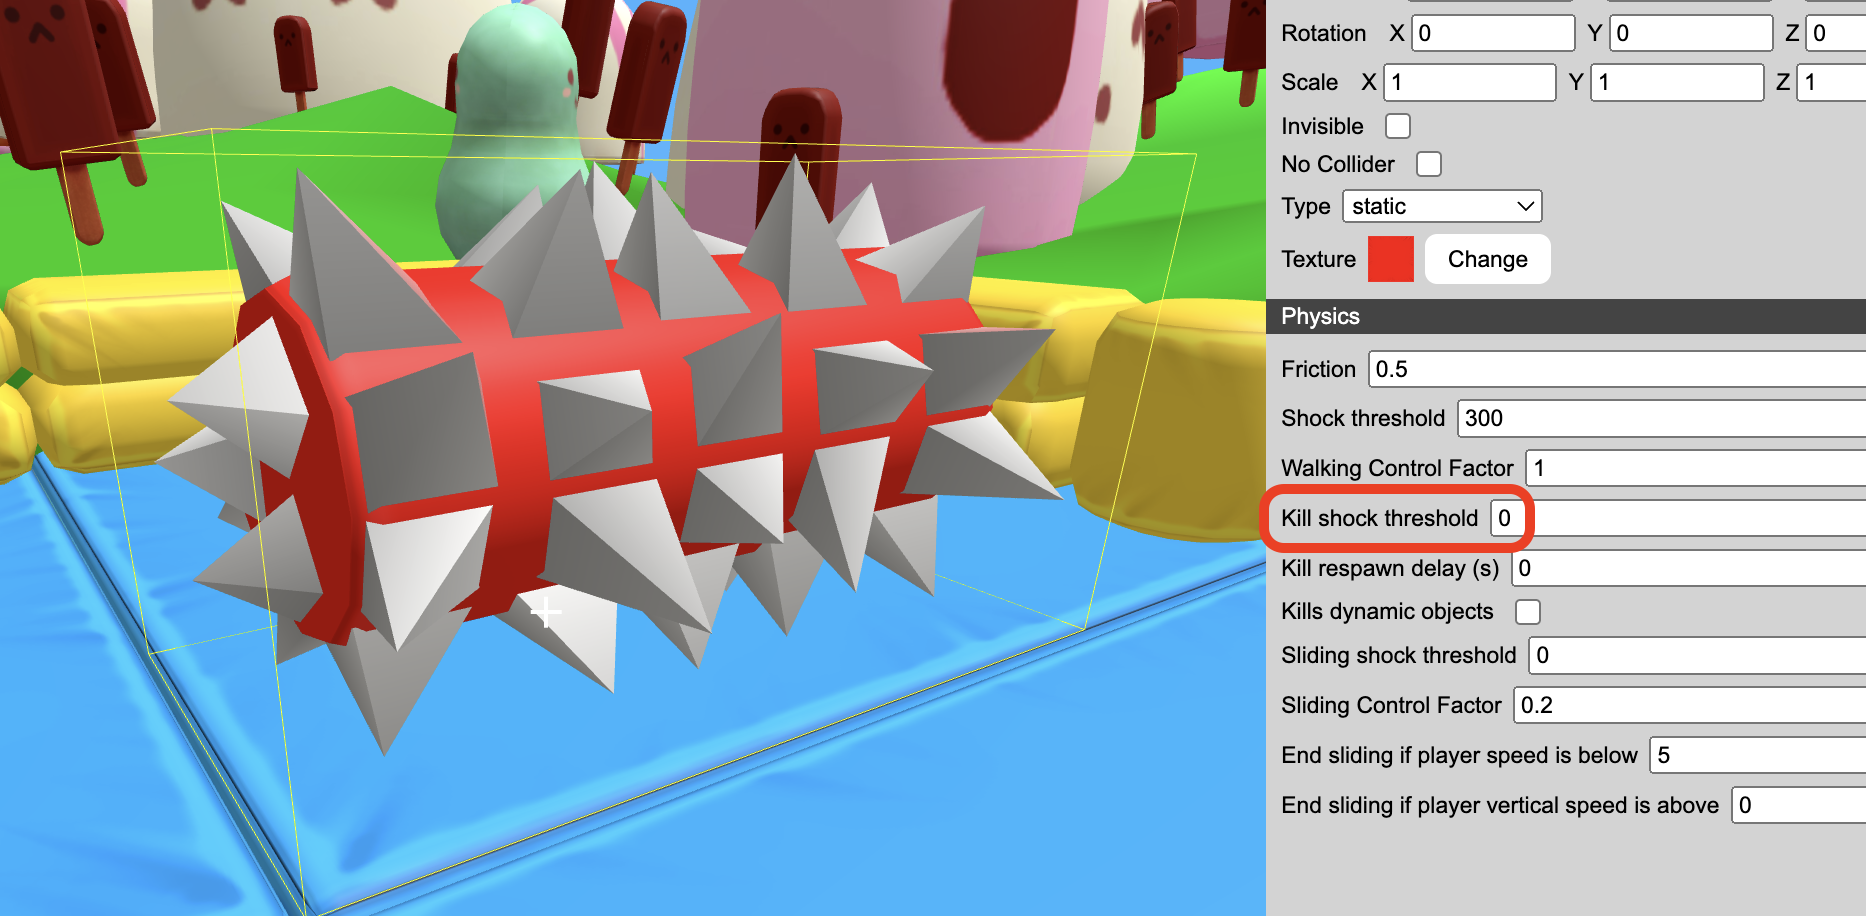
Uses of the kill shock threshold include
- Creating deadly hazards, spikes for example
- Creating dynamic or kinematic elements that can be deadly if collided with at higher speeds. For example: a swinging hammer that will kill players if hit at the end of a swing or catapult them if they stand on it at the beginning of the movement arc.
💡Attention: if you need the collision to instantly kill the player, set the value to 0, not a very low value like 0.01. Jumping on a floor very quickly can generate collisions with a force of 0.
💡Remember: if you set the “kill shock threshold” to a value lower than “Shock threshold” players can never be “shocked” when colliding with the block, only killed.
Kill respawn delay
With values higher than 0, instead of respawning immediately at the last checkpoint, players will see a camera animation starting from the position where they were killed to the respawn position. The duration of the animation in seconds is the value of the kill respawn delay.
💡Tip: kill respawn delays can be useful with sprawling level designs where it would be hard for players to immediately orient themselves after a respawn. They also prevent players from making risky or fatal movements at a respawn location close to ledges or moving blocks by showing them preemptively what will be around them when they spawn.
Kills dynamic objects
When activated, this flag will ensure that any dynamic object that collides with the block will be removed from the scene.
When touching the block, dynamic objects such as cannon balls will quickly scale down to 0 and disappear.
💡Tip: use this option to eliminate dynamic objects once they have left the area in which players are supposed to interact with them. This is a good alternative to setting the “Object Lifetime” flag when you don’t know how long a dynamic object will remain on the scene, but you know the boundaries within which it must remain.
Sliding shock threshold
Defines the minimum collision force needed for the player to enter the sliding state (see player states).
A value if 0 disables the threshold and the player will never enter the sliding state.
If you need the player to enter the sliding state on every collision, set it to a negative value like -1. If you need the player to be able to walk the surface when moving slowly, set the value to a low positive value (you will need to test which exact value fits your needs)
💡Tip: to create a sliding slope on which the players can control their sideways movement you can set the sliding shock threshold to a low value like 0.1 and friction to a very low value like 0.001
⚠️Note: when a player starts sliding it is “toppled” to imitate a real-life slide. The toppling direction depends on the player’s 1st contact point with the surface
Sliding control factor
Determines the intensity of the movement impulse of the player when they’re in the sliding state ( 🚧see player states 🚧). The default value is 0.2, higher values give the player the ability to change directions quicker.
💡Tip: the “sliding control factor” is useful when designing slides featuring obstacles, ramps or booster pads to allow players to avoid the obstacles or to move to the ideal position to hit a ramp/booster pad. The default 0.2 factor allows this type of control. On the other hand: if you’re designing slippery slopes where the challenge is perfect timing for initiating the descent, but where the players cannot control their trajectory, you can set this factor to as low as 0.
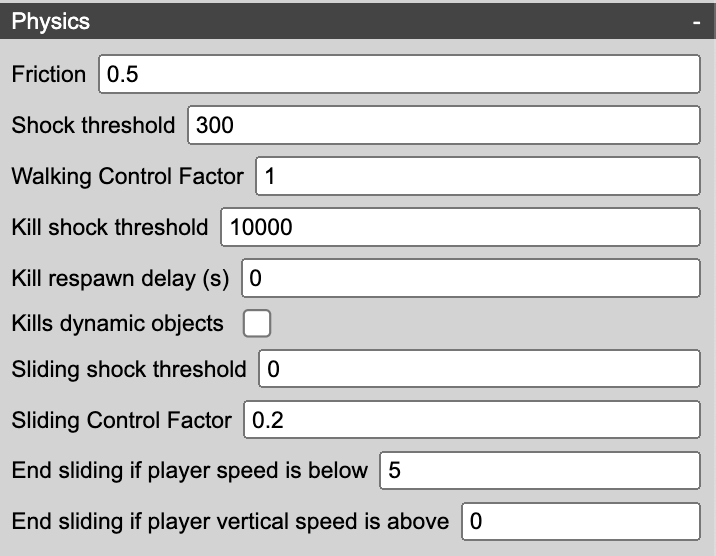
End sliding if player speed is below
This value determines the threshold of speed below which the player will exit the sliding state.
💡Tip: use this threshold when you want players to be able to stop on a sliding slope and resume walking.
End sliding if player vertical speed is above
This value determines the threshold of vertical speed towards Y+ above which the player will exit the sliding state.
💡Remember: when moving downwards in the world space the Y speed is negative, when moving upwards the Y speed is positive. This is similar to “end the sliding if the player speed is below”, the key difference is that one only checks for the up/down vertical speed, while the other checks for the magnitude of the velocity, no matter the direction.
Adding blocks
To add blocks to the scene use the ADD button at the bottom of the editor view

Selecting blocks
To select a block: while in fly/select mode, navigate to the location of the block you want to select and center your view on it. When the white crosshair at the center of the screen is over the block the block will display a yellow bounding box and its properties will be shown in the right-hand panel.

A selected block with its bounding box displayed
Removing blocks
After selecting a block click on DELETE.

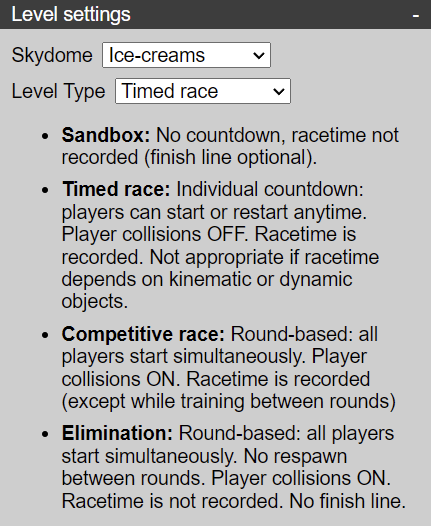
Level settings
Click LEVEL then SETTINGS to access global level properties.
You can change here the skydome (background decor) and level type, which will define the gameplay rules for the level when it’s published.
Randomness & variables
For round-based levels only (competitive race and elimination), the editor allows you to:
- define variables from mathematical/logical expression, such as 5 + 10
- change any block property from the variables you defined previously.
This brings the possibility to randomize the level obstacles. This is what is done for examples in regular LOLBeans levels like Silly Slide (the door that can be broken is random), Devil’s Tricks (which mole blocks are moving is randomized), BoulderHill (the caterpillar’s timing is randomized) and many more.
A variable is just a named value that the editor calculates for you at the start of every round. You give it a name (for example OpenedDoorNumber) and a formula (for example randomInt(1, 3)). Wherever you use that name afterwards, the editor substitutes the calculated value. Since the formula can be random, the value can differ from round to round, and so can the blocks that depend on it. No programming experience is needed: a formula is written the way you'd type it into a calculator.
Creating your first variable
- Click LEVEL, then SETTINGS, and make sure your level type is set to Competitive or Elimination
- On the same right-panel, click EDIT VARIABLES to open the list.
- Add a new line to the list.
- Type a name on the left. Use no spaces — for example DoorNumber or IsOpen.
- Type a formula on the right. It can be a plain number (10), a calculation (5 + 10), or a random draw (randomInt(1, 3)).
A variable holds either a number (3, 12.5) or a logical value (true / false, also called a boolean). This matters later: tick-box properties like Invisible and No Collider need true/false, while positions, rotations and durations need numbers.
To confirm it works, click “Re-evaluate all variables” and see the values change.
You may also test by clicking TIME then RESET, to simulate a round restart.
Order of variables
You can use variables to compute the result for other variables and thus the order is important.
A variable's formula can use variables defined above it in the list, but not below it. So if Door1Open uses OpenedDoorNumber, then OpenedDoorNumber must sit higher in the list. If you get an error message, check the positions.
Assign property values from Variables
Defining a variable does nothing by itself. You then have to tell a block to take one of its properties from that variable.
- Hover the block so it's highlighted and its parameters appear in the right-hand panel.
- Find the variable assignment section in that panel.
- Choose the property you want the variable to control (Position X, Invisible, No Collider, Rotation Y…).
- Choose the variable that will supply its value.
From now on that property is driven by the variable and is rewritten every time the round resets, changing it by hand in the panel will not stick. Make sure the types match: a true/false variable for tick-boxes, a number for positions, rotations, scales and durations.
References tables
Most levels only ever use a handful of these. randomInt(m, n), random(n) and the condition ? valueIfTrue : valueIfFalse form covers nearly every randomised level. The tables below are for reference, you don't need to read them through
x ? y : z reads as: if x is true, use y, otherwise use z. For instance OpenedDoorNumber == 1 ? 30 : 0 gives 30 when the opened door is number 1, and 0 in every other case. Note that == means "is equal to" (a single = assigns a value instead).
Expression reference
You can use these predefined constants
Constant | Description |
E | 2.718281828459045 |
PI | 3.141592653589793 |
true | Logical true value |
false | Logical false value |
Operator Precedence
You may use these operators, higher in the table will take precedence.
So for example (1 + 2)^2 will give a different result (9) than 1 + 2^2 which gives 5
Operator | Associativity | Description |
(...) | None | Grouping |
! | Left | Factorial |
^ | Right | Exponentiation |
+, -, not, sqrt, etc. | Right | Unary prefix operators (see below for the full list) |
*, /, % | Left | Multiplication, division, remainder |
+, -, || | Left | Addition, subtraction, array/list concatenation |
==, !=, >=, <=, >, < | Left | Equals, not equals, etc. |
and | Left | Logical AND |
or | Left | Logical OR |
x ? y : z | Right | Ternary conditional (if x then y else z) |
Unary operators
Operator | Description |
-x | Negation |
+x | Unary plus. This converts it's operand to a number, but has no other effect. |
x! | Factorial (x * (x-1) * (x-2) * … * 2 * 1). gamma(x + 1) for non-integers. |
abs x | Absolute value (magnitude) of x |
acos x | Arc cosine of x (in radians) |
acosh x | Hyperbolic arc cosine of x (in radians) |
asin x | Arc sine of x (in radians) |
asinh x | Hyperbolic arc sine of x (in radians) |
atan x | Arc tangent of x (in radians) |
atanh x | Hyperbolic arc tangent of x (in radians) |
cbrt x | Cube root of x |
ceil x | Ceiling of x — the smallest integer that’s >= x |
cos x | Cosine of x (x is in radians) |
cosh x | Hyperbolic cosine of x (x is in radians) |
exp x | e^x (exponential/antilogarithm function with base e) |
expm1 x | e^x - 1 |
floor x | Floor of x — the largest integer that’s <= x |
length x | String or array length of x |
ln x | Natural logarithm of x |
log x | Natural logarithm of x (synonym for ln, not base-10) |
log10 x | Base-10 logarithm of x |
log2 x | Base-2 logarithm of x |
log1p x | Natural logarithm of (1 + x) |
not x | Logical NOT operator |
round x | X, rounded to the nearest integer, using "grade-school rounding" |
sign x | Sign of x (-1, 0, or 1 for negative, zero, or positive respectively) |
sin x | Sine of x (x is in radians) |
sinh x | Hyperbolic sine of x (x is in radians) |
sqrt x | Square root of x. Result is NaN (Not a Number) if x is negative. |
tan x | Tangent of x (x is in radians) |
tanh x | Hyperbolic tangent of x (x is in radians) |
trunc x | Integral part of a X, looks like floor(x) unless for negative number |
Functions
Function | Description |
random(n) | Get a random floating number in the range [0, n), i.e. at least n and strictly less and n. If n is zero, or not provided, it defaults to 1. |
randomInt(m, n) | Get a random integer number in the range [m, n], i.e. at least m and no more than n. |
fac(n) | n! (factorial of n: "n * (n-1) * (n-2) * … * 2 * 1") Deprecated. Use the ! operator instead. |
min(a,b,…) | Get the smallest (minimum) number in the list. |
max(a,b,…) | Get the largest (maximum) number in the list. |
hypot(a,b) | Hypotenuse, i.e. the square root of the sum of squares of its arguments. |
pyt(a, b) | Alias for hypot. |
pow(x, y) | Equivalent to x^y. For consistency with JavaScript's Math object. |
atan2(y, x) | Arc tangent of x/y. i.e. the angle between (0, 0) and (x, y) in radians. |
roundTo(x, n) | Rounds x to n places after the decimal point. |
if(c, a, b) | Function form of c ? a : b. Note: This always evaluates both a and b, regardless of whether c is true or not. Use c ? a : b instead if there are side effects, or if evaluating the branches could be expensive. |
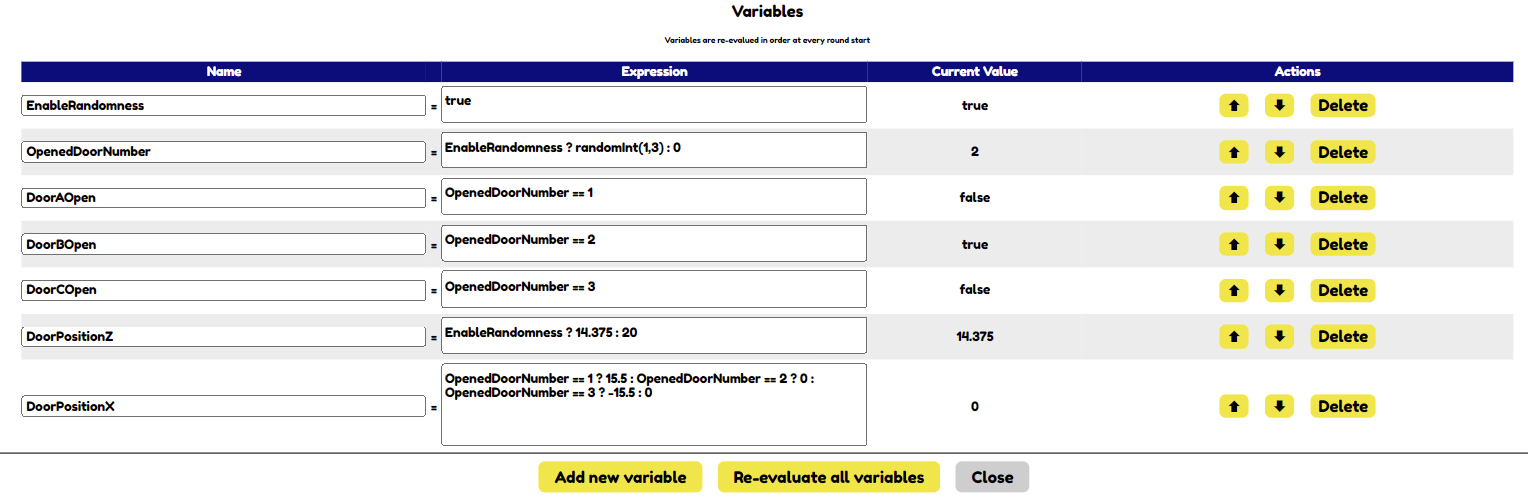
Example : Random Doors
This example describes a level with 3 doors and only one can be broken open.
The level file can be downloaded here.
First, make the structure with walls and static blocks for the doors. We’ll number the doors 1, 2 and 3 from left to right.
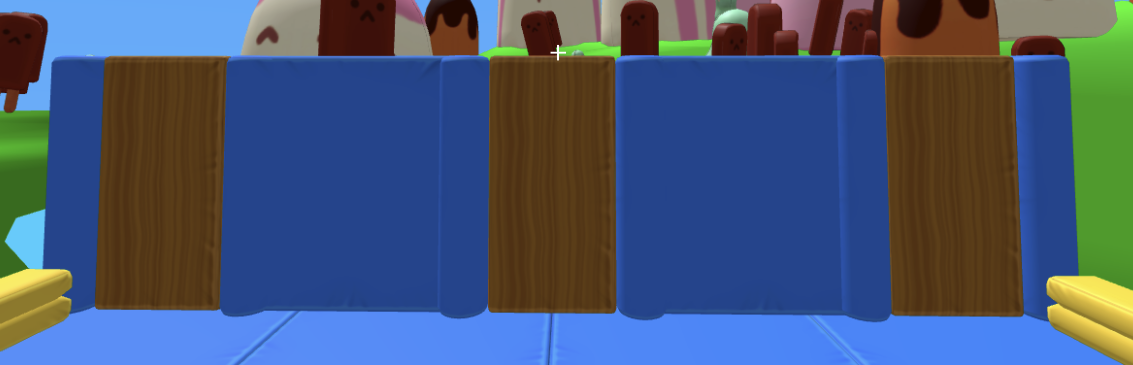
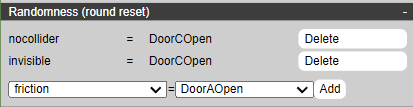
Removing one static door
The first step is randomly removing one of the static door blocks. For that we will change 2 properties, nocollider and invisible. The block will not really be removed but instead made invisible and intangible.
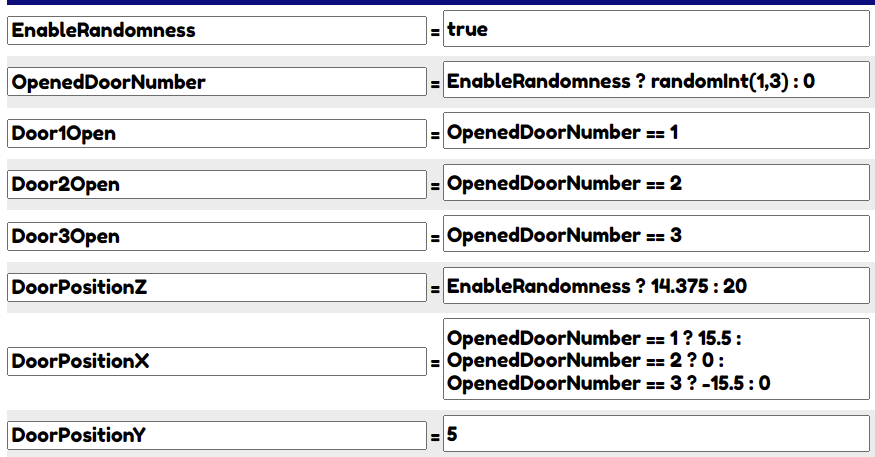
We define a variable containing a number indicating which door will be open: 1, 2 or 3 and for that use the randomInt() function

Then we define one boolean (true or false) variable for each door that will be used to set the properties

Finally, we hover each door and assign nocollider and invisible properties from the variables. We use Door1Open for Door 1, Door2Open for Door 2 and Door3Open for Door 3.

At this point, we can already test a few times (TIME then RESET) and see one spot will be randomly left “open”.
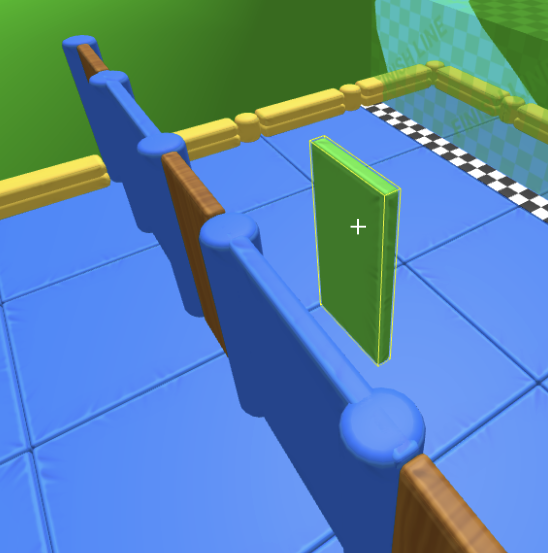
Adding a “breakable” door
For the breakable door, we need to create another block that will be dynamic (so that players can push it). For illustration & testing purposes, the block is textured green but it should have the same texture as static doors.
Place it anywhere near at first, but make sure the Y position is the same as the static doors.
This block will need to be placed in the open spot. Write down the Z position for the 3 static doors (which should be equal) and the 3 different X positions (15.5, 0 and -15.5)
We use this value to define 2 variables, one for the Z position and one for the X position. We set this value depending on the door that is left open.

These variables are used to set the dynamic door block position properties:

And that’s it! We can test again and see that the dynamic door will be placed in the open spot.
Making it easier to maintain
With this setup, it’s easy to lose the dynamic door out of the screen and never see it again, or have a hard time selecting the dynamic door without pushing it first by playing. We can add a new variable at the top to control whether we enable the randomness behavior or not.
In this example, if we disable the randomness, the OpenedDoorNumber will be set to 0, and the door positioned at a Z value of 20, X value of 0.
We also assign the Y position from a variable to make sure it’s always the same even if we save and reload the level after the dynamic block has been pushed out.
Programmatic objects
Programmatic objects are a special kind of kinematic objects. You can set their position and rotation with a mathematical formula depending on elapsed time from the start of the race.
You can use the same constants, operators, and functions as for variable definitions used for competitive race’s randomness.
In addition, multiple pre-defined variables may be used :
- time: the elapsed time in seconds since the start of round, or since the activation, for objects are activated with a trigger
- startPositionX, startPositionY, startPositionZ: the start position for the block, allowing you to program a relative movement
- startRotationX, startRotationY, startRotationZ: the start rotation for the block, allowing you to program a relative rotation
- duration: is set from the “Loop Duration” property, allowing you to easily change the overall duration when you use this variable in your formulas
Also, defining new variables is allowed with the = (equal ) operator. Instructions must be separated with a ; (semicolon). The last instruction is used as the return value.
Please note that the “Loop Duration” property must be set appropriately when the object is activated by a trigger, as the animation will only run for this duration and there is no way to determine the loop duration from the formula.
Here are some examples to matching the other base kinematic objects
Moving in a straight line
Set positionZ to:
startPositionZ + (time / duration) % 1 * 5
5 being the distance traveled
Moving in a straight line, alternate movement
Set positionZ to:
t = (time / duration) % 1;
t = (t < 0.5 ? t : 1 - t) * 2;
startPositionZ + t * 5
Moving in a straight line, alternate movement, with easeInOutQuad
Set positionZ to:
t = (time / duration) % 1;
t = (t < 0.5 ? t : 1 - t) * 2;
t = t < 0.5 ? 2 * t * t : 1 - pow(-2 * t + 2, 2) / 2;
startPositionZ + t * 5
The mathematical formulas for easing can be found on website like this one.
Rotating
Set rotationY to:
(startRotationY + time * 90) % 360
90 is the rotating speed (°/s)
Swinging
Set rotationY to:
startRotationY + sin(time / duration * 2 * PI) * 45
Note we are multiplying by 2.PI because it’s the period of the sin function
Step Acceleration over time
This example will have the rotation speed increase by 90°/s after 5s and 10s
Set rotationY to:
step1 = time * 90;
step2 = time > 5 ? (time - 5) * 90 : 0;
step3 = time > 10 ? (time - 10) * 90 : 0;
(startRotationY + step1 + step2 + step3) % 360
Linear Acceleration over time
This example will have the rotation speed increase with a constant acceleration.
The math is quite complex, but you can find explanations on websites like this one.
Set rotationY to:
a = 45;
v0 = 45;
(startRotationY + v0 * time + a * time * time / 2) % 360
a is the acceleration (%/s²) and v0 is the initial rotation speed.
This previous formula will not behave well after a certain time, because the speed is not limited and the speed will never stop increasing. Let’s try to cap the speed after 5s:
- If the time is < 5, we use the previous formula
- If the time is >= 5, we add the angle calculated at time t=5 (with the previous formula), then add the angle with a constant rotation speed at time t-5
- The rotation speed at time t=5 is: v0 + a * 5 (details on the website linked above)
Set rotationY to:
a = 45;
v0 = 45;
time < 5 ?
(startRotationY + v0 * time + a * time * time / 2) % 360
:
(startRotationY + v0 * 5 + a * 5 * 5 / 2 + (v0 + a * 5) * (time - 5) ) % 360
The final rotation speed in this example is 270°/s²
Saving, sharing and loading levels
Saving
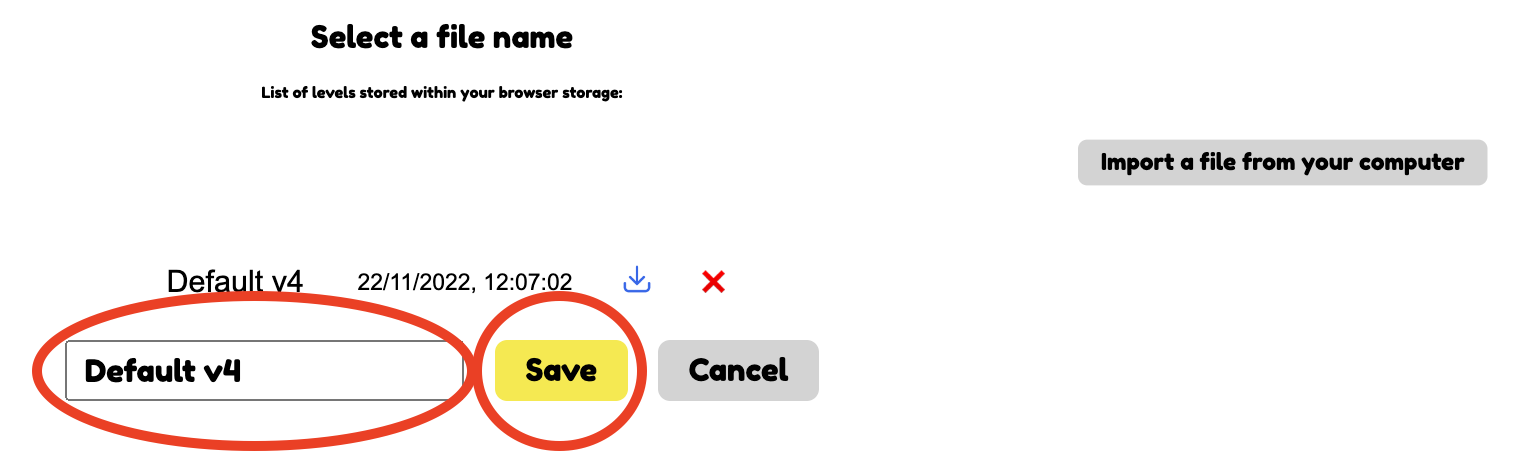
STEP 1: Click on LEVEL>SAVE in the functions menu at the bottom of the editor view.

STEP 2: Enter a name for you level in the text field and click SAVE
⚠️IMPORTANT
By default, levels are saved in the local storage of your browser, this means that if you clear the browser’s local storage all your levels will be erased.
It is good practice to always download your levels as a .lol file from time to time.
Entering the name of an existing level in the map name field will overwrite the existing level with that name. It is good practice to add version numbers to your level saves to be able to go back to a previous version if needed.
Downloading the .lol level file
To download a copy of your level for backup or sharing purposes after saving your level using the procedure described above do the following:
STEP 1: Click on LEVEL>SAVE in the functions menu at the bottom of the editor view.
STEP 2: Click on the download icon beside the name of the map you want to download as a .lol file. Save to the location of your choice.
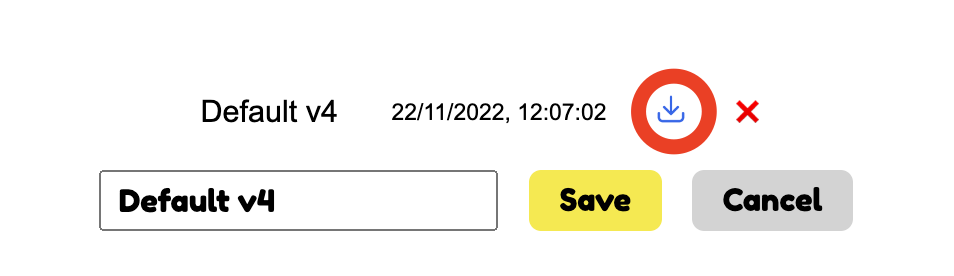
STEP 3: Click the CANCEL button to return to the editor
Sharing levels
To share a level with your fellow LOLBeans players download the level file as explained under downloading the level file.
Send the .lol file to your friends or post your creations in the #player-level-creations forum on the LOLBeans Discord
💡Remember to add a screenshot of your map for easy reference to your post
Loading levels
STEP 1: Click on LEVEL>LOAD in the functions menu at the bottom of the editor view.
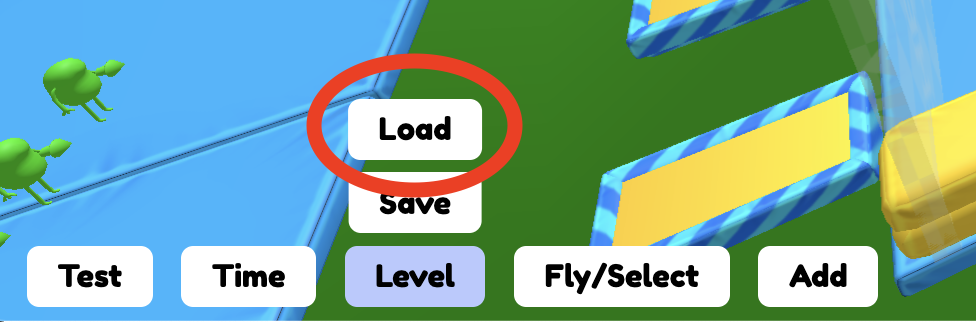
STEP 2: Locate the .lol file of the level on your hard drive and confirm.
—
🚧 This document is a work in progress, please report any mistakes and add your documentation request to the #feedback-suggestions-bug-report forum on the LOLBeans Discord