Behemoth Guide
compiled by Kevin
A not-quite-comprehensive info dump to (hopefully) make your time with this monster a bit easier and less confusing. Developed from the experience of over thousands of Behemoth hunts and various online resources, as well as collaboration with several other “Behemoth addicts”. This is just a rough draft.
Disclaimer: This guide is primarily directed to newer hunters who have just recently unlocked Behemoth in High Rank and don’t know anything about the fight. It serves as a recommendation for how to approach the fight.
Some basic facts and stats:
- 35,000 hp, 35 minute time limit
- Fight outline: Moves through 4 zones. He starts in zone 8 of Elder’s Recess (“area 1”) then moves to zone 9 (“area 2”). If you break one of his parts by the end of zone 9, he moves to zone 14 (“area 3”) then 15 (“area 4”) (Nergigante route). If he has no parts broken by the end of zone 9, he moves to zone 12 (“area 3”) then 13 (“area 4”) (Teostra route).
- Casts Ecliptic Meteor 3 times: at the end of areas 2, 3 and 4 (see "Ecliptic Meteor" section for more info)
- Hitzone value (hzv) data (from Honey Hunters World)
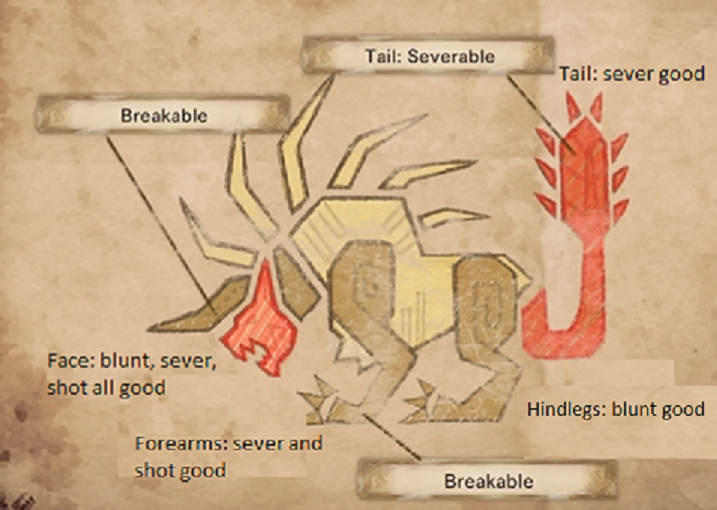
- Forearms (50 hzv), face (60 hzv), and tail (45-50 hzv) weak to sever type damage
- Hind legs (55 hzv) and face (55 hzv) weak to blunt type damage
- Forearms (45 hzv) and face (50 hzv) weak to shot type damage
- Noteworthy elemental weaknesses: water on the face (25 hzv), dragon on the arms (15 hzv), ice on the hind legs (25 hzv)
- Sever weapons will bounce on the horns and chest, take the skill mind’s eye if you can
- Enmity is gained by hitting his face a certain number of times, it varies by weapon. It can also be gained by shooting dragon pods (the person who fires the 5th pod at Behemoth gains enmity; pods drop twice, once at the end of area 1/start of area 2 and once at the end of area 3). Enmity lasts 90 seconds. Disabling status effects such as paralysis, KO, and sleep will remove enmity. Flash also gets rid of it.
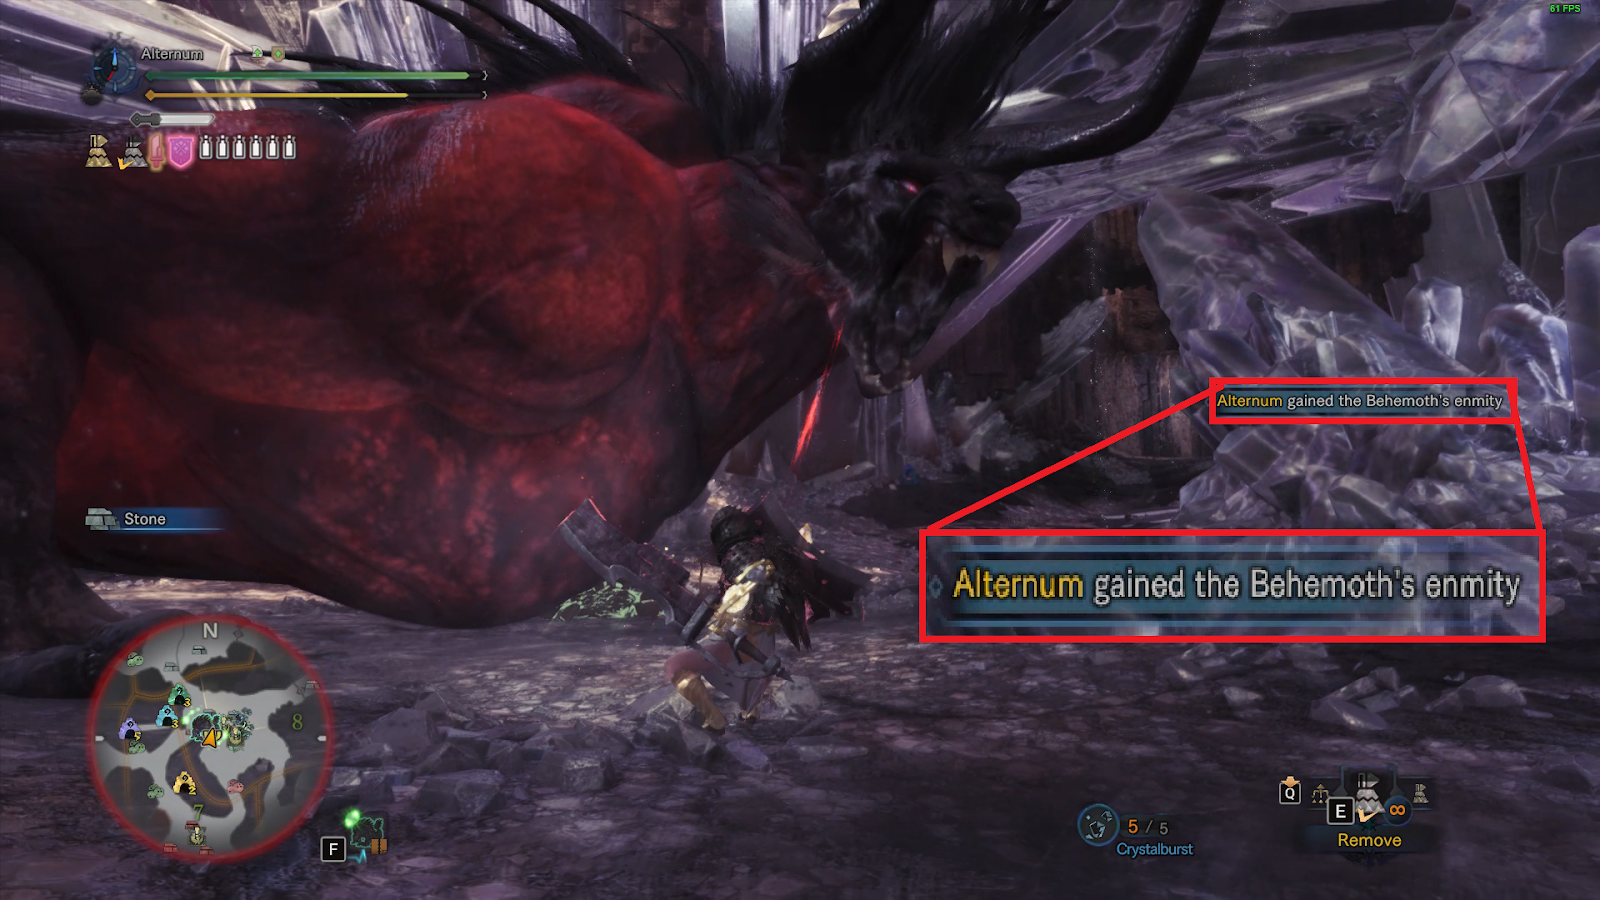
- When someone has enmity (Behemoth glows red and there’s a red line from his eyes directed at the person with enmity), Behemoth will target all attacks on this person and will no longer cast charybdis. Of course, some attacks will have AOE that can hit others so you still need to be cautious, but once someone has enmity you’re generally safe to attack Behemoth without too much fear of carting.
Why fight Behemoth?
- Gives you arguably the best armor in base MHW. 4 piece Drachen master’s touch is the meta for most melee weapons and some pieces are so efficient they show up in non-master’s touch mixed sets (e.g. the arms are quite common in bow sets).
- Is probably the best teacher going into the endgame of MHW. Really enforces the idea that not getting hit takes priority over getting damage in - you can't deal damage if you need to heal or if you're dead. If you can learn how to properly fight Behemoth or even solo him, you’ll find it a lot easier to tackle some of the other tough fights in the game.
- On a similar note, he’s a good monster to practice i-frames. A lot of his attacks have very few active hitboxes so they can be i-framed quite easily. i-frames = invulnerability frames, you get 13 frames @ 60fps at the start of your roll; some weapons get extended i-frames like longsword's foresight slash or dashing in demon mode on dual blades, and some get reduced i-frames like switch axe/lance/gun lance side-hops.
- He’s actually a really fun fight. When you put enough time into the game, you’ll rarely find yourself in an optional quest or investigation which takes over 2-5 minutes to complete. Behemoth is an engaging monster which evolves and speeds up as he progresses from area to area, raising the stakes with each passing minute.
Enmity
- If you get enmity and are not prepared to tank it, flash immediately. You don’t want to wreak havoc or accidentally cart from having enmity when you’re not prepared to tank.
- If you have enmity and were supposed to get it, do not just AFK while holding guard, do not run mindlessly all over the place, do not back yourself into a corner. Let’s go into why:
- AFK guarding: Behemoth’s attacks will hit you for a lot of chip damage, even with guard 5. You also need to reposition regularly. Once you get enmity, your job is not done, it has only begun.
- Running around mindlessly: This is a good way to get all the comets destroyed (and in turn sentencing your team to death come ecliptic) as well as a good way to cause Behemoth to charge all over the place, making it difficult for your team to get good hits in.
- Backing into a corner: This locks you in, and makes it hard for you to sheathe and heal if you get dangerously low while tanking. This also puts your teammates in danger, as they cannot safely DPS while he’s in a tight corner.
- Your 2 goals as a good tank: Keep Behemoth steady, and keep the comets alive.
- A lot of guides say guard 5/up + 3 shield mod glutton is a good tank, or that guard 5/guard up lance or gun lance are good tanks. These could work well for you. Personally, I find them quite uncomfortable without health augment or lifepowders from teammates and prefer evade-tanking enmity, but find out what works best for you. Ideally, your tank should be experienced in fighting Behemoth (for all the reasons listed above).
Ecliptic Meteor
- Behemoth will cast ecliptic meteor 3 times, once each at the end of areas 2 (55% hp), 3 (30% hp), and 4 (1% hp, the last ecliptic kills him).
- Ecliptic meteor is a one-shot move that has a range of ~1.5 zones. It can only be dodged in a few ways:
1. Hiding behind a comet
2. Timing the Final Fantasy XIV jump emote correctly
3. Sitting at the canteen
4. Sitting inside the tent
5. Being out of range of the blast radius
- He drops comets which you hide behind to survive ecliptic. He drops 3 comets in area 2 (71%, 66%, and 61% hp), 4 comets in area 3 (50%, 45%, 40%, and 35% hp), 2 comets in area 4 (10% and 5% hp). You can use these comets as a way to keep track of how close he is to casting ecliptic in that area.
- ALWAYS try to run to a comet when he casts ecliptic, and always be ready for him to cast ecliptic at any moment. Read the prompts that show up in chat, it’ll tell you “The Behemoth is casting Ecliptic Meteor”. Do not try to jump if you haven’t practiced in advance. More often than not, you have enough time to run behind a comet.
- On a similar note: Always keep a comet within running distance.
- If you do want to learn the jump timing, know that it is quite tight and also dependent on your distance from the center of the ecliptic meteor drop zone. This is one of the few things you can use a YouTube guide for, as long as the author factors in distance. Always practice behind a comet. If you get the jump timing right, regardless of whether or not you’re behind a comet, you’ll end up landing from your jump at his head. If you fail the jump timing behind comet, you land back where you were, safe and sound. If you fail the jump timing outside of a comet, you’ll faint. Don’t try to look cool and flex by jumping outside of a comet if you don’t need to.
- If you cart in area 3 and four comets have already been dropped, get in the tent immediately. He will cast ecliptic soon, and you will die to it if you’re in NW camp (camp 16). For areas 2/4, check how many comets have been dropped. If Behemoth still hasn’t dropped all of them, run as quickly as possible back into the area.
Common misconceptions/mistakes:
- Flashing Charybdis: "But all the guides I watched told me to flash charybdis!" Don’t. Do. It. When Behemoth is channeling charybdis, he stands still for a whole 6-7 seconds. For normal Behemoth, that's his biggest opening for you to do damage and for your “tank” to gain enmity. If the tornado is on you, bring it to the edge of the room, but not blocking any entrances/exits. If it's not on you, use that time to land your biggest combos on Behemoth.
- Applying statuses (sleep/para/KO) at will in area 1: Behemoth gets faster as he progresses from area to area. That means in areas 1and 2, he's at his slowest, least dangerous state. So using all your CC on him early on is a big waste*, save it for area 3/4. Not only that, but every status application increases the threshold for the next proc, so paralyzing/sleeping/KOing him early will only make it more difficult to get another one later.
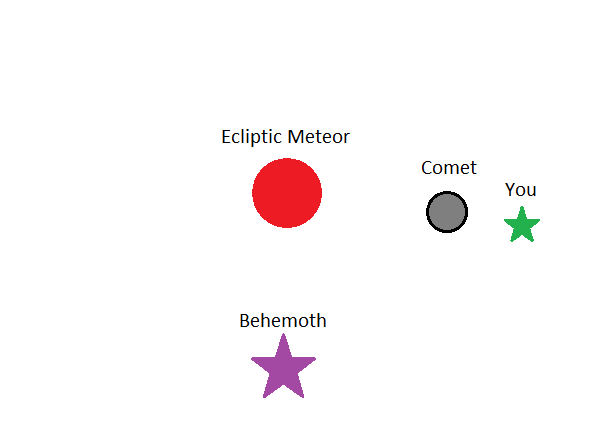
- Standing on the wrong side of the comet (see diagram below): This one is really simple, but people do it wrong way too often. ECLIPTIC -> COMET -> YOU. NOT BEHEMOTH -> COMET -> YOU. Use the comet to block the giant explosion from the center of the room (ecliptic meteor), i.e. stand in the shadow of the comet.
Tips for Builds/Weapons/General fight prep
- Make sure your armor is upgraded, maybe even augmented + fully upgraded again. Your defense should be nearly 400 before any defensive buffs (armorcharm/talon). The bare minimum is 350.
- Because of how hard Behemoth hits, run health boost 3. It is +33% effective health for three level 1 skill points, the biggest ROI (return on investment) of any defensive skill in the game. Following health boost, the next best defense skills to run would be evade window (increases your i-frames), divine blessing, or evade extender (increases your evade distance).

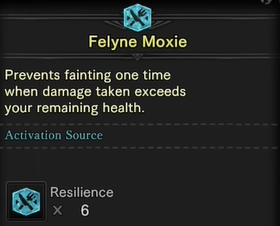
- For food skills, Felyne Moxie is a great option (6x light blue foods or “Health Platter” from the canteen). It keeps you from carting once (if you take fatal damage, your health bar goes to 0 but you will still be alive, so you can heal it back up) and is more than worth using a voucher for against Behemoth. Note: moxie does not work against ecliptic meteor. Felyne Insurance is nice if you can snipe it.
- For food buffs, either eat for Attack up (L) or Elemental res up (L). DEFENSE UP (L) IS NEARLY USELESS in terms of how much survivability it gives you.
- Faster, mobile weapons with shorter combos are generally easier to navigate vs Behemoth. Personal recommendations include longsword, dual blades, sword and shield, insect glaive, light bowgun (rapidfire normal 2 ammo).
Good resources for learning how to actually fight Behemoth:
- Po Chi: THE Behemoth main of all Behemoth mains. TA records/top 3 TA times for numerous weapons, both normal and extreme Behemoth. Has videos of Behemoth solos using pretty much every weapon type. If you want to learn what you should be doing with the weapon you’re playing vs Behemoth, he’s the guy to go watch. A playlist of his Behemoth runs can be found here: https://www.youtube.com/playlist?list=PLQxuA3mO1Nb7AZ6DpKgDxZS7Rs_IQrjwI
- mhw.seiken.io: ShinSeiKen’s speedrun leaderboard for base MHW. Great resource for finding the fastest speedruns, both for freestyle and TA ruleset. All the fastest Behemoth times can be found there, if you want more than Po Chi: https://mhw.seiken.io/quests/optional-quest/9%E2%98%85-a-visitor-from-eorzea/
- The Artful Dodger: For a quick and dirty “how do I stop getting hit so much” guide, these guys made a short 7-minute video illustrating how to i-frame/outspace most of Behemoth’s attacks: https://www.youtube.com/watch?v=s4_7FEA4Pn0