Unofficial UFO Owners Guide
Edited by Martin Langhoff <martin.langhoff@gmail.com>, with content from the UFO community at Sailing Anarchy.
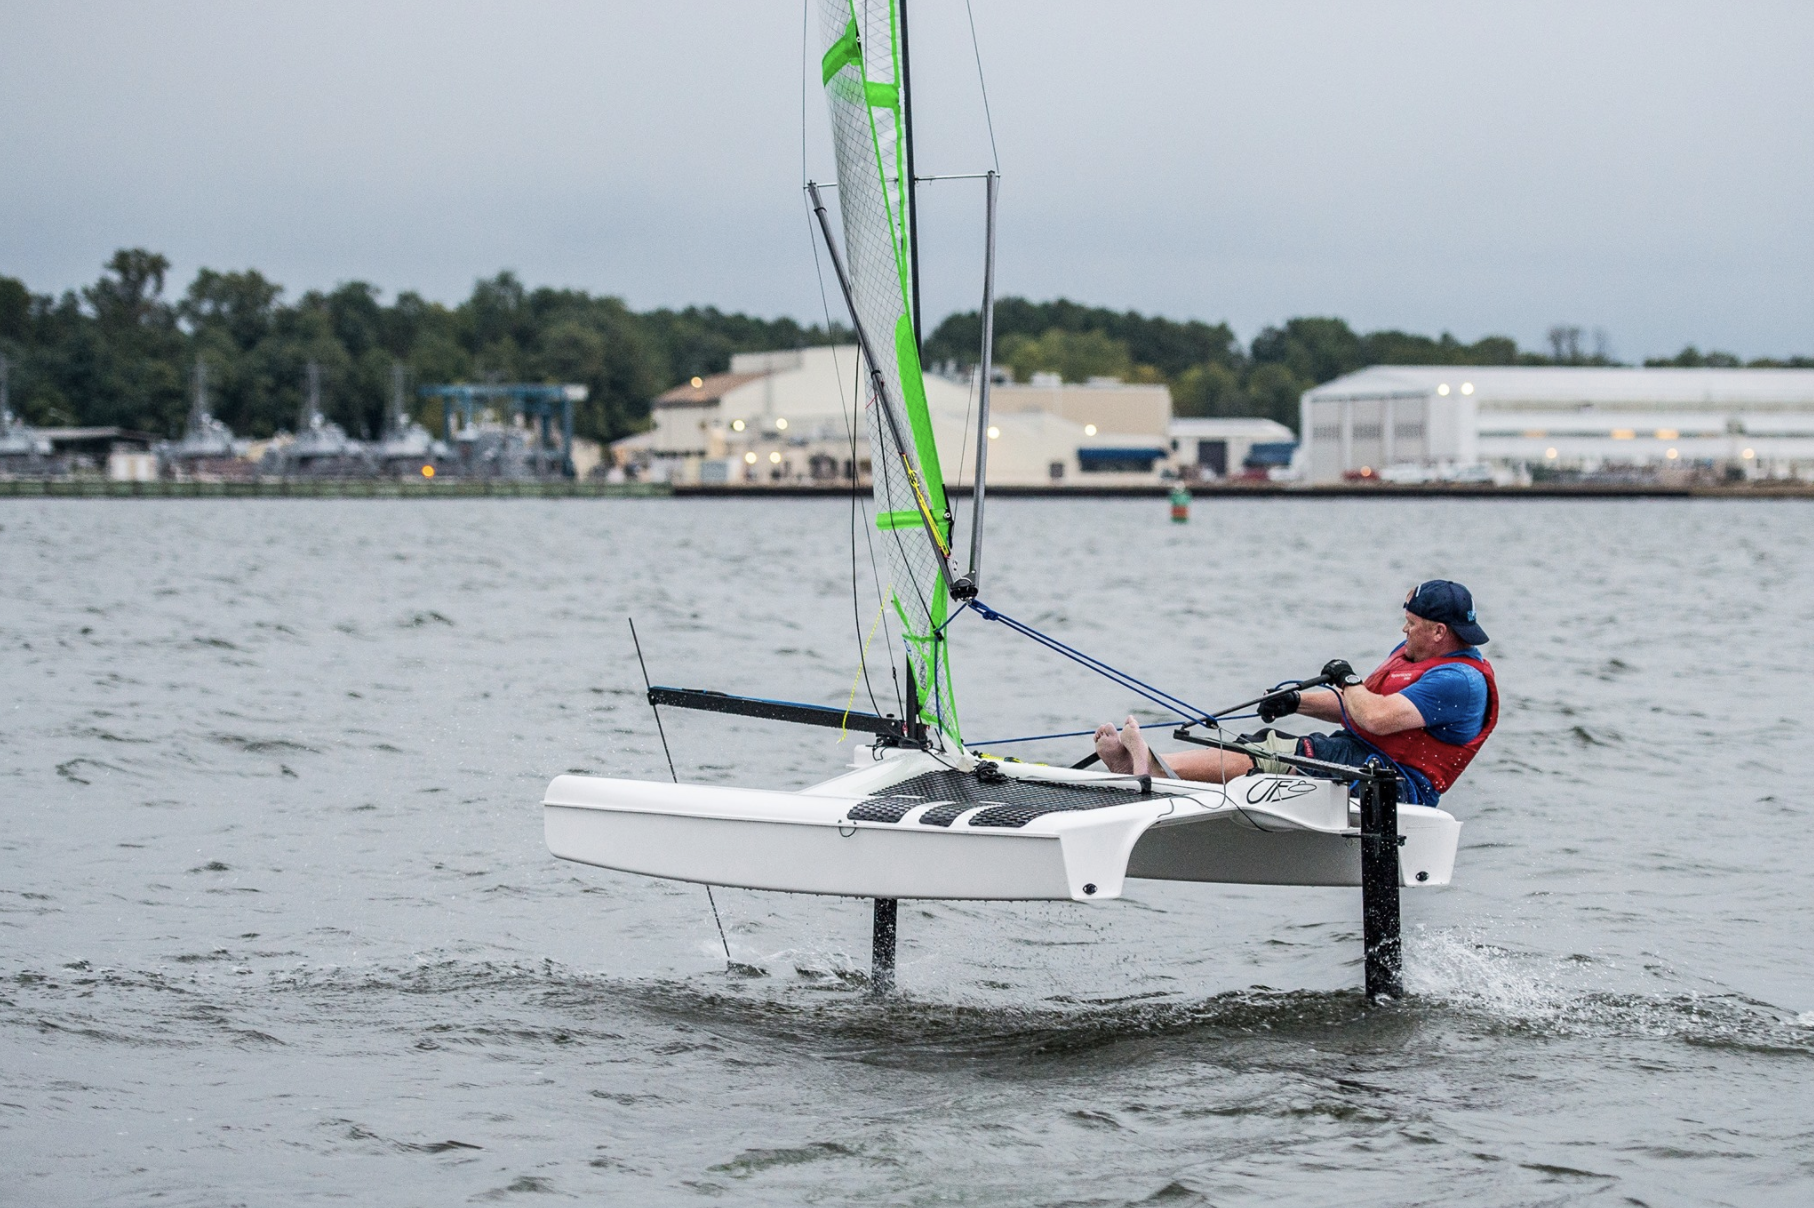
The UFO dinghy is fast, wet, and a ton of fun. As it is a new boat, it has limited official documentation -- mostly videos from the Fulcrum team -- and most of us do not have local fellow UFO sailors to help with tips and tricks. So this is a curated collection of useful info from all corners of the internet.
First -- some important notes:
- This is an unofficial guide. Though we try to get it right, we may inadvertently give you incorrect advice. No warranties here.
- We will specially mark advice that we know is different from what the builder recommends with a light color background. We report, you decide.
- This document sources ideas from the ‘New UFO Owner Tips’ document, and from the Sailing Anarchy UFO Thread.
- This document is maintained as a google doc. If you have suggestions, corrections, etc you can make comments in this google doc, or post in the Sailing Anarchy UFO thread.
Documents and Help
Where do I find documents and help?
- Fulcrum’s UFO FAQ
- Fulcrum’s YouTube Channel has excellent videos including setup and rigging, and getting started foiling.
- Sailing Anarchy UFO thread -- you can ask questions there; Sailing Anarchy can be extreme in helpfulness and unhelpfulness. Recommendation: take the good, ignore the bad.
- This very page! Read on!
Getting Started
Your UFO has just landed! Here is some guidance on initial assembly
Dolly and walking around
The small grey ropes on the side of the hull are where you tie the dolly to (the location of these ropes is the center of balance of the UFO all rigged up). The black ones the dolly ships with are usually a bit short. Get longer ones and put clips on them.
Moving the boat around on the dolly is accomplished by standing between the bows. One hand grabs the shrouds, the other hand on one bow. Do not grab the boat from the wand crane -- it is not designed for this effort.
You can push the boat (so it moves “backwards”) or pull the boat. This is handy for shorter sailors, a bit awkward for tall folks.
Moving the boat around on the dolly is easier if you add a short line to each bow. This involves drilling the “lip” of the bows to run the line through -- similar to the grey lines for the dolly attachment. You must seal the inside of any holes you drill with epoxy (best) or silicone (needs re-sealing every season).
TODO: pics
Rudder
- When attaching the rudder head, pins into bushings for connection may be very tight. Check the angle on the rudder rake adjustment wheel. Lubrication -- McLube, silicone spray, can help.
- Rudder foil might not slide easily in the rudder head. This will loosen up over time, but to get started...
- Use silicone spray over the entire extrusion.
- Alternatively, could be way too tight. May need to remove some of the gasket, but give it some sails first.
- Rudder bushings may come off. Use super glue to reattach per Steve Clark. There should be three rudder bushings, one on the bottom of the lower gudgeon hole (the lower arm extending from the hull) and one of the bottom of each of the arms of the rudder.
- If you need additional rudder bushings, look at the spare parts table, at the end of this page.
Shrouds
- With the spreaders detached…
- Attach the lines to the spreaders
- Attach the shackle
- Then put the spreaders in place
- Use a marlin spike to adjust the simple loop knot over the spreader attachment until the upper part has more tension than the lower part. The lower shrouds get tensioned and released every time you rig/derig.
- You’ll want to re-adjust this loop know every 2nd or 3rd outing. The shrouds stretch/creep significantly over time.
Tips:
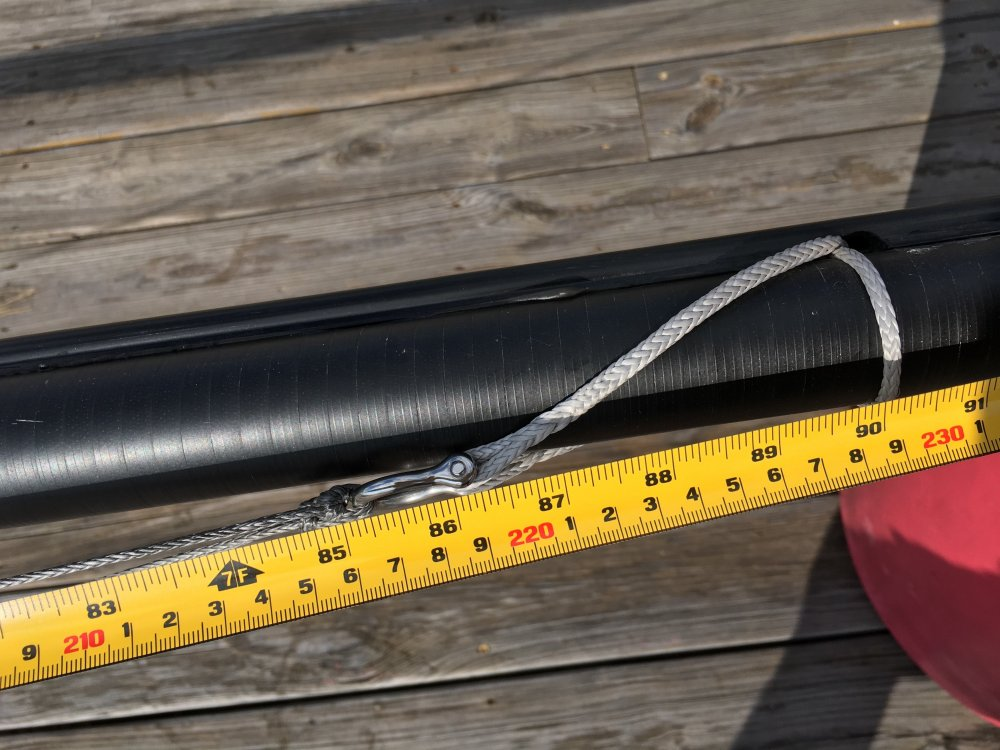
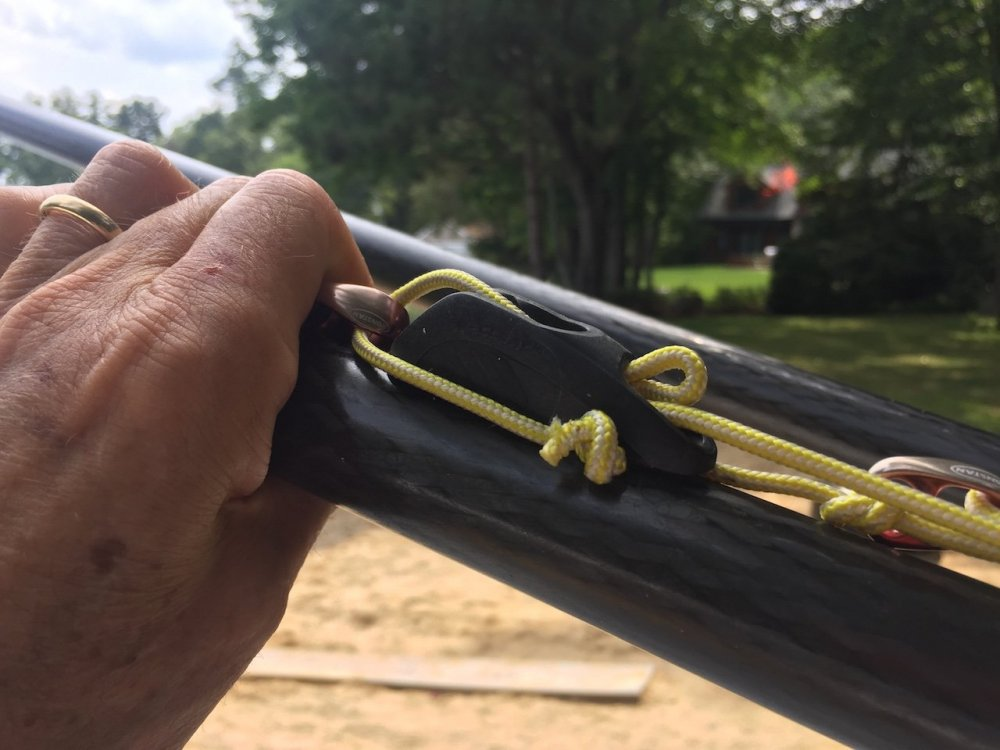
Shroud length - from the end of the spreader to the horizontal strop about 90". See picture below. Don’t force or bend your spreaders! It’s ok to have 90.5.
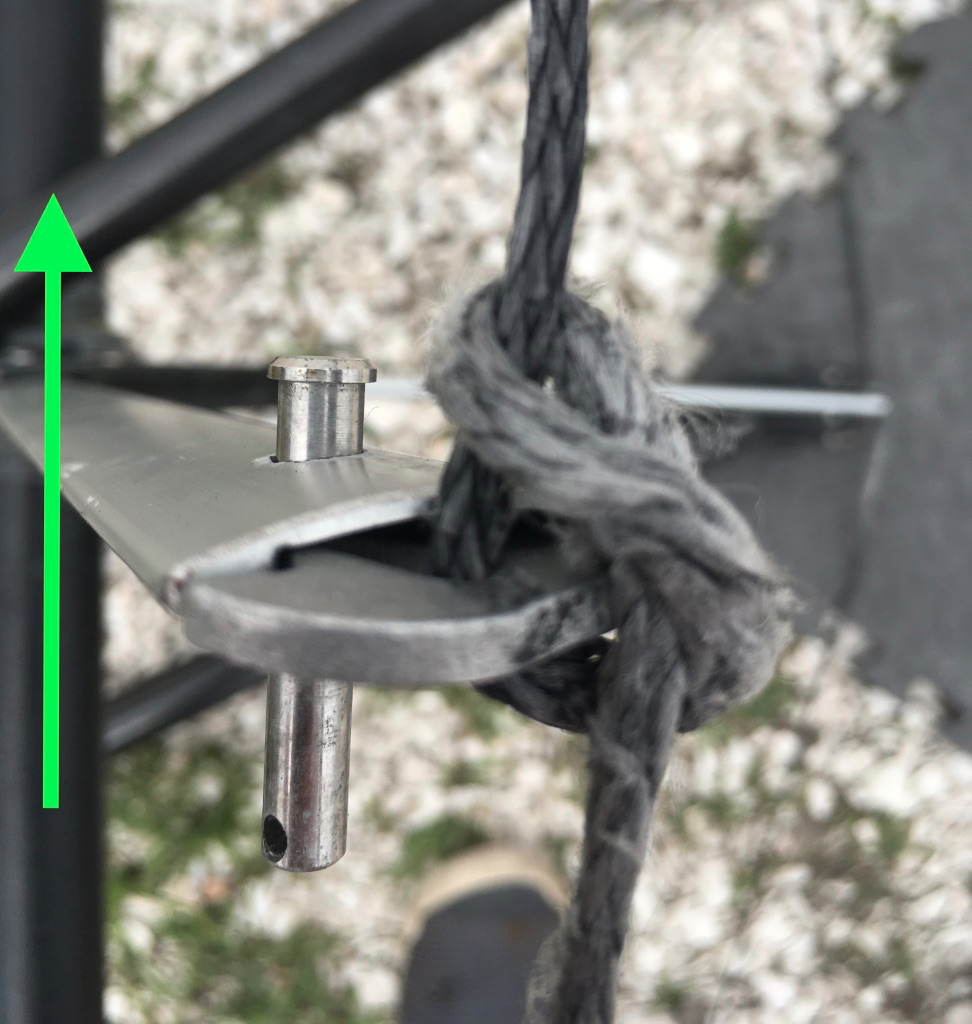
When tying your spreader tips you should make sure you tie the knot to minimize slip. When you tie the hitches at the end of the spreaders, you want the knots to be on the top of the spreaders (pic below). Here's what the knot should look like when its loosened up. Arrow points towards the top of the mast.
Hoisting the Mainsail the First Time
This is generally well explained in Fulcrum’s rigging video. These are additional comments:
- You should have your shrouds setup, but without tension, slack, for the hoist
- Have little or no batten tension - just for the first time
- The tool on the end of the outhaul is a batten tensioning device.
- Use soapy water, McLube or silicone spray.
- Feed the boltrope and push the battens up (as seen on Fulcrum’s rigging video).
- For final ⅓ of the hoist, pull the halyard while standing at the stern of the boat.
Gets much easier as the sail wears a bit, because the luff rope stretches out.
Foils - Main Foil and Rudder
Assembly
- Use silicone spray on the threads in the rods, and on the rectangular aluminium pieces (where they slide against the foil verticals). This will make disassembly a lot easier.
- Mainfoil: insert pin before tightening nut at the top to keep things lined up, if you don’t do this, pin will not go into final sailing position - through multi-hole blocks.
- Tighten the whole setup firmly. The tension is what holds the system together.
- Wand
- Add a wrap of white electrical tape at the top of the wand. Prevents it from being accidentally pulled down too far (TODO: pic!). Mark the electrical tape with a sharpie to indicate direction of the paddle.
- Set the bungee (TODO: pic/video)
- Rudder: the long hold-down line must go through the eye at the side of the rudder and the eye on the tiller.
After Assembly
- The safe position of the foil hold-up clip is between the foil vertical and the horizontal flap. If you put the foil hold-up clip under the horizontal flap, you can end up with damage on the foil flap -- the rod can perforate it.
- For sailing -- start with the main foil pin in the middle hole, and the rudder rake set also to the middle of its range. Work with your body positioning (fore, aft) to get started with your first flights.
Tips and Tricks for Every Outing
The UFO is very versatile in many wind conditions. Below is a summary table of how to rig the different components (Battens, mast, sail, foils, and wand) for various wind conditions and skill level. This summary table is for a standard size sail. Fulcrum also sells an additional storm sail. Rigging settings for the storm sail are still being tested by the team. In the future, we hope to have a similar table for the storm sail. More detailed information about how to rig and tune each component is in the following section after the table.
UFO RIGGING TABLE - Standard Size Sail
Wind Speed (Knots): | 7-12 | 13-20 | 21-30 | OMG | |
Mode | Baseline | Medium Wind | High Wind | Survival Mode Fully Depowered | |
Batten Tension 1 Turn = 180 degrees - note 1 | Batten 1 Top Gaff Batten 2 Batten 3 Batten 4 Batten 5 Bottom | 9-15 6-10 3-5 3-5 3-5 | Ease 1 Turn Ease 1 Turn Baseline Baseline Baseline | Ease 2 Turns Ease 2 Turns Baseline Baseline Baseline | Ease 2 Turns Ease 2 Turns Baseline Baseline Baseline |
Mast - note 2 | Shroud Tension | Full Tight | Ease 1 inch (2.5 cm) | Ease 2-3 inches (5 - 7.6 cm) | Min tension to support shrouds, but not flapping |
Sail Shape Type | Full Straight Sail | Flat and Twisted ( Lowered Sail) | Flat with De-powered Leech | Flat with De-powered Leech | |
Rigging Order | Shroud tension Cunningham Outhaul | Shroud tension Cunningham Outhaul | Shroud tension Outhaul Cunningham | Shroud tension Outhaul Cunningham | |
Sail | Halyard | Fully raised | 3 inches (7.6 cm) Lowered | Fully raised | Fully raised |
Cunningham | 5.5 inches (14 cm) Bottom of boltope to top of mast collar. | 2.5 inches (6.9 cm) Bottom of boltope to top of mast collar. | Max Downhaul - note 3 | Max Downhaul - note 3 | |
Out Haul | 6.75 inches (17 cm) grommet to U-bolt | 1 inch (2.5 cm) grommet to U-bolt | Max Outhaul | Max Outhaul | |
Main Sheet | Normal | Normal | Luff Sail in Gusts | Luff Sail in Gusts | |
Foils Angle of Attack | Front Foil | Position 3 (middle) | Position 3 (middle) | Position 2 or 1 (forward) | Position 2 or 1 (forward) |
Aft Foil - note 4 | Middle Position | 1-3 turns negative | 4-7 turns negative | 7 turns negative | |
Wand Height - note 5 | Height is measured from the sprit to the bottom of the wand | Per Skill Level: 1/4 down - Not foiling 1/2 down - Learning 3/4 down - Advanced Full down - Have fun! | 3/4 to Full Down depending on gust and chop conditions | 1/2 to Full Down depending on gust and chop conditions | 1/4 Down |
TABLE NOTES: |
1. Batten tension turns can vary depending if the sail is new or has stretched after several years of use. See Nick's video to get a sense of what to look for in the sail shape and batten stiffness: (https://www.youtube.com/watch?v=JYKXCTZDuWY) |
2. For finer tuning of the shroud and sail, see tension loads and procedure as described in the Unofficial UFO Manual. |
3. Max Downhaul Notes: Bottom of sail on deck. Don't over tighten Cunningham since it will prevent the sail from rotating about the mast. There is a limit on how low the tack can go down. |
4. Aft Foil - Aft foil has too much lift at high speeds. Trim the aft foil full negative and move your weight aft. |
5. a) Wand position is based on skill level, if the wind is gusting or clean, and if there are waves. b) In survival mode, the wand is 1/4 down to keep the bow riding above waves. c) The higher the boat rides, the more it can heel to windward and increase speed. d) High Wind: Reduce height by 6 inches (15.2 cm) to help prevent the forward foil from penetrating the back of a wave. e) If the front foil lifts out of the water, the boat will pitchpole and crash (see Crash Recovery Table). |
Checklist
- Lubrication
- Initial wand height/length
- Check rudder hold-down line for chafe
- Batten tension
- Release rig tension, hoist
- Set rig tension - w/o cunningham: 40Kg, fully tensioned 85Kg-100Kg
- Lubrication – Silicone spray in
- Wand bell cranks (“gears”)
- Rudder rake adjuster
- Mast p-tex ring
Initial wand height/length
- Wand 1ft down: not planning to foil
- Wand halfway down: learning to foil
- Wand ¾ down: advanced learning to foil or 15+kt wind
- Wand fully down: yipeeeeee!
The boat needs the lift from the foil system for breezy conditions (ie: downwind) to sail properly.
Check rudder hold-down line for chafe
The rudder hold-down line chafes significantly around the rudder head. The spot with wear is small, if it is showing damage, you can shorten it a little bit at the stopper knot that ties it to the rudderhead.
Mainsail Battens Setup
Battens come from North Sails with nearly zero tension on them. One must initially tighten them until the battens “support” themselves. Excellent video explanation here: https://www.youtube.com/watch?v=JYKXCTZDuWY
Outline:
- Baseline: battens support themselves
- 9 half turns to the gaff batten (this is the top of sail batten, angled to the corner)
- 6 half turns to the next batten down
- 3 half turns to the next batten down
As the wind picks up working on rig tension (as explained below) is usually enough. In 20+kt removing some batten tension on the top 2 battens can help.
Alternate technique:
- Baseline: remove the wrinkles
- 15 half turns to the gaff batten (this is the top of sail batten, angled to the corner)
- 10 half turns to the next batten down
- 5 half turns to the next batten down
Hoisting Mainsail
- Ensure the battens are set up
- Release shroud tension -- you can’t hoist the main with a mast under tension
- As you hoist, push battens up - hold the mast down with your foot on the mast collar, otherwise the mast will jump out of its step.
- As you hoist the final stretch, stand by the stern of the boat
- At the top, ensure you jam the halyard in the cleat at top of mast
- Coil up the halyard line, attach it to the boom (near one of the spreaders), or to a spreader if you can reach), with a bungee, velcro, or short piece of webbing.
(Early instruction videos suggested putting the halyard line in fillet at the bottom of the sail, this is not recommended as it can jam the mainsheet in the ratchet block).
Rig Tension / Tuning
Very light to moderate winds - full straight sail
This setup requires a spinlock rigsense to calibrate it. It's a good tool to have.
- Hoist the sail to full hoist, the halyard should be cleated on the mast with the sail at the very top of the track
- Attach no other lines.
- Add rig tension (on diamond shrouds) until both stays read 40kg of tension on the rigsense
- If you're getting uneven tensions by more than 5kg (batten loading will always make it slightly uneven), release the rig tension and move the final bowline hitch on the loose shroud at the black low friction ring. Repeat until you've got an even 40kg (or 5/barely reading on a PT-1) on each stay.
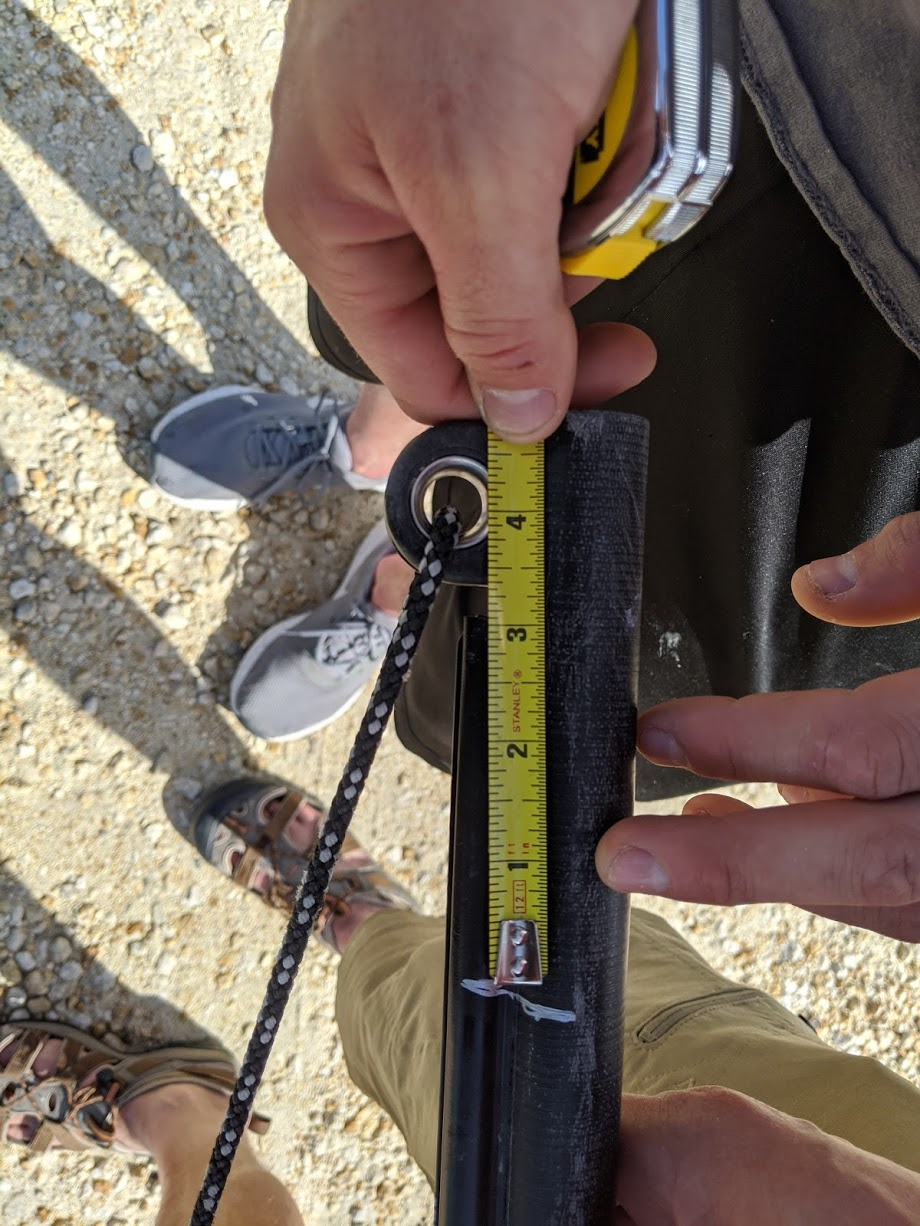
- Pull the cunningham on -- it’s hard but doable -- until you have 5.5 inches (14cm) of separation between the bottom of the bolt rope (the actual bolt rope, not the “slug” or the strap) and the top surface of the mast collar. It is a good idea to mark this 5.5 inch spot on the mast.
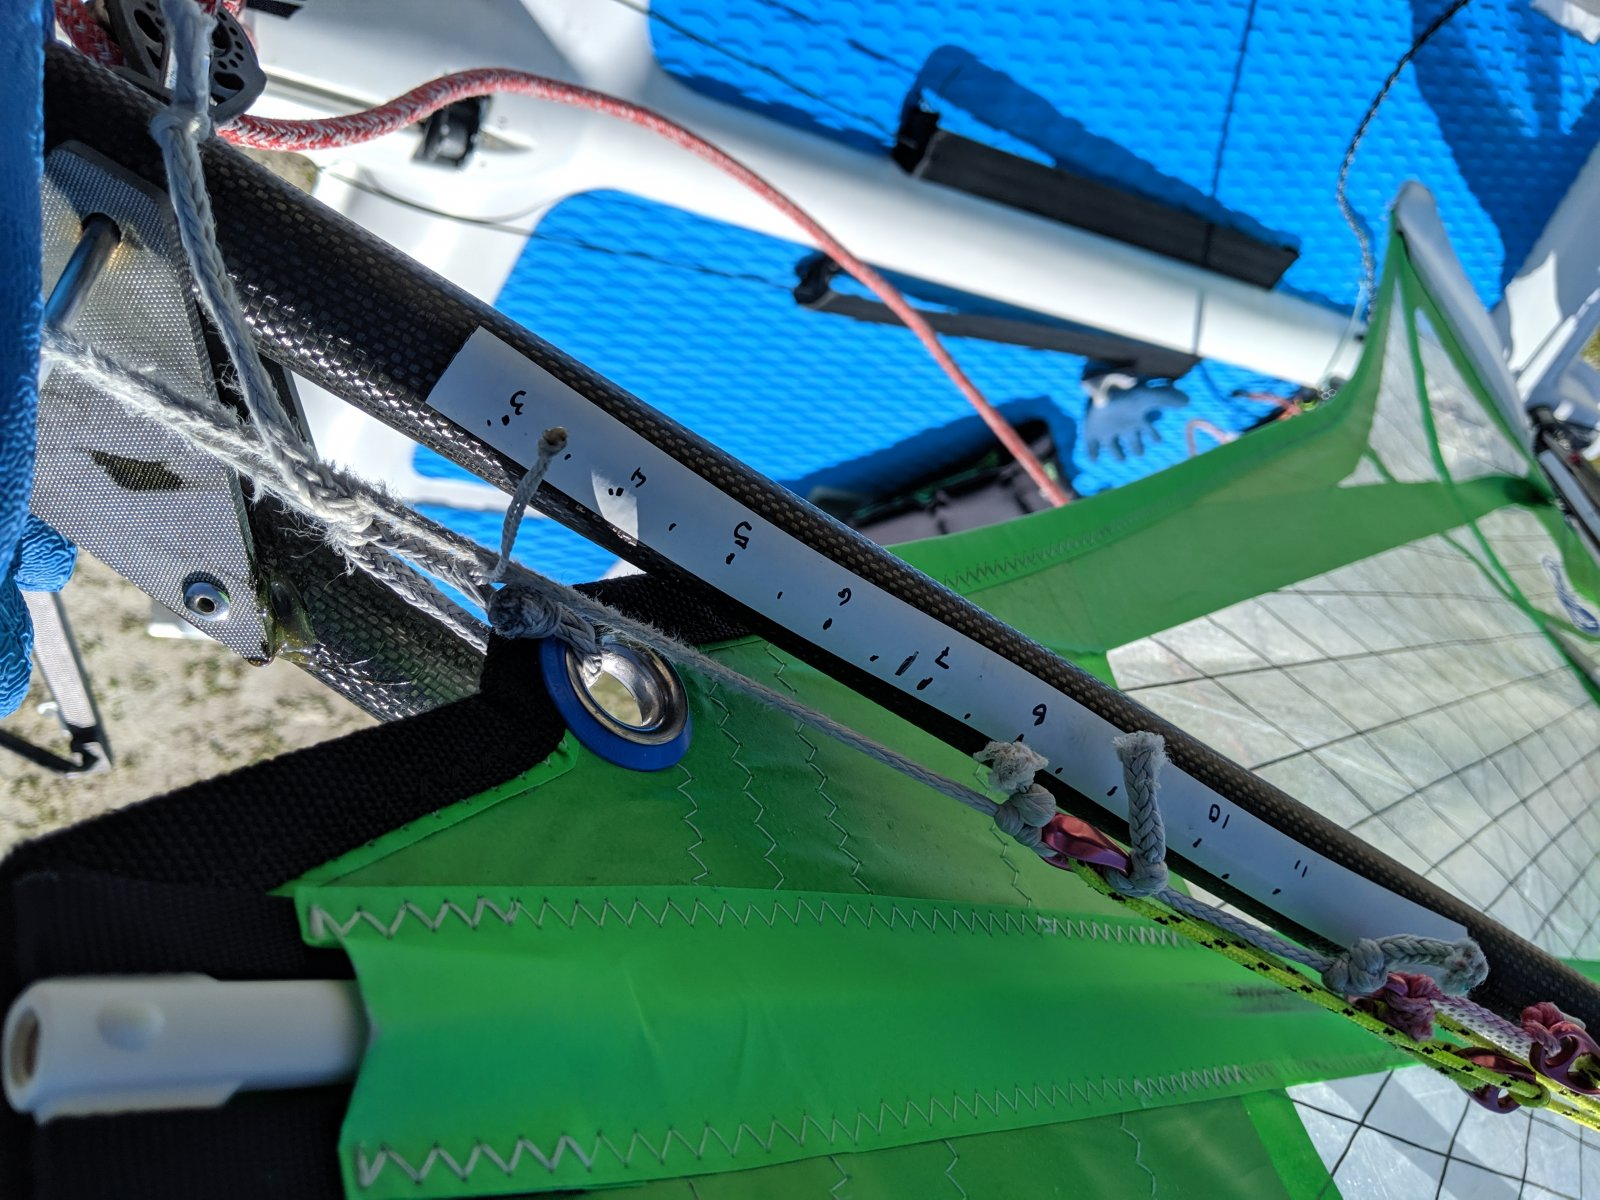
- Pull on the outhaul until you read between 85kg and 100kg (16 on a PT-1) of tension in the shrouds. You can't attach the gauge to the outhaul (no room) so you need to deduce it from the shrouds tension. On the picture below, where the boom is marked in inches from the metal “arch”, when the grommet is just shy of the 7 inch mark (there’s an extra mark there), the shrouds read 100Kg.
This results in a full sail that takes off faster in puffs and keeps you flying through lulls. Works great in the 8-12kt range.
Why this is good: Flatter sails, while technically more efficient in wind are outright disadvantaged in course-racing both upwind and down, in 8 to 12 knots at least as far as we can tell. Essentially it's better to lose some performance up in puffs with a full sail than to fall out of the sky in lulls with a flat sail.
Downside: at full straight tension, it can be a bit “binary” - full power on, or off with a narrow “some power” band. It can be hard to “calibrate” your sheeting. Pumping does not work well (sail stalls). If this affects you, try flat’n’twisted below.
To depower from there: Ease Shrouds just a tad. ADD CUNNINGHAM AND OUTHAUL
Light to Moderate Winds - flat’n’twisted sail
This is another option that works well. Needs a bit more wind than full straight sail.
Apply some cunningham before rig tension. Then rig tension, then WAY WAY WAY more outhaul. flat’n’twisted achieved (ie: see picture above, with grommet at approx 4 ½ inches from metal arch). TODO: Need tension numbers.
The twist seems to counteract the downside of a full sail with a straight leech when you're pumping. If you have an outright full and straight sail and you're pumping you have pretty high odds of stalling the sail. If you twist it, you'll keep a bubble of attached flow on the sail somewhere which can be used to reattach flow elsewhere.
Light to Moderate Winds Tuning - Lowered mainsail
With wind in the 12+ range -- recipe:
- Hoist to the top... and then drop it ~3 inches (top of sail will be ~4 inches from halyard eye at top of mast). You can mark the mast with white electrical tape.
- Before attaching any lines - put ~35Kg on the shrouds
- Apply downhaul until sail boltrope is ~2.5 inches from mast collar
- Apply outhaul until it's the sail is ~1 inch from from maxed out
- Shrouds should now read ~85Kg
The setup process is similar to the light air configuration, but the sail is lower on the mast, endplated. Because of how the mast section interacts with the sail and battens, you get a very different sail shape: the deep mid-section from the light air configuration is gone, replaced by a fairly constant curve in all battens.
Because the sail sits lower, in this setup you are somewhat limited in how much you can depower from there. If you are expecting big winds at any time in your outing, hoist to the top. When you need it you'll have the full range of the downhaul to depower.
Combine this with Low Drag foil configuration (a bit further below).
Heavy Winds - 20+ kt
This is serious business!
- Sail: bring the batten tension down to baseline, in particular the 2 top battens need to be depowered. (Remember to power them back on for light conditions.)
- Rig:
- Keep the shrouds relatively tight.
- NAIL. THE. OUTHAUL.
(full outhaul puts a lot of pressure on the spreader bracket -- you want the spreader bracket fully upgraded to latest spec…) - Cunningham to taste.
- Keep the endplate sealed (the bottom of the sail must close the gap with the deck)
- Wand: pull it up about six inches
- Main Foil: forward pin groove
- Rudder: minimum rake, to the point where the tiller almost touches the wheel
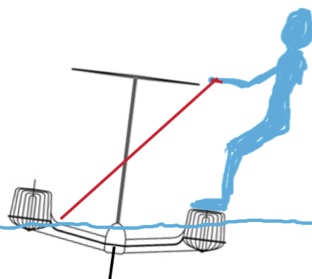
- Going for peak speed. Try to hold about 7 degrees of weather heel and just stay laser focused on one point you're steering towards.
- Try not to use the tiller at all. Use sheeting and body motion. Steering is slow and unstable. The boat is a missile and you are the guidance system.
Choosing Rudder and main foil Rake
Baseline:
- 10-12 knots wind
- Main foil: use the middle pin groove
- Rudder rake: middle of the range (see “Tracking Rudder Rake” section)
Generally, if the boat ‘drags the stern’ increase rudder rake by a half-turn on the wheel. If the boat stern lifts before the bow lifts, increase by half turn. Experiment :-)
Above 15kt
- Main foil - one groove ahead of the middle groove
- Rudder rake - reduce rake by 4 half turns (?)
Always remember - you also control AoA with your body weight!
Marginal foiling conditions
- Main foil - one groove aft of the middle groove
- Rudder rake - increase rake by 4 half turns (?)
Low Drag Configuration
Works from about 12knots onwards; takeoff needs more effort (sit at the far back, work it… scuttle forward a bit once you’ve taken off). Achieves more stable flight and higher speed.
- Mainfoil to forward-most pin (pin 1) or one back (pin 2).
- Rudder raked forward to match mainfoil.
- Wand fully down, or close to fully down (ie: if there's chop).
Advanced Topics
Tuning, fixing, diagnosing oddities
Hold Outhaul Bungee while Rigging
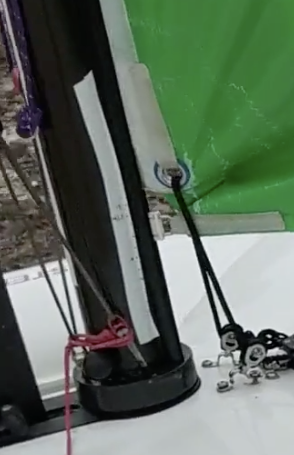
The outhaul bungee can make it really hard to put the outhaul on. You can put a kink on the line to hold it (pic below) and you can put the end of the boom on one shoulder while you attach the outhaul.
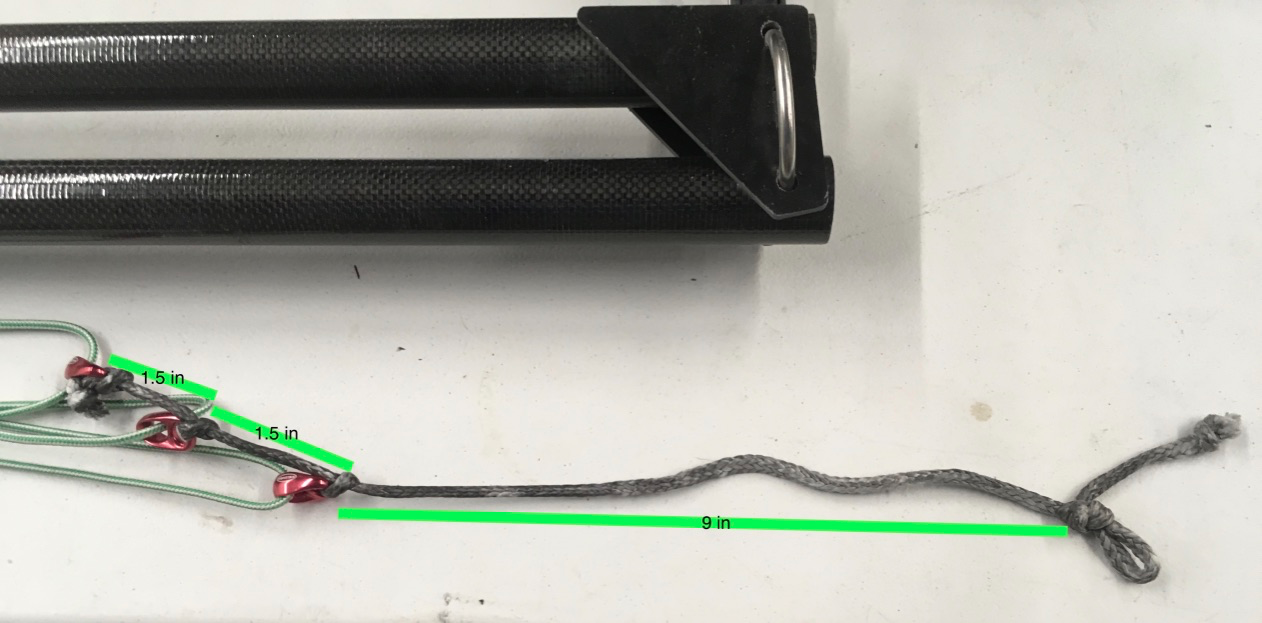
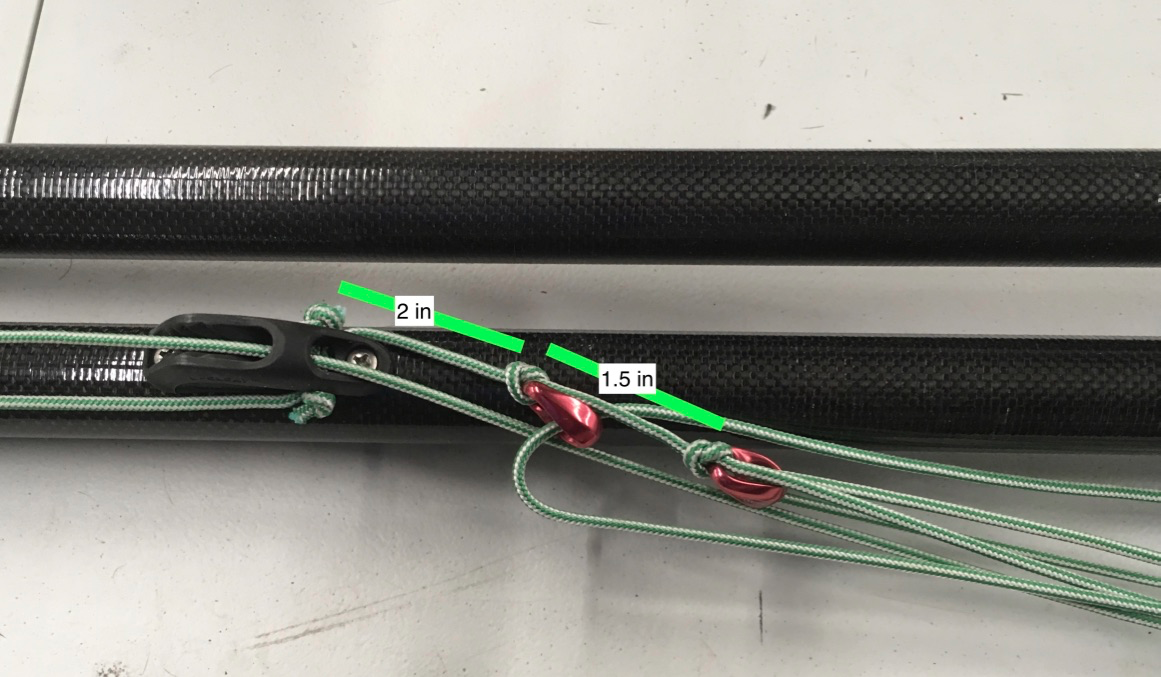
Outhaul line lengths
After sailing a bit, a new outhaul will stretch and the shock-blocks will settle in. Check the distances between parts, as below:
Carrying stuff with you
There isn’t much room, and zero storage space on the UFO. Some gear we need on the go, and some comforts we just want -- sailing is a pleasure after all. Some ideas below.
Ropes, paddles
You can use small bungees or velcro straps to put a telescopic paddle, or a painter, on the wand crane. Place items as close to the main foil as possible. All forces, weights, etc increase towards the forward end of the crane arm.
Do not attach things to the tiller. It’s already prone to getting tangled as it is…
Water Bottle
Bungee with Gatorade bottles -- the groove in those bottles is the trick
Mesh baggie
You can add a mesh baggie just behind the forward crossbeam. Sunscreen, muesli bar, water can go there. To put it in place, drill one hole on the lip join of the hull, forward of the main crossbeam. You will need to seal the hole with epoxy. All the other hooking points are standard holes or fasteners.
The baggie is from a pair of water shoes, I added a rope which I glued to the baggie with a special epoxy glue for sails.

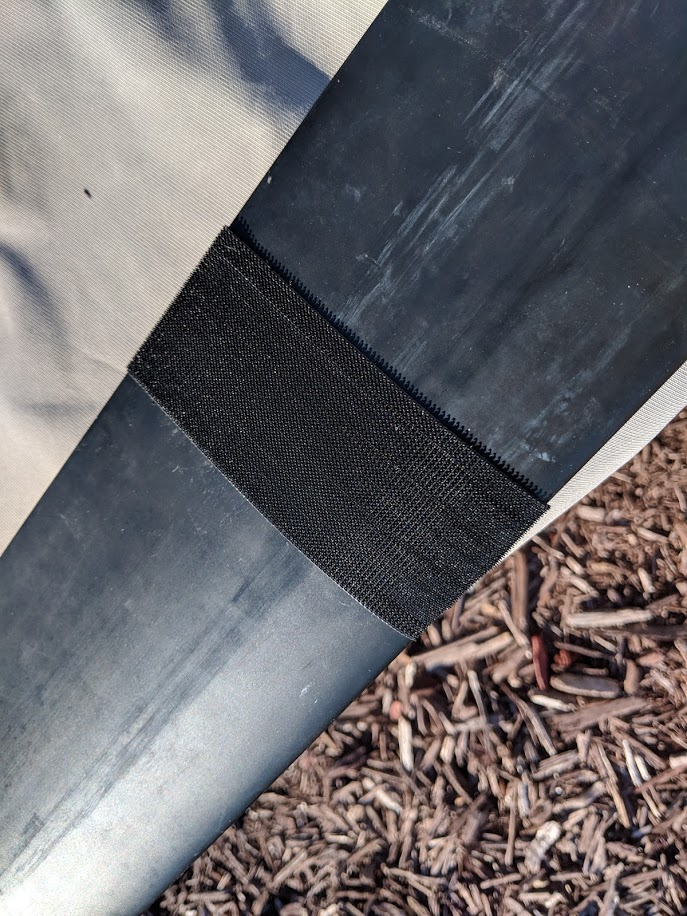
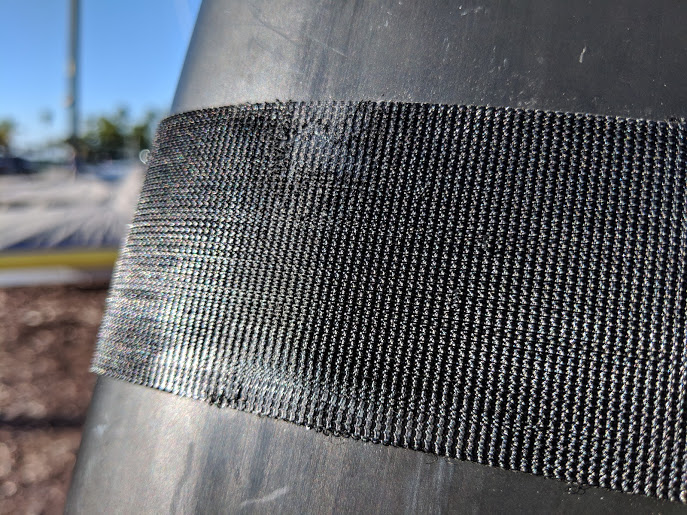
Slop in Main Foil
It is typical to have slop on the main foil. The bottom of the foil trunk is not tight with the foil. A very effective technique is to use Velcro tape.
- Obtain 3M black velcro self adhesive tape
- Cut a length of velcro tape that is just shy of wrapping the foil vertical
- Separate hook tape from the loop tape. We will only use the hook side.
- Find on the foil the area where the bottom exit of the foil trunk rubs. It’s usually worn. Clean it (alcohol, acetone) in preparation for a contact adhesive.
- Stick the hook tape on the foil vertical, putting the ‘ends’ at the fore end of the foil. It is ok if there is a gap.
- Put the UFO where you can lower the foil completely, while having the boat tied up (ie: on a dock). The foil will not lower completely, the velcro tape makes it too ‘thick’. Try to lower it anyway, then pull it up.
- Look at where the velcro tape shows damage. “Shave” the hooks in the marked areas with a sharp knife or razor.
- Repeat until the foil just barely lowers into place.
This results in excellent snug fit. Unfortunately, it is short lived -- usually lasts around 10 outings. Once it is worn out it can make lowering the foil difficult so be prepared to remove it.
Freshly installed velcro tape - pic below
Velcro tape trimmed to fit in the foil trunk super snug - below
Slop in Rudder Rake
The rudder should have little to no slop -- in particular it should not have play fore-aft. If you have a lot of slop, you get “the jumpies” - you hear and feel a clunk, and the pitch angle of the boat changes dramatically. More generally, the tighter your rudder setup, the more control you have.
We look at
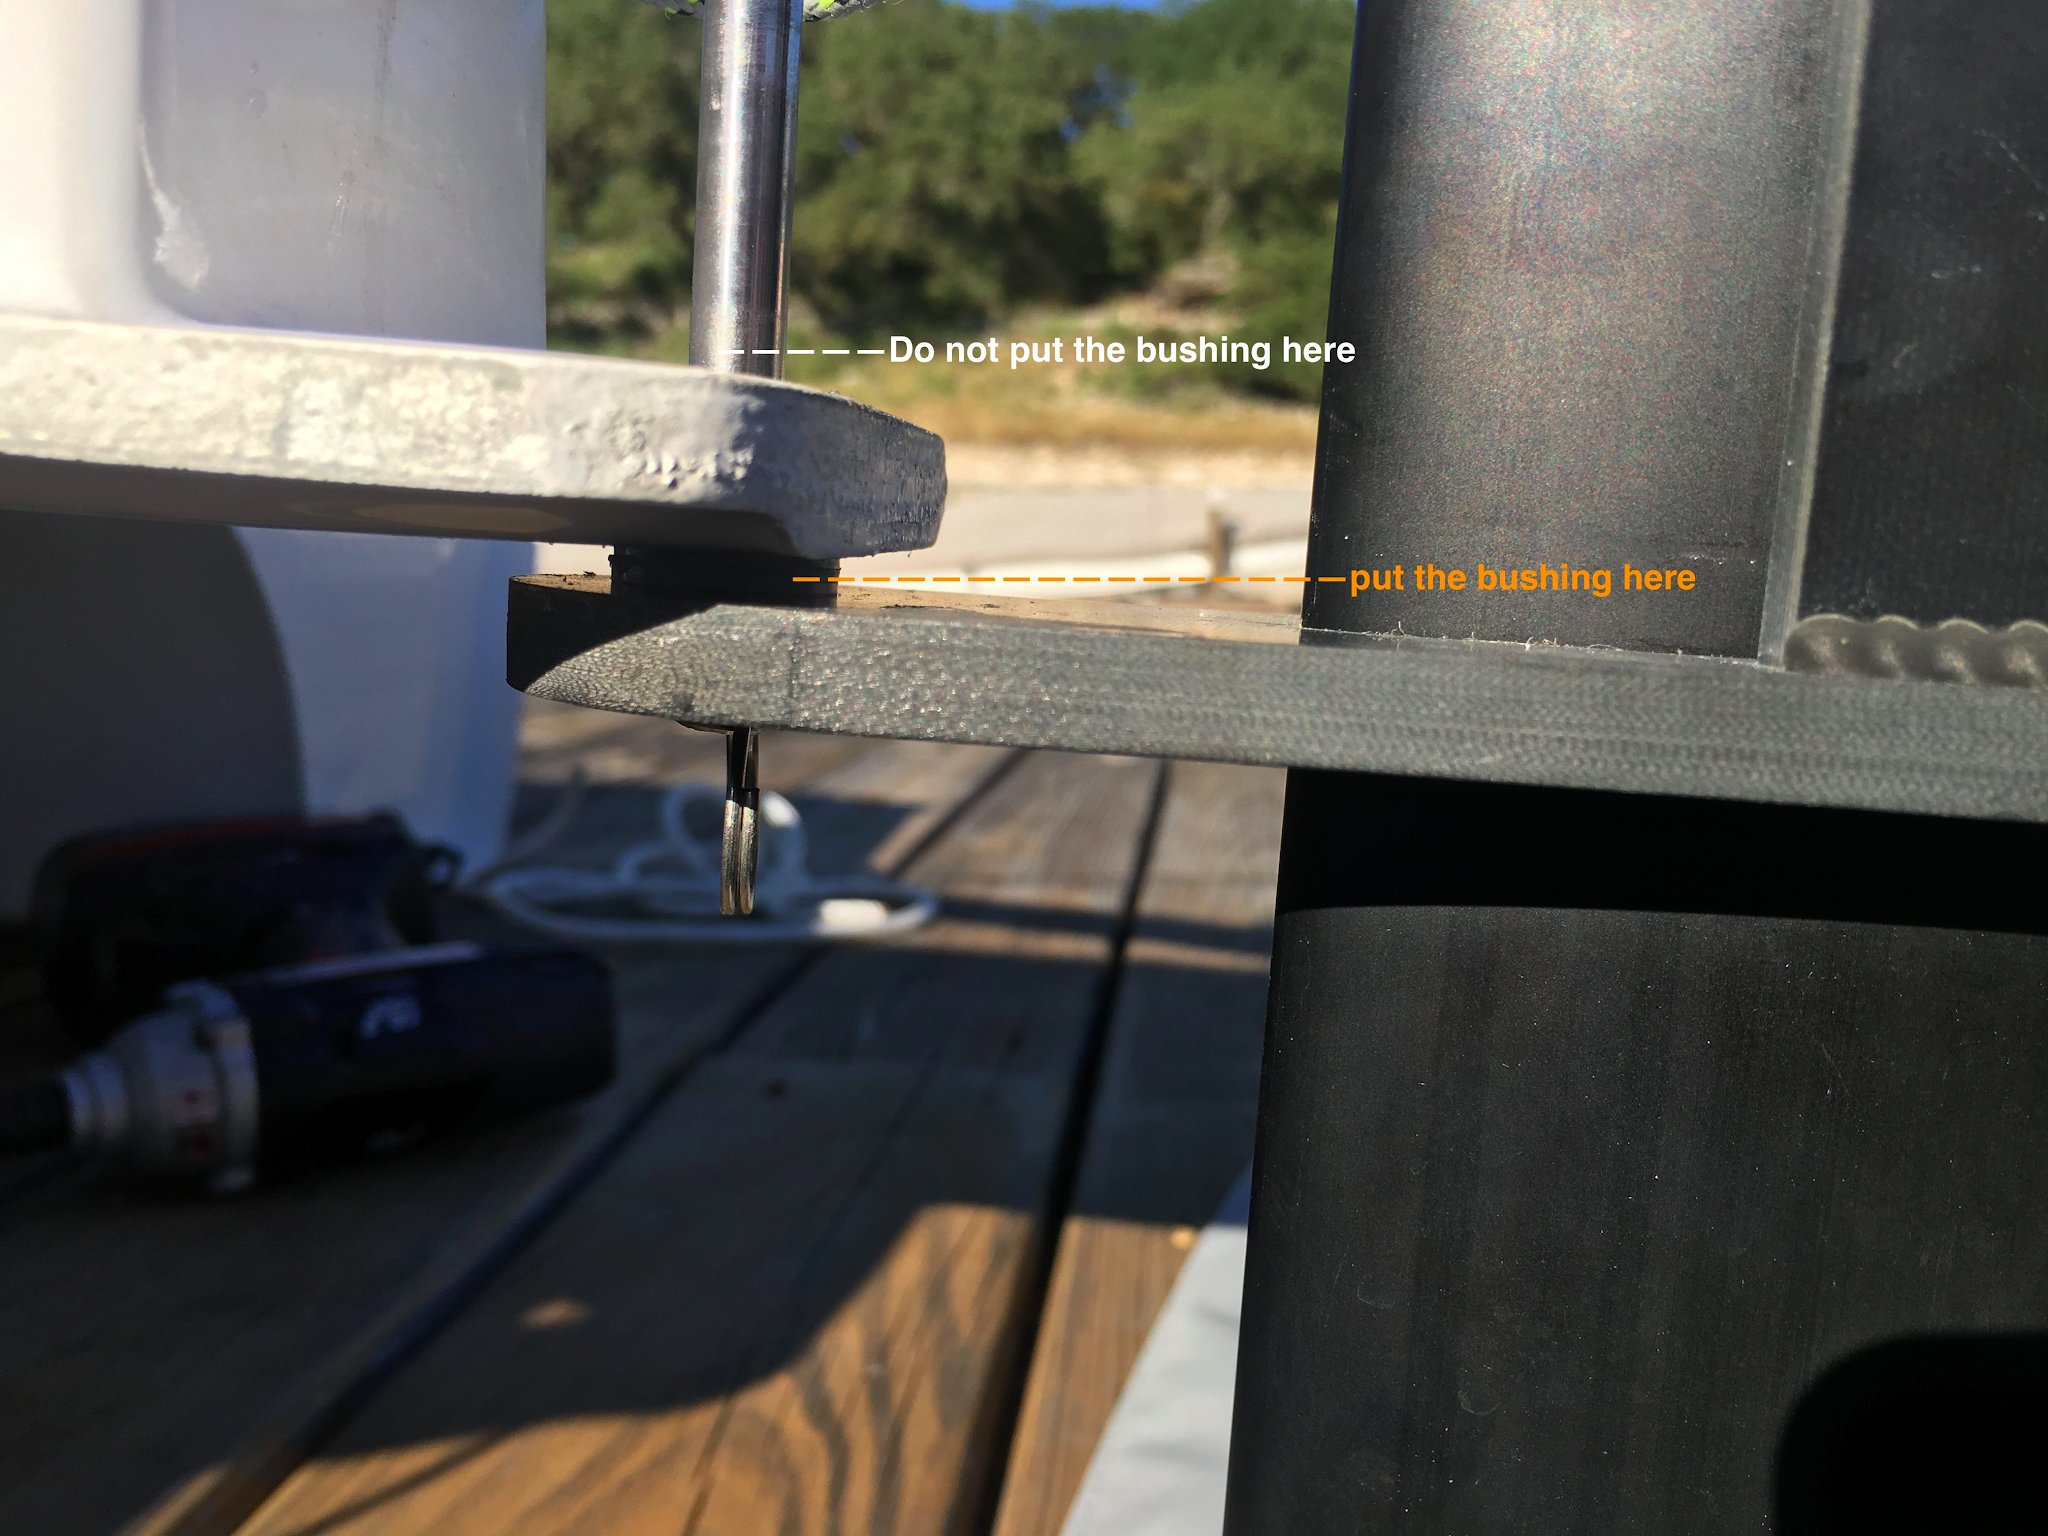
- Is the lower gudgeon in good shape and tight? If not, you might need to replace the plastic bushing (see parts list at end of this document). If the hole in the lower gudgeon is too large for the bushing, that might need repair/rebuild.
- Is the rudder rake adjustment wheel “snug” in its place? If not, you can try adding spacers at one end of the wheel -- layers of Tyvek tape for example. Make sure it still turns under some load.
- The rudder rake adjustment wheel contains a nut inside. It is important that the nut is firmly in place and does not have slop. If there’s slop, see the instructions below...
Fixing the Rudder Rake Adjustment Wheel
- Remove the wheel from the boat
- Get a spare ¼-20 Bolt and liberally grease the end and threads
- Insert the bolt into the wheel in a direction that pulling the bolt pulls the nut into the center of the wheel. Thread it into the nut so that its threads are fully engaged in it. Maintain slight tension on the bolt to hold the nut toward the center.
- Inject epoxy (West or Plexus) into the hole in the other end of the wheel and let it cure. I used West 105/205, slightly thickened to minimize any chance it would find its way into the threads.
- Once hardened, remove the ¼-20 bolt. Drill out the wheel from the bolt side with a 3/16 drill bit, being careful not to drill the threads in the nut. Drill out the other side of the hole (the epoxied side) with a ¼” bit, proceeding slowly and stopping as soon as the drill bit touches the nut. The ¼” bit will follow the ‘pilot hole’ you established with the 3/16” bit.
- Re-assemble the pitch adjustment wheel and rod.
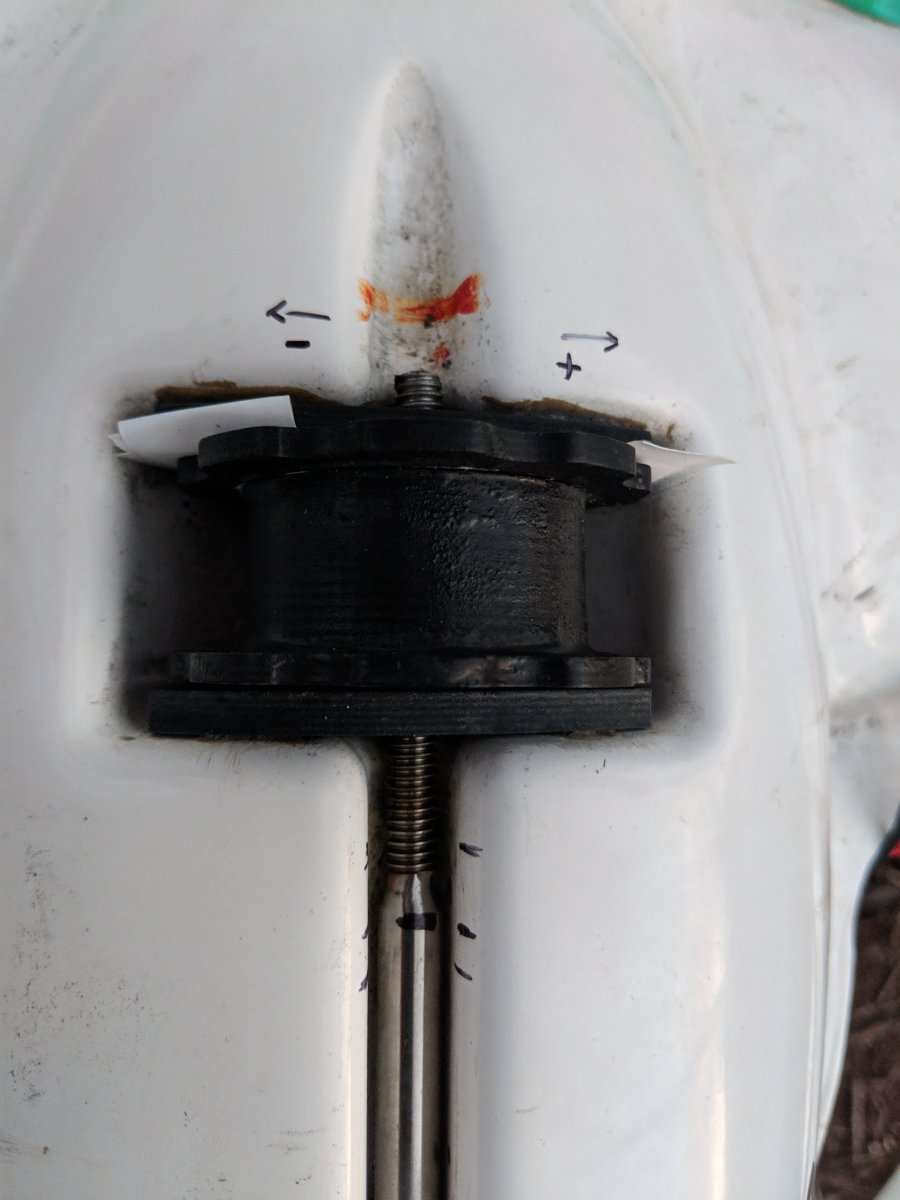
Tracking Rudder Rake
With a sharpie, mark a point in the rudder rake adjustment rod, and mark the hull at max/min and mid-point. These reference points are good for a quick adjustment when you are out in the water.
It’s easy to forget which direction to turn the wheel. You can add + / - markers to the hull with a sharpie.
Rudder Handle & Hold Down Line
The small eye on the rudderhead often has a sharp border as it comes from the factory. This chafes the rudder hold-down line quite a bit. The sharp border that causes the most damage is on the underside, as the line pulls forward. You can sand it, or file it, and this will significantly improve the life of the line.
Check for chafe anyway on each outing.
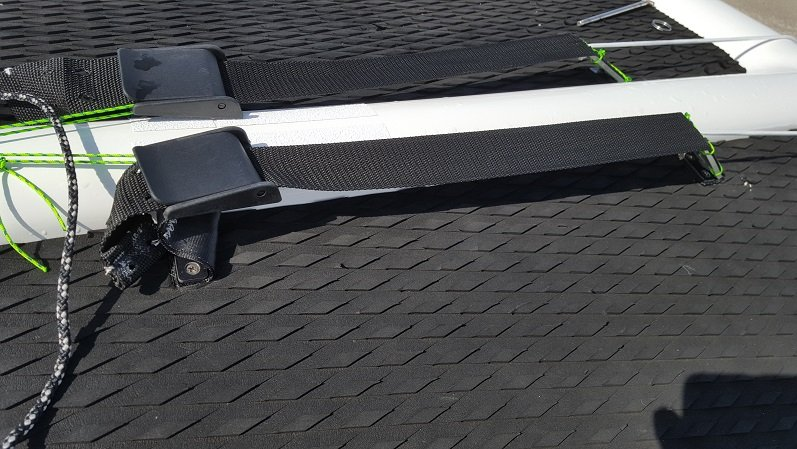
Adding a rope handle to the rudder makes it easier to pull it up. See picture below. Make sure you add an oversize stainless steel washer. Put the large washer under the knot, smaller washer above the knot, making a sandwich. The rope handle can slant or bend the washer slightly. The standard washer is just the right size to prevent the rudder from sliding down, so a minor slant or bend will have you swimming for your rudder.
Do not tie a handle to the hold-down eye, its attachment is not designed for the forces involved, and you will pull it out of the rudder.
If the hold-down line is a bother... you can cut the eye open (see pic below) and use a much shorter line, just to hold down the rudder when is fully down. You need just enough slack to put the line fore or aft of the foil vertical.
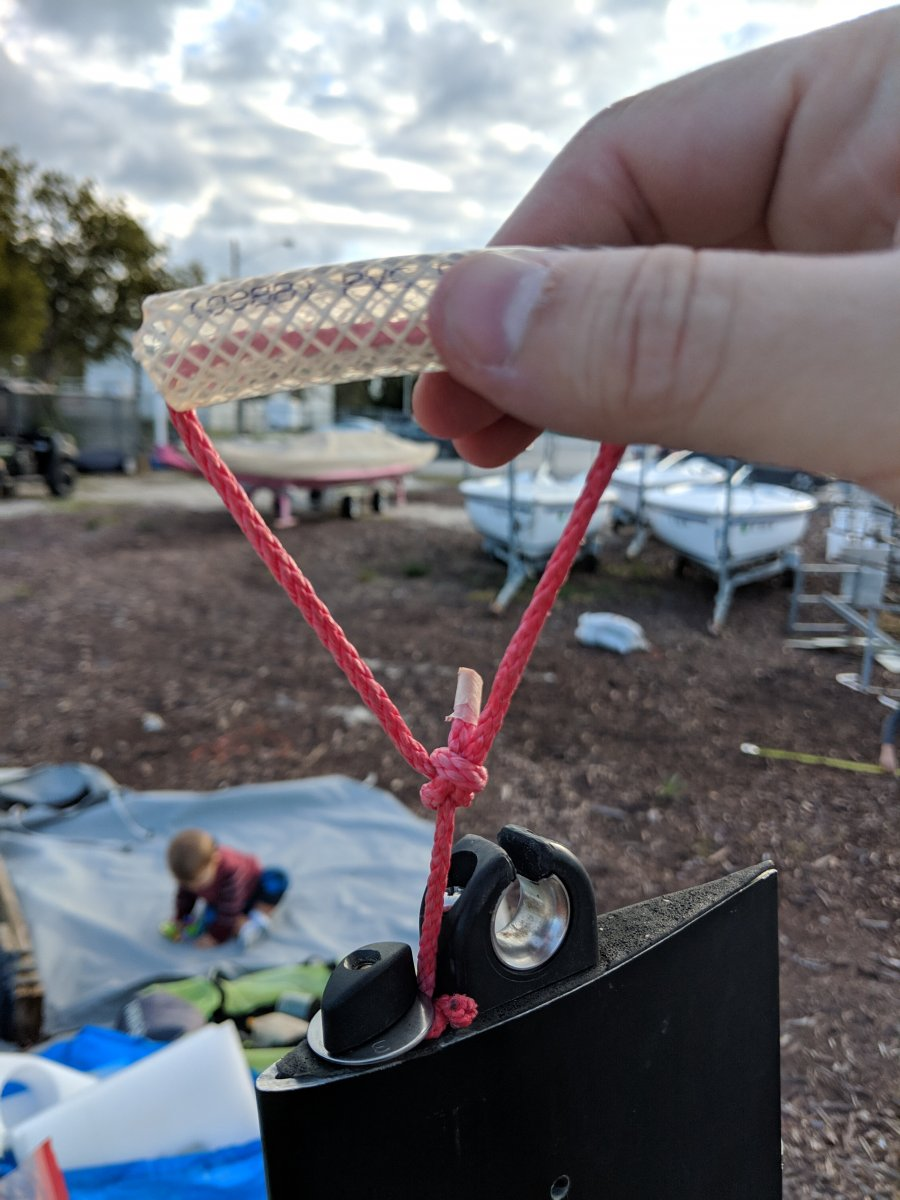
Here is a different handle option -- apparently an “M5” part from Walmart:

Main Foil Handle and Shroud Hang
There is an alternative system to pull and keep the main foil up.
TODO: Add more details / pic
Re-tightening the main foil gates
Applies to the the 2nd generation strut hold down system, where there is a ‘gate’ on either side of the foil that pivots in from the rear and traps the quick pin into one of five groves below the gates.
The gates are secured to the hull using bolts with locknuts under the deck, in the mast pod. Over time, the gates will loosen up, and you will find them opening when you are low-riding, or when you capsize or crash. Re-tightening is fairly simple. Get a ⅜” wrench, remove the mast, and feel for the nuts with your finger. Place the wrench over the nuts and use a phillips head screwdriver to tighten the corresponding bolt. Tighten until the gate moves with some resistance. Repeat for all 4 bolts. The forward nuts are tricky, but you can get a finger into the strut groove in front of the foil and push the wrench onto the nut.
Foil Disassembly
First, apply lubricant (silicone spray) and allow it time to work. If needed, use a mallet gently.
Mast disassembly
When mast sections get stuck and refuse to separate, you can use the wrench strap trick. Get wrench straps. The product linked here has 2 straps, big and small, the small ones fit the mast diameter best, so you might want to order 2 pairs. Just one pair can probably be made to work, we just have not tried it https://www.amazon.com/gp/product/B00K92810A/ref=ppx_od_dt_b_asin_title_s00?ie=UTF8&psc=1
The wrenches are rubber straps. Attach the handles so that the normal force is not near the sail track and the rubber strap provided a large tangential load via friction. If not done correctly, the wrench handle will crush the sail track.
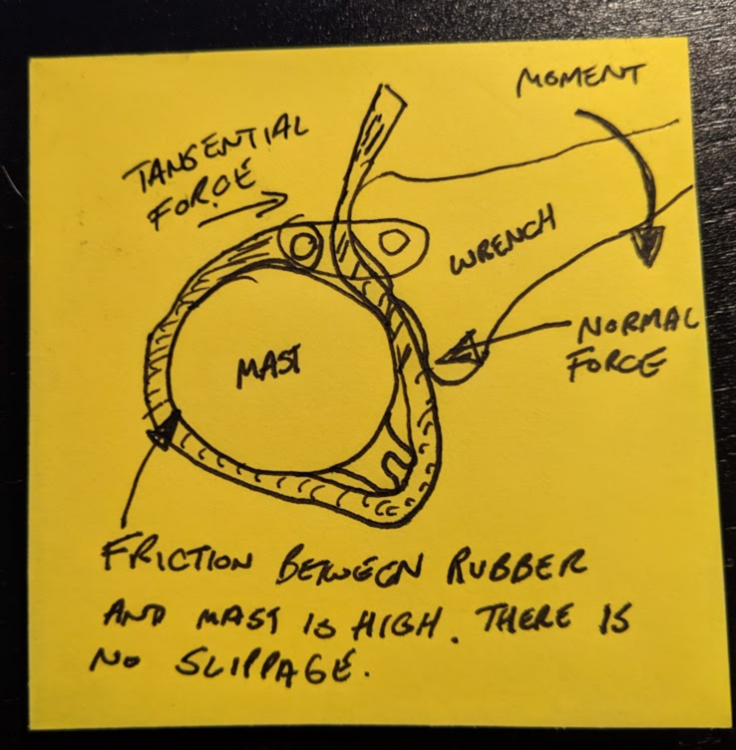
Above is a photo and a sketch. Two wrenches are needed. Set the wrenches to oppose each other so that the mast pieces can be twisted. While one person twists, the other two people grab the mast and pull along the axis. You need 3 people - one pulling at each end, and one using the wrenches to apply torsion, occasionally changing rotation direction. It should come apart very quickly.
Adjustable straps
Some people want them short, others want them long…
Foil Pushrod - Re-straightening
The foil pushrod -- which pushes the main foil flap for ride height control -- is easy to bend. Trying to straighten the bends turns them into kinks, and it can get jammed in the narrow hole it travels through. It is a good idea to store it in something that provides protection -- the foil itself can do it, but it leaves an end exposed.
Keep it straight! A PVC pipe is a low-cost alternative for keeping your pushrod straight. Store it in the PVC pipe, keep it in place with masking tape.
You can remove the kinks with a sandwich press, locking pliers, gloves and a wood block. Note that this will probably weaken the pushrod slightly every time you do it, and might weaken its rust protection.
- Drill multiple holes, as holes are worn out, enlarged, switch to an unused one.
- If you have soft wood and hard wood, use soft wood first, then hard wood block
- You'll make multiple passes - work in both directions of the rod, and work almost always pulling . Or pull-rotate. Where you have a kink it'll have a hard time going through the wood. Grab the rod from both ends (careful! hot!) and run the kink through the wood block many times, alternating which side you pull from. In a few cases you cannot avoid pushing - careful and gentle, the warm metal bends easily!
- You can only warm about 15cm at a time (5inch) so work in that 15cm section, and then leave the next section to warm up. I give it about 5 minutes to warm up
- It works really well to do this near the foil vertical, and to insert the rod in the vertical while it's still warm.
Of course, you can get a new one from Fulcrum as well.

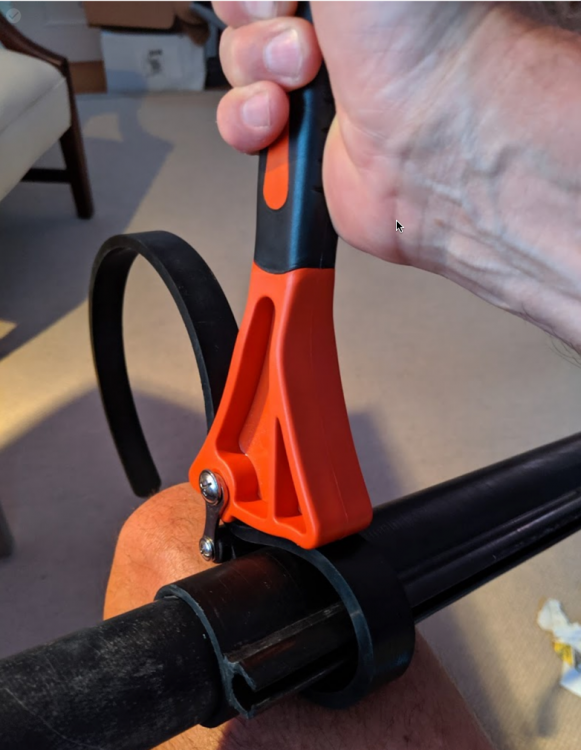
Aft Adjustment Rod - Re-straightening
It's not IF you run aground, but WHEN...
The aft foil is lower than the front foil and will typically hit bottom first due to the length and also because of the weight at the stern. The rod that controls the aft foil rake is a hollow steel tube and is designed to crumple to avoid damaging expensive boat parts. This rod will buckle if the aft foil hits the bottom, even at low speeds.
To repair, remove the rod from the stern. This may require two people: One person pushes down on the bent rod while the other person pulls from the stern. The rudder pin can be inserted into the rod eye to provide a handle to pull.
Manually bend the rod to remove most of the kink. Roll the rod on a table to see the bends. Manually bend until the "waves" in the rod are less than 0.1 inches (2.5 mm).
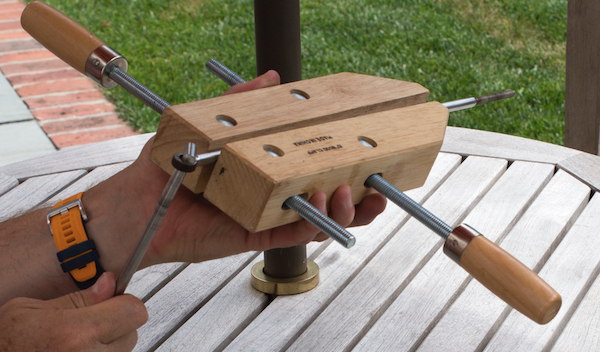
To remove these waves, use a wood clamp to straighten the rod along its axis. Use the rudder pin to rotate the rod while in the clamp. After a turn, tighten the clamp more. After about 5 turns, the rod will be almost perfectly straight again.
The clamp in the photo can be purchased at: https://www.amazon.com/gp/product/B0006A4A5U/
Boat Fittings - Inspection and repair
With heavy use and sailing in strong winds, fittings may become loose over time. Inspect deck, boom, and mast fittings from time to time. On rare occasions, you may find that a screw has become loose. Simply retighten. A simple inspection can prevent major problems while on the water.
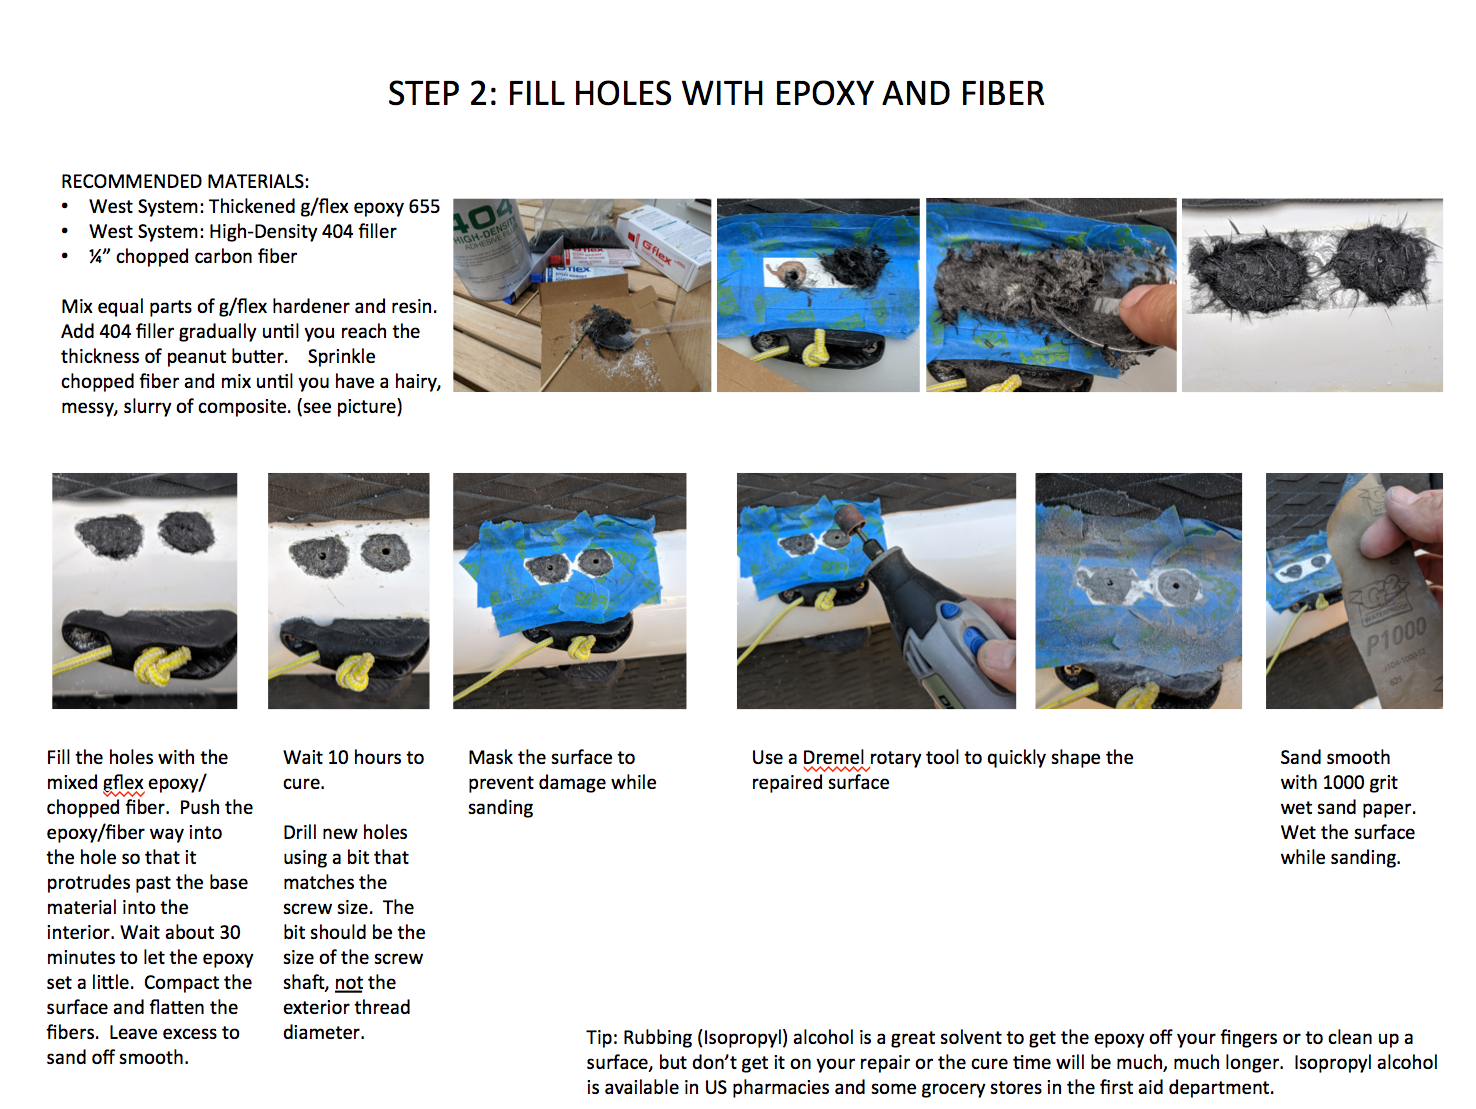
In very rare cases, a fitting may have pulled from the composite base material damaging the hole. Below are instructions on how to repair a damaged hole.
Sailing Technique
Righting tips
- Get the latest righting line setup, allows you to right the boat “from the water”, without climbing on the hulls. Except when it turtles.
- The hulls are extremely slippery! Consider wearing booties
- Also consider not wearing booties as they interfere with the hiking straps.
CRASH RECOVERY TABLE
Capsize Mode | Image | Condition | Cause | Avoidance / Recovery | Hazards / Comments |
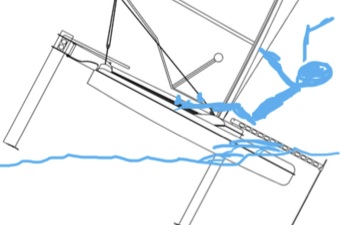
Pitchpole | Bow of the boat submerges while moving and the boat flips forward. | Too much weight forward. Rogue wave or boat wake. Front foil breaks the water surface due to improper foil trim or going through a large wave. | Shift weight aft. Avoid hitting waves head-on and be aware of large wakes. Adjust the wand to fly at a lower level if there is chop or waves. | Rapid deceleration will launch your body forward. Your feet may stay stuck in the straps and release after you capsize. There is a chance you will land on the wand and snap it. If you ever sailed a catamaran, then you know all about the Pitchpole. | |
Flip to Stern | Hull flips to aft | This happens during rigging or rudder adjustments while in irons. A strong head wind will also push the sail aft adding to a heavy stern condition. A rogue wave can lift the bow and compound the problem. | Lay flat on your stomach while working on rudder height or while fixing a fouled main sheet. Your feet should be extended beyond the front of the deck. | This flip is really embarrassing. Your ego will be severely hurt as you flip the boat like a noob. This flip will most likely occur when you are showing your new UFO to your friends and family who are onshore watching. Expect extreme ridicule. | |
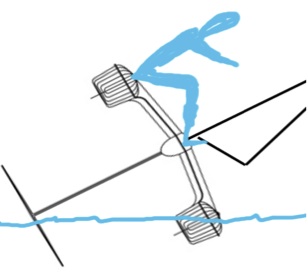
Flip to Leeward | Hull leans too far to leeward | Over-powered by a strong gust or general conditions. Weight too far inboard. | Luff the sail. Head more into the wind. Hike out more. Consider re-rigging the sail for heavy wind conditions. | When capsizing, your feet may be stuck in the straps until you flip over. You will be thrown forward on top of the sail. Flipping-to-leeward may result in turtling. | |
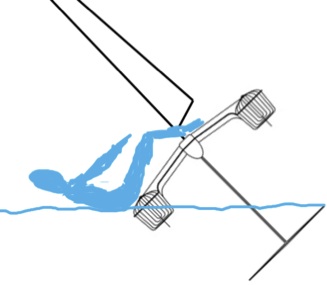
Flip to Windward (Most Common Crash) | Hull leans too far to windward and your body hits the water | A lull in the wind. Too much weight outboard. Flying too high for light air conditions. | Look for lulls on the surface of the water. Stage 1: Move weight in if possible, and power the sail. To get more power, often you have to ease – because your sail is stalled. It's hard to know whether to ease or trim, so ease/trim in short but-not-too-fast cycles. With some experience, you can start to recognize whether you're powering up on the ease or on the trim by the force on the mainsheet. Stage 2 - if you've fallen in a wind-hole and cannot recover, stretch out, put your torso & PFD in the water. Very counterintuitive. The PDF will provide flotation and the drag will stop the boat – so the foils will stop lifting. Don't let go of the mainsheet. The boat will come to sit flat on the water, pulling your head/torso out of it. | If the boat does flip to the side, your body will hit the water first and stop the boat. The hull will roll on its side and you can then slide out of the foot straps. | |
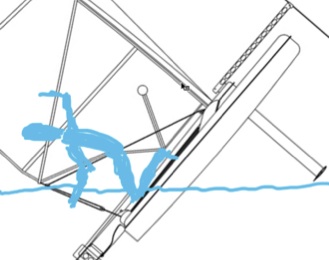
Turtling | Hull flips up-side-down | You are thrown from the boat, and then while swimming back, the mast sinks completely. | Always use the foot straps and stay with the boat. Once turtled, it can be very difficult to right the boat if the mast is touching the bottom. Be aware of currents due to rivers and tides. Align the boat to point into the current. Stand on a hull, pull on the righting line. Then, LEAN BACK WITH ALL YOUR WEIGHT. As the boat rotates, grab the front foil strut for more leverage. The boat will very, very, slowly flip. Once the boat is on it's side, re-align the boat with wind rather than the current to help make it easier to flip. | It only takes minutes for the boat to turtle. QUICKLY get back to the boat. If you are separated from the boat, swim to the closest part of the boat. That might be the mast and not the hull to keep the boat from turtling. Try to avoid turtling since it will take a lot of your energy and time to right the boat. | |
Water Hauled | Similar to Flip-to- Windward, but boat does NOT capsize. You are stuck in the straps with your body hanging off the stern. You will be water-hauled by the boat. | Flying at maximum height and tipping to windward at high speed. At high speed, your weight is aft so you are closer to the stern. The high impact will sweep your body from the side of the boat to over the stern in the blink of an eye. | As your body hits the water, induce a flip by pushing the tiller leeward so that the boat capsizes to avoid being water-hauled. It is easier to flip. If you are water-hauled, stop the boat by grabbing the rudder (you won't be able to reach the tiller or mainsheet) and turning the boat into the wind. Once the boat has stopped, your feet will still be stuck in the straps. You will need to swing yourself to the side of the boat, and with all your strength, hoist yourself on to the deck. | DON'T PANIC! Hold your breath and turn the rudder and stop the boat. After you have fallen off the boat, it is possible that the boat will continue to sail at low speed (<2 knots) if the main sheet is fouled under the tiller. You can be dragged in the water by your ankles for some distance until you stop the boat. | |
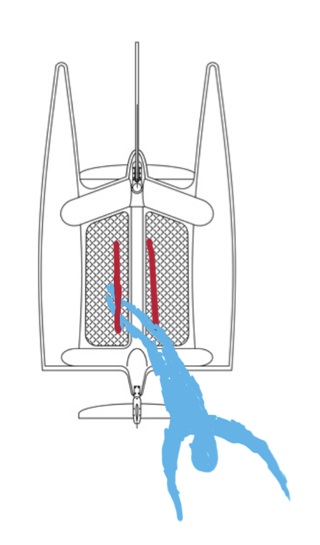
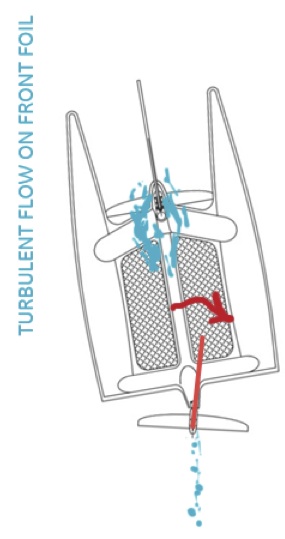
The Skid | Front foil skids to leeward. Sail can catch more wind as the boat bears-off | Water flow across the front strut separates due to seaweed (particularly eel grass) wrapped across the lead edge. In very cold water, the foil can cause cavitation which will also lead to a skid. | Pull the tiller toward yourself to steer into the skid. The water flow should self-correct. | The skid usually happens at higher speed. If the water has a lot of seaweed, expect frequent skids. Remove the seaweed from the foils by pausing from time to time and pull it off by hand. |
Light wind tips
- Weight forward. Try to get back of hulls out of water
- Downwind sail all the way out. Weight forward
- If you have no chance of foiling, proven: slide wand up wand, downwind- main foil all the way up.
Tacking - Heisman Tack
Watch the Light Wind Tack video by Dave https://www.youtube.com/watch?v=E6kArw1WaJM and also https://www.youtube.com/watch?v=XYGGrEylqCI . This tack is tricky to complete gracefully.
- Gain speed, sit on windward stern
- Turn, stay sitting on the corner, after the sail comes across, reach your hand up and push the sail the rest of the way across you then out as far as you can. It helps to get on your knees for this. You should keep control of the tiller.
- If in this process the boat stops or starts sailing backwards…
- Push the sail fully out
- Turn the tiller 45 degrees, in the opposite direction as you are steering backwards
- Once you are pointing in the right direction…
- You must still be sitting on the old corner at this point -- Change sides, move weight forward
- Grab mainsheet, swift pull to pop battens.
- Light pumps on the mainsheet until you have some speed.
(When the boat is stopped or slow, the mainsail overpowers the rudder easily, so you can’t trim the main yet, it would put the boat back in irons.) - Trim the sail to new direction
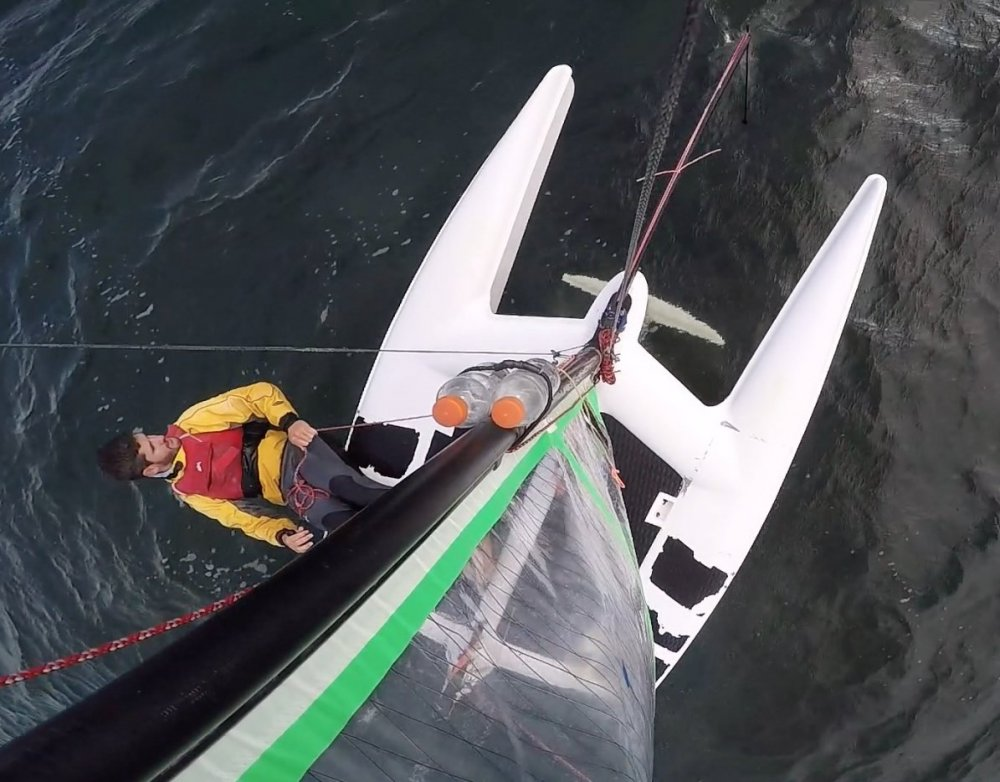
Getting Started Foiling
Watch those Fulcrum Videos :-)
Advanced Foiling
Feel The Mainsheet
By Nick Burroughs
The "feel in the mainsheet" technique is really a key part of getting a UFO flying around on all points of sail, so here's an explanation. Simply, I mean the amount of load you "feel in the mainsheet," but I also mean "when in doubt, let it out," which I'm sure you've all heard before.
In many situations on the UFO your ideal mainsheet trim is within about 6 inches of ease from the point where the load in the sheet drops off precipitously. You'll see me constantly easing and then retrimming the sheet as I foil, to make sure the point where it goes light is nearby and then trimming in a little bit to the ideal spot.
There are two times where "feel in the mainsheet" is really important while the sailing UFO. The first is getting the boat launched onto the foils, and this becomes particularly important when the breeze is marginal and your margin for error in take-off maneuvers is much smaller. It's extremely important to keep the boat flat, or slightly heeled to windward when trying to get launched. That means easing a lot of mainsheet. Some folks have eased the mainsheet to the point where it goes light, thought they were very undertrimmed and then over-trimmed the sheet to compensate, preventing the boat from getting up in the air. What you really want to do is ease the mainsheet as far as you have to, to keep the boat flat, which generally means easing it until it goes light and then trimming in a little bit.
The other point of sail where "feel in the mainsheet" drives decisions, is when trying to sail max-VMG angles downwind. When you're sailing such low angles, it's easy to get over-trimmed, lee-stall the sail, and if you don't catch it quickly, deathroll. To avoid all that, you want to be continually easing your sail to find the spot where the mainsheet goes light and then trimming only a little bit in from there. In practice downwind, I ease to find the light spot, retrim a little, then ease and bear away to sail lower, keep easing to find the light spot and retrim. If I feel the boat slowing or stalling, I may head up a little to keep it foiling and stable. If you go way too low, you'll find a spot where the apparent wind is really far aft and you can't ease the sail out far enough to find the light point. At this point you're in a very unstable mode (you may have already capsized). To get sorted you should head up, heel to weather and get back into the stable, fast, higher-angle downwind sailing mode. You can work lower once you're stable and ripping. Check the Downwind section below for more details on how to make max-VMG downwind. The "feel in the mainsheet" is just another piece of information to help you keep it in the groove.
Finally, I should note that the "feel in the mainsheet" trick doesn't work nearly as well for upwind angles. "When in doubt, let it out" is still good advice when sailing any boat on any point of sail. However, the point where the mainsheet goes light is significantly more undertrimmed upwind, so while you can ease to where the sheet goes light and then trim in as a recreational foiling mode or a step on the learning curve to sailing faster upwind modes, it is not the fastest way around the racecourse. The one caveat is that in marginal foiling conditions, being overtrimmed is death, so proactive easing and sailing lower angles can work upwind when you can barely foil. But when you get locked into "King Crab mode" in moderate breeze and start really ripping upwind, you actually want to be trimming on extra mainsheet, pulling the boom down and increasing leach tension to increase speed. You can overdo it and stall, but a quick ease and/or bearaway will have you up and ripping again. For more details on "King Crab mode" and upwind sailing in general, see below...
Advanced Upwind Modes
“King Crab” and “High Altitude - flat”
Downwind
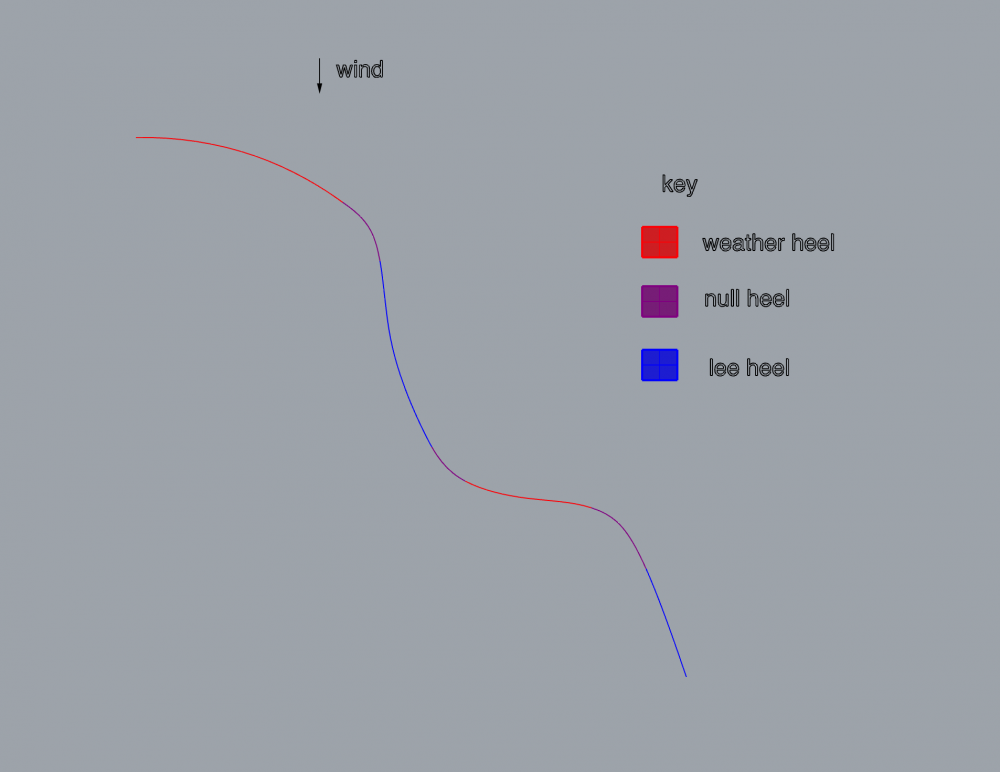
Definitely heel to weather to build speed downwind and carve towards the mark, but view heel as a consumable, not a prerequisite. Expect to slowly swing to upright and then heeled to leeward and hiking hard before you arc back up to build speed again. It's a smooth transition from the moth-thing to the wild-thing and it's presently the way to get downwind fast.
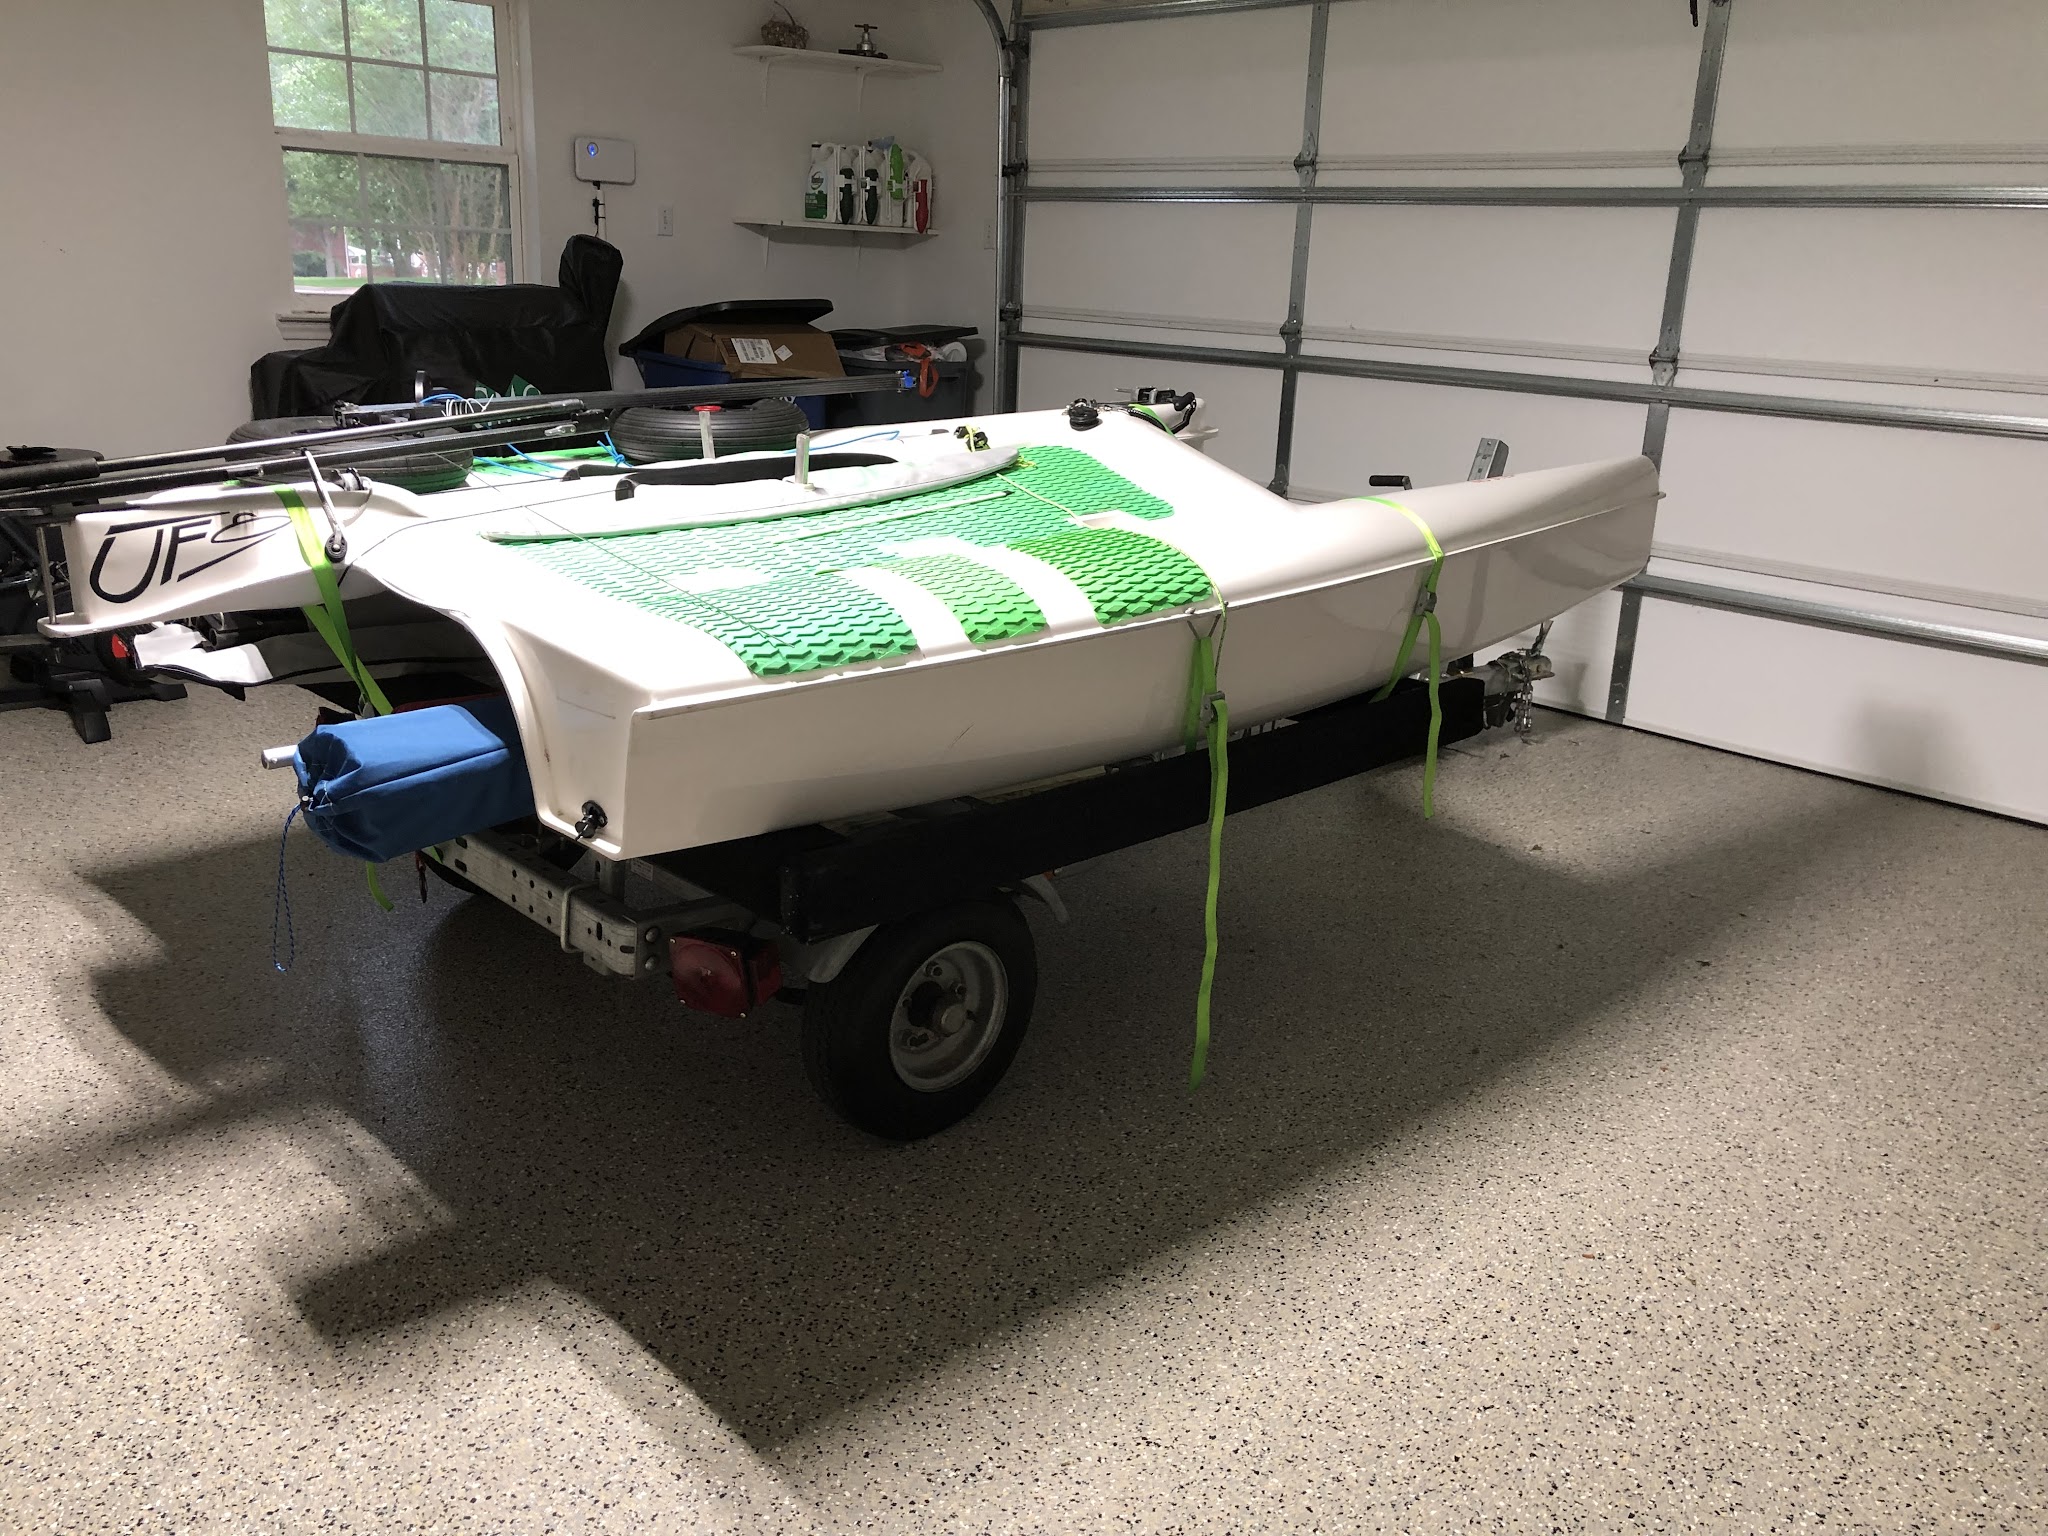
Trailers and Mobility
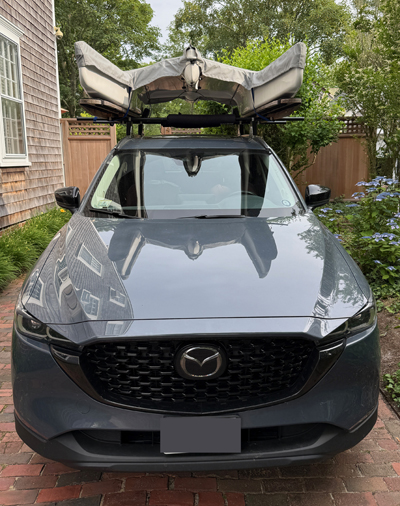
Cartopping bar length
You need bars at least 60 inches long (152cm).
Boat Trailer from a Jet Ski Trailer
Jet ski trailer easily converted using 4x4s run horizontally. Took 45 minutes including carpeting.
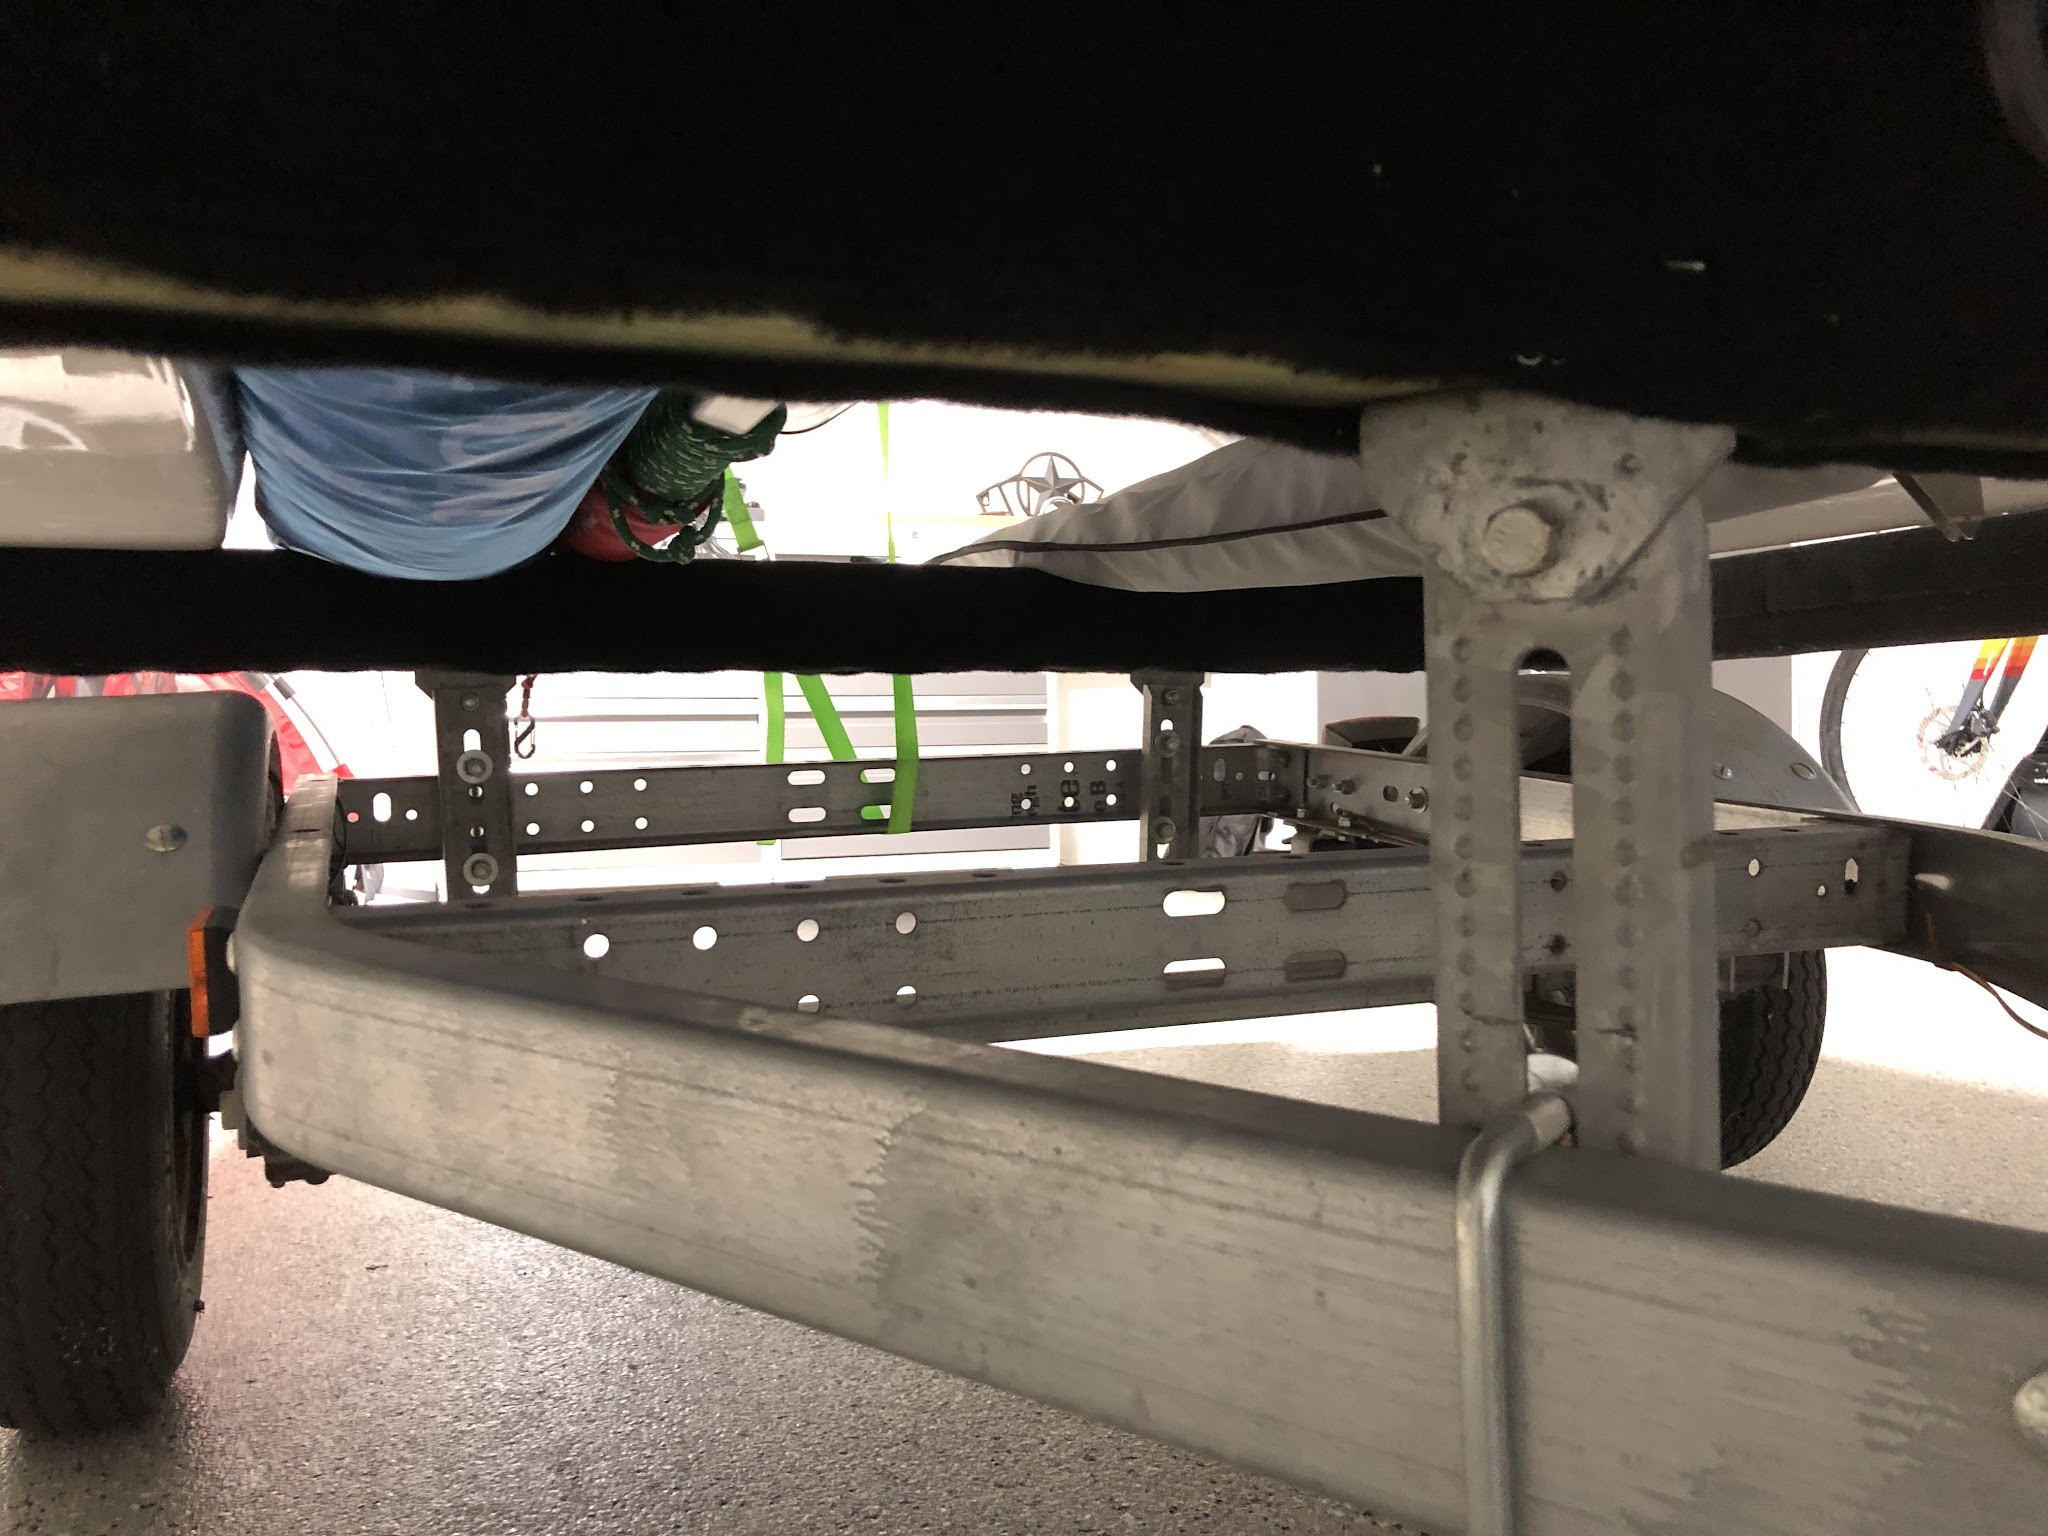
A different Jet Ski trailer, adapted
The main issue is to elevate the hulls of the UFO above the fenders as the boat will be wider than a small power boat or jet ski trailer. I used 4x4s as the cross beams instead of 2x4s to pull this off. Everything bolted to the trailer with U-bolts. Then I got fancy and built some nice pads and carpet out of some noodles, a microfiber doormat and lots of duct tape, which has held up surprisingly well for the last year. The fancy padding solution is unnecessary. You could just add carpet directly to the 4x4s and you'd be all set.
Pickup Truck Setup
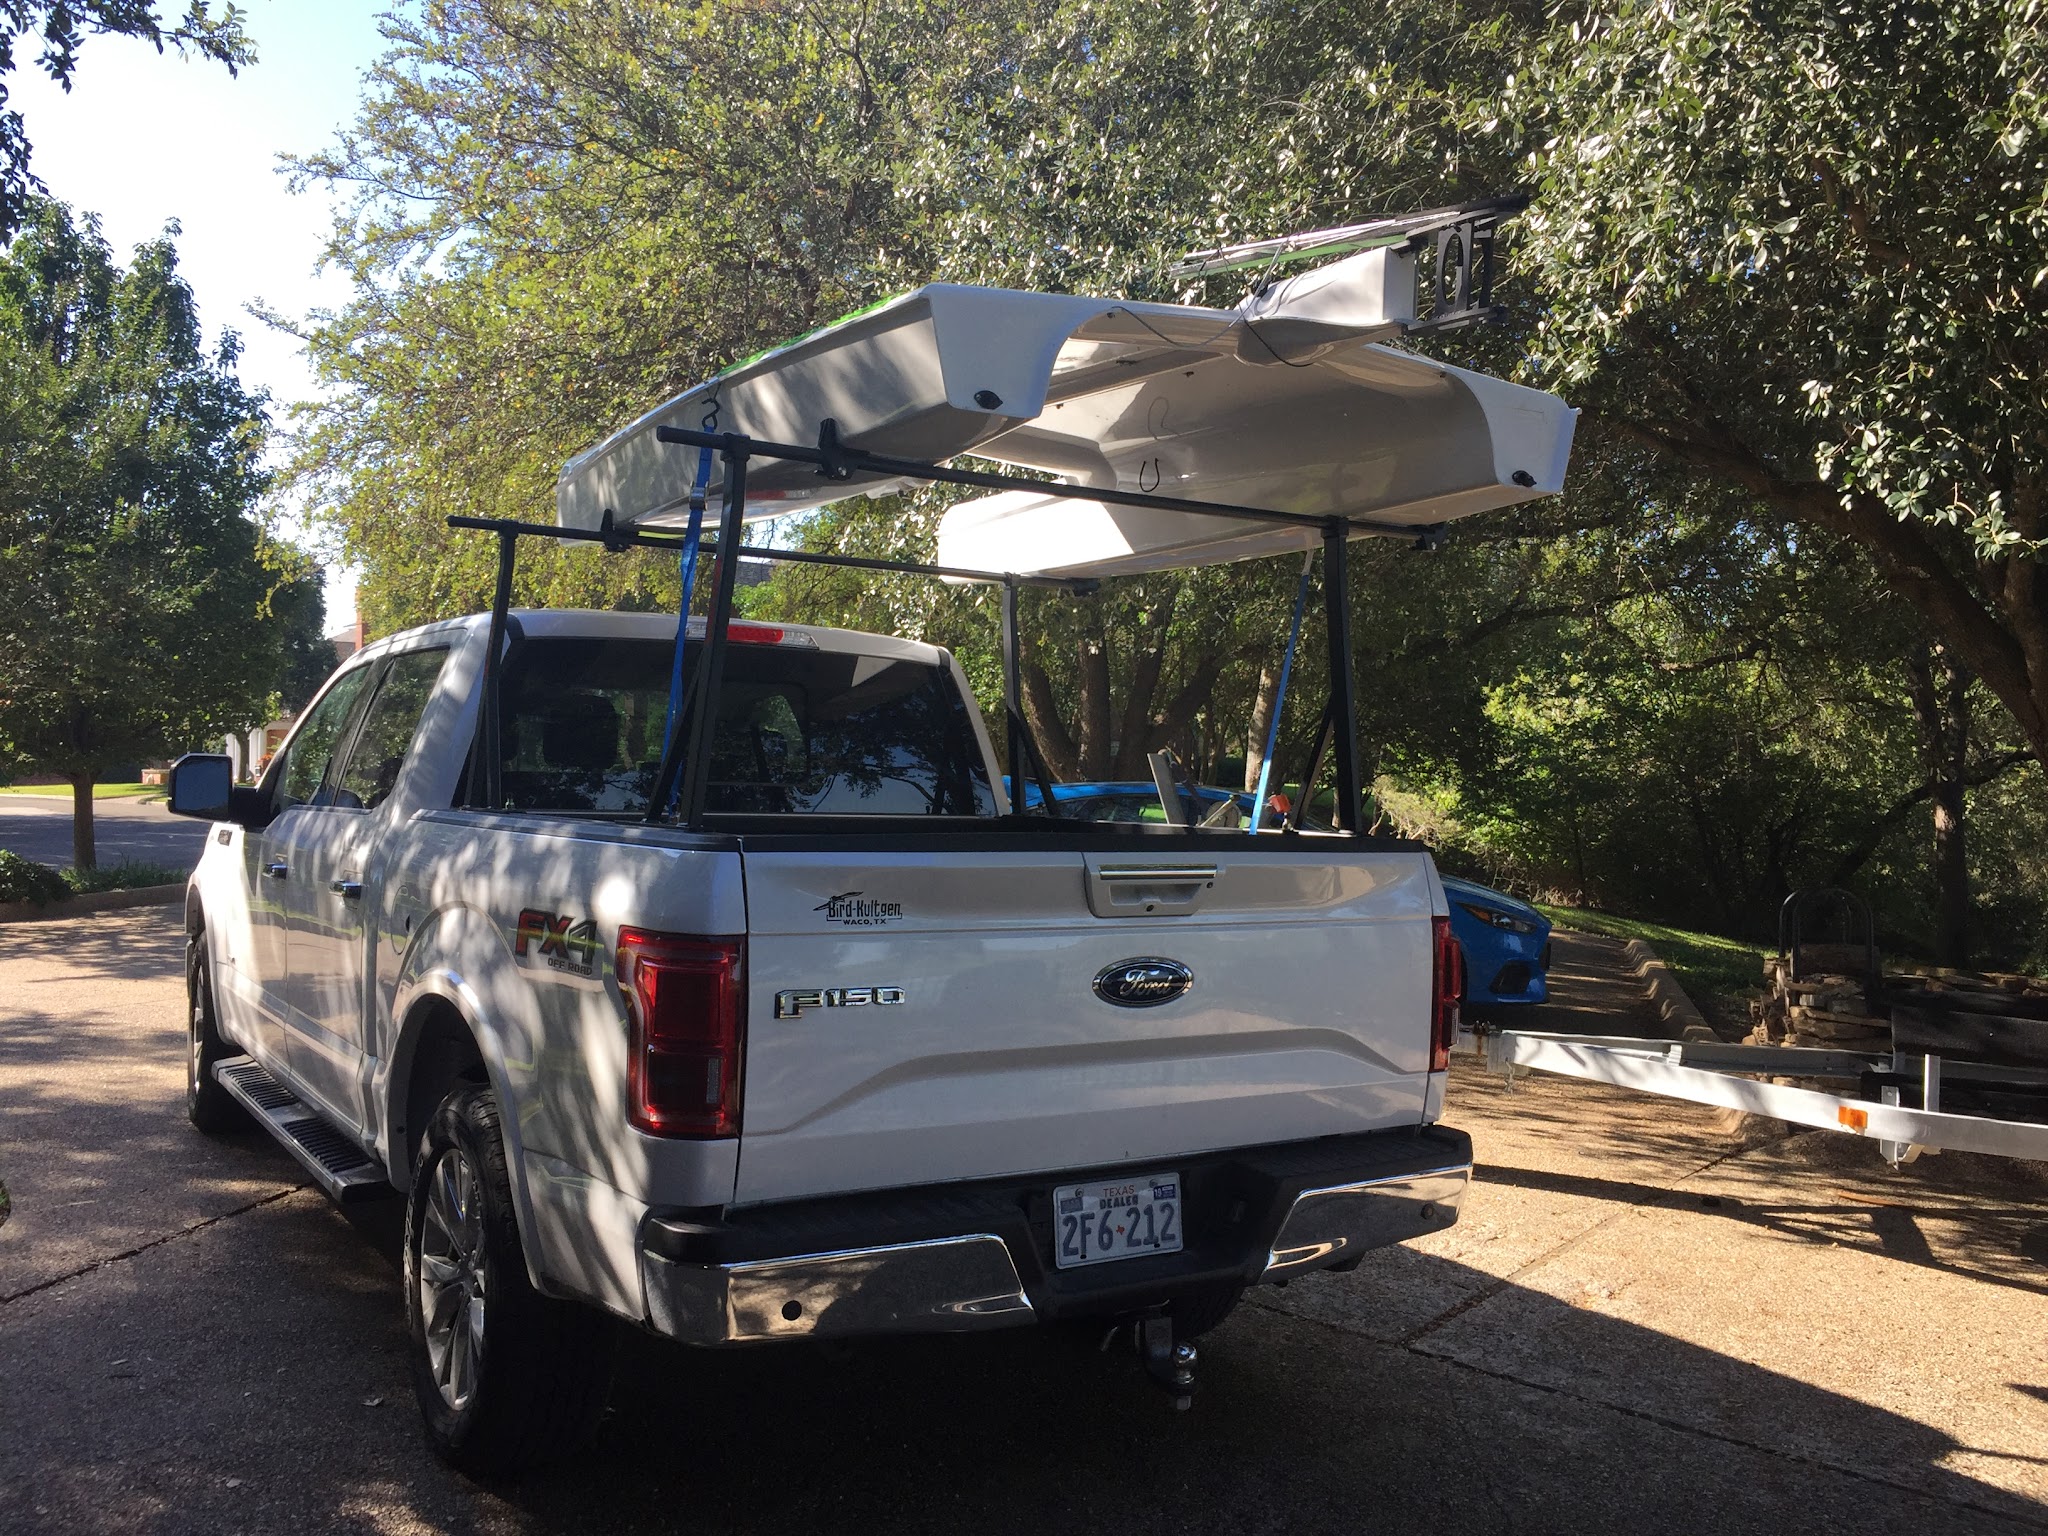
Solo Rack for Car-top, SUV, or Van:
A rack system for easy one person loading/unloading
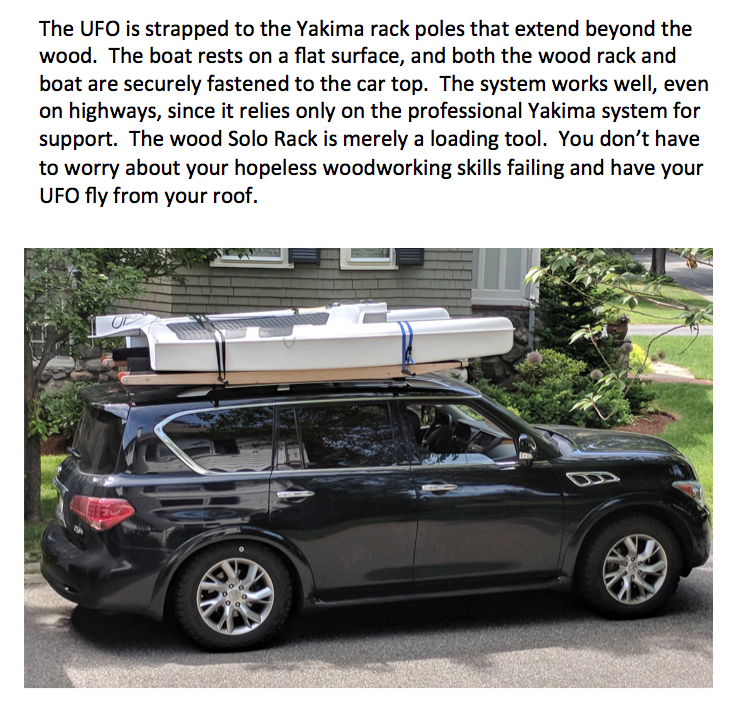
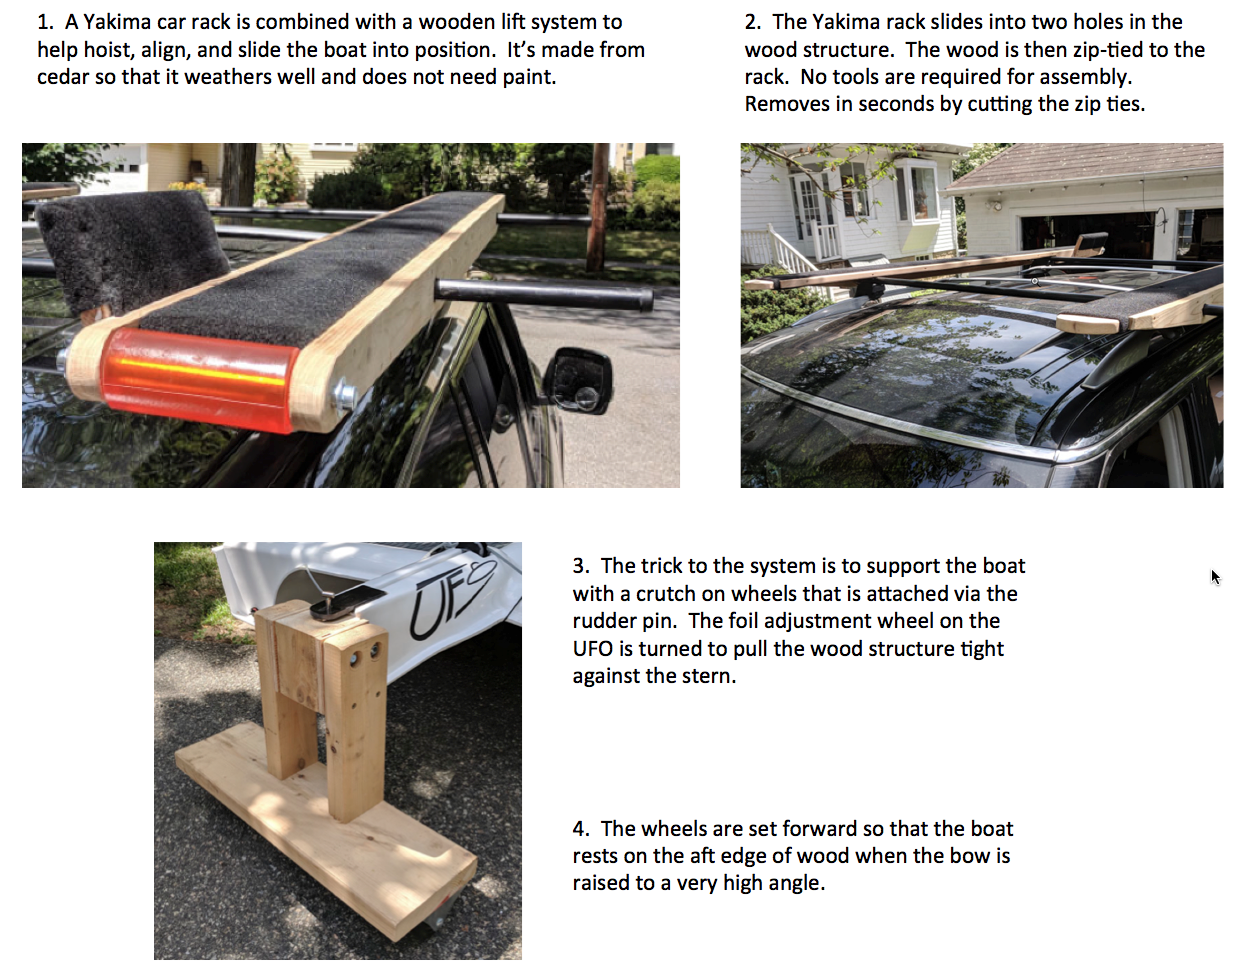

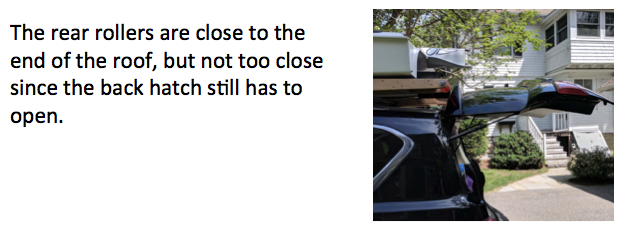
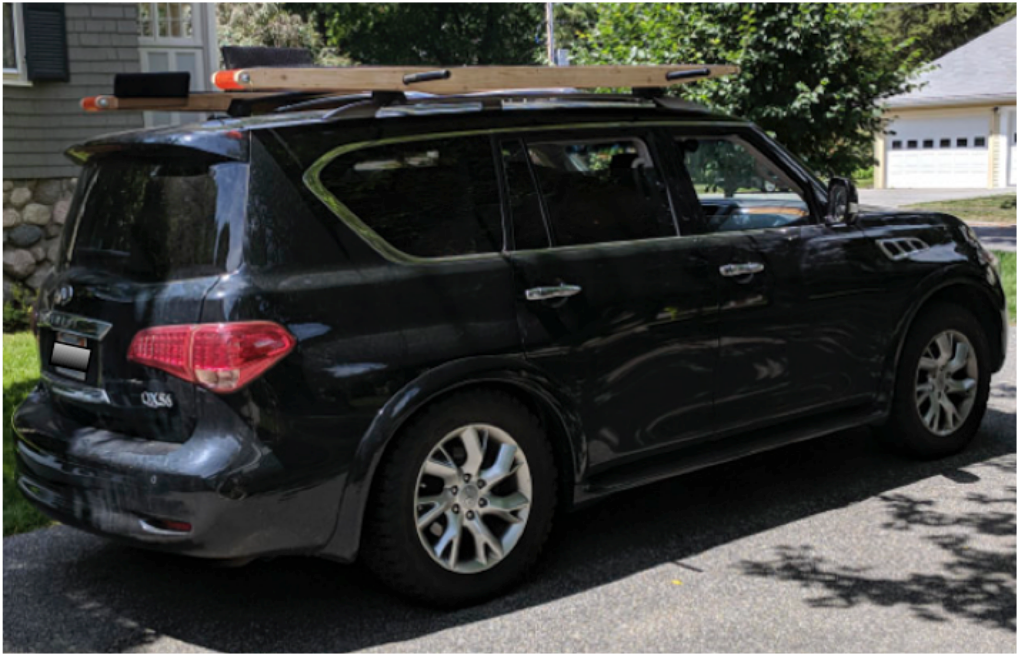
Update 2025: Solo Rack modified for a car top!
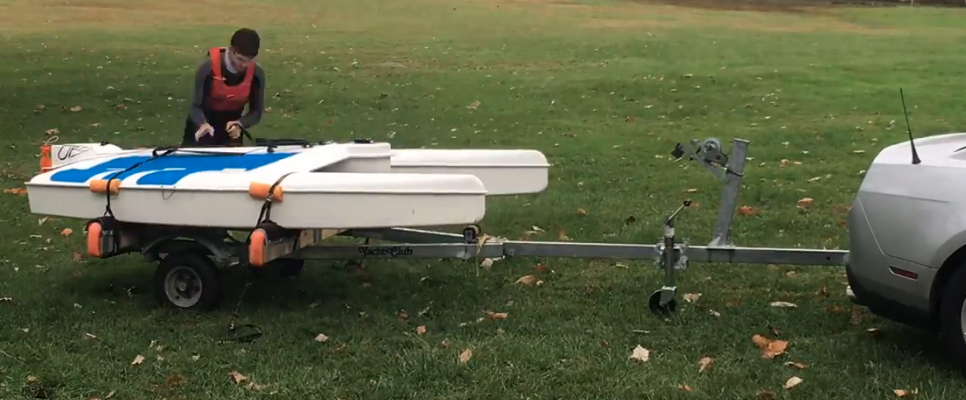
Bike Trailer
Derek Falconer writes:
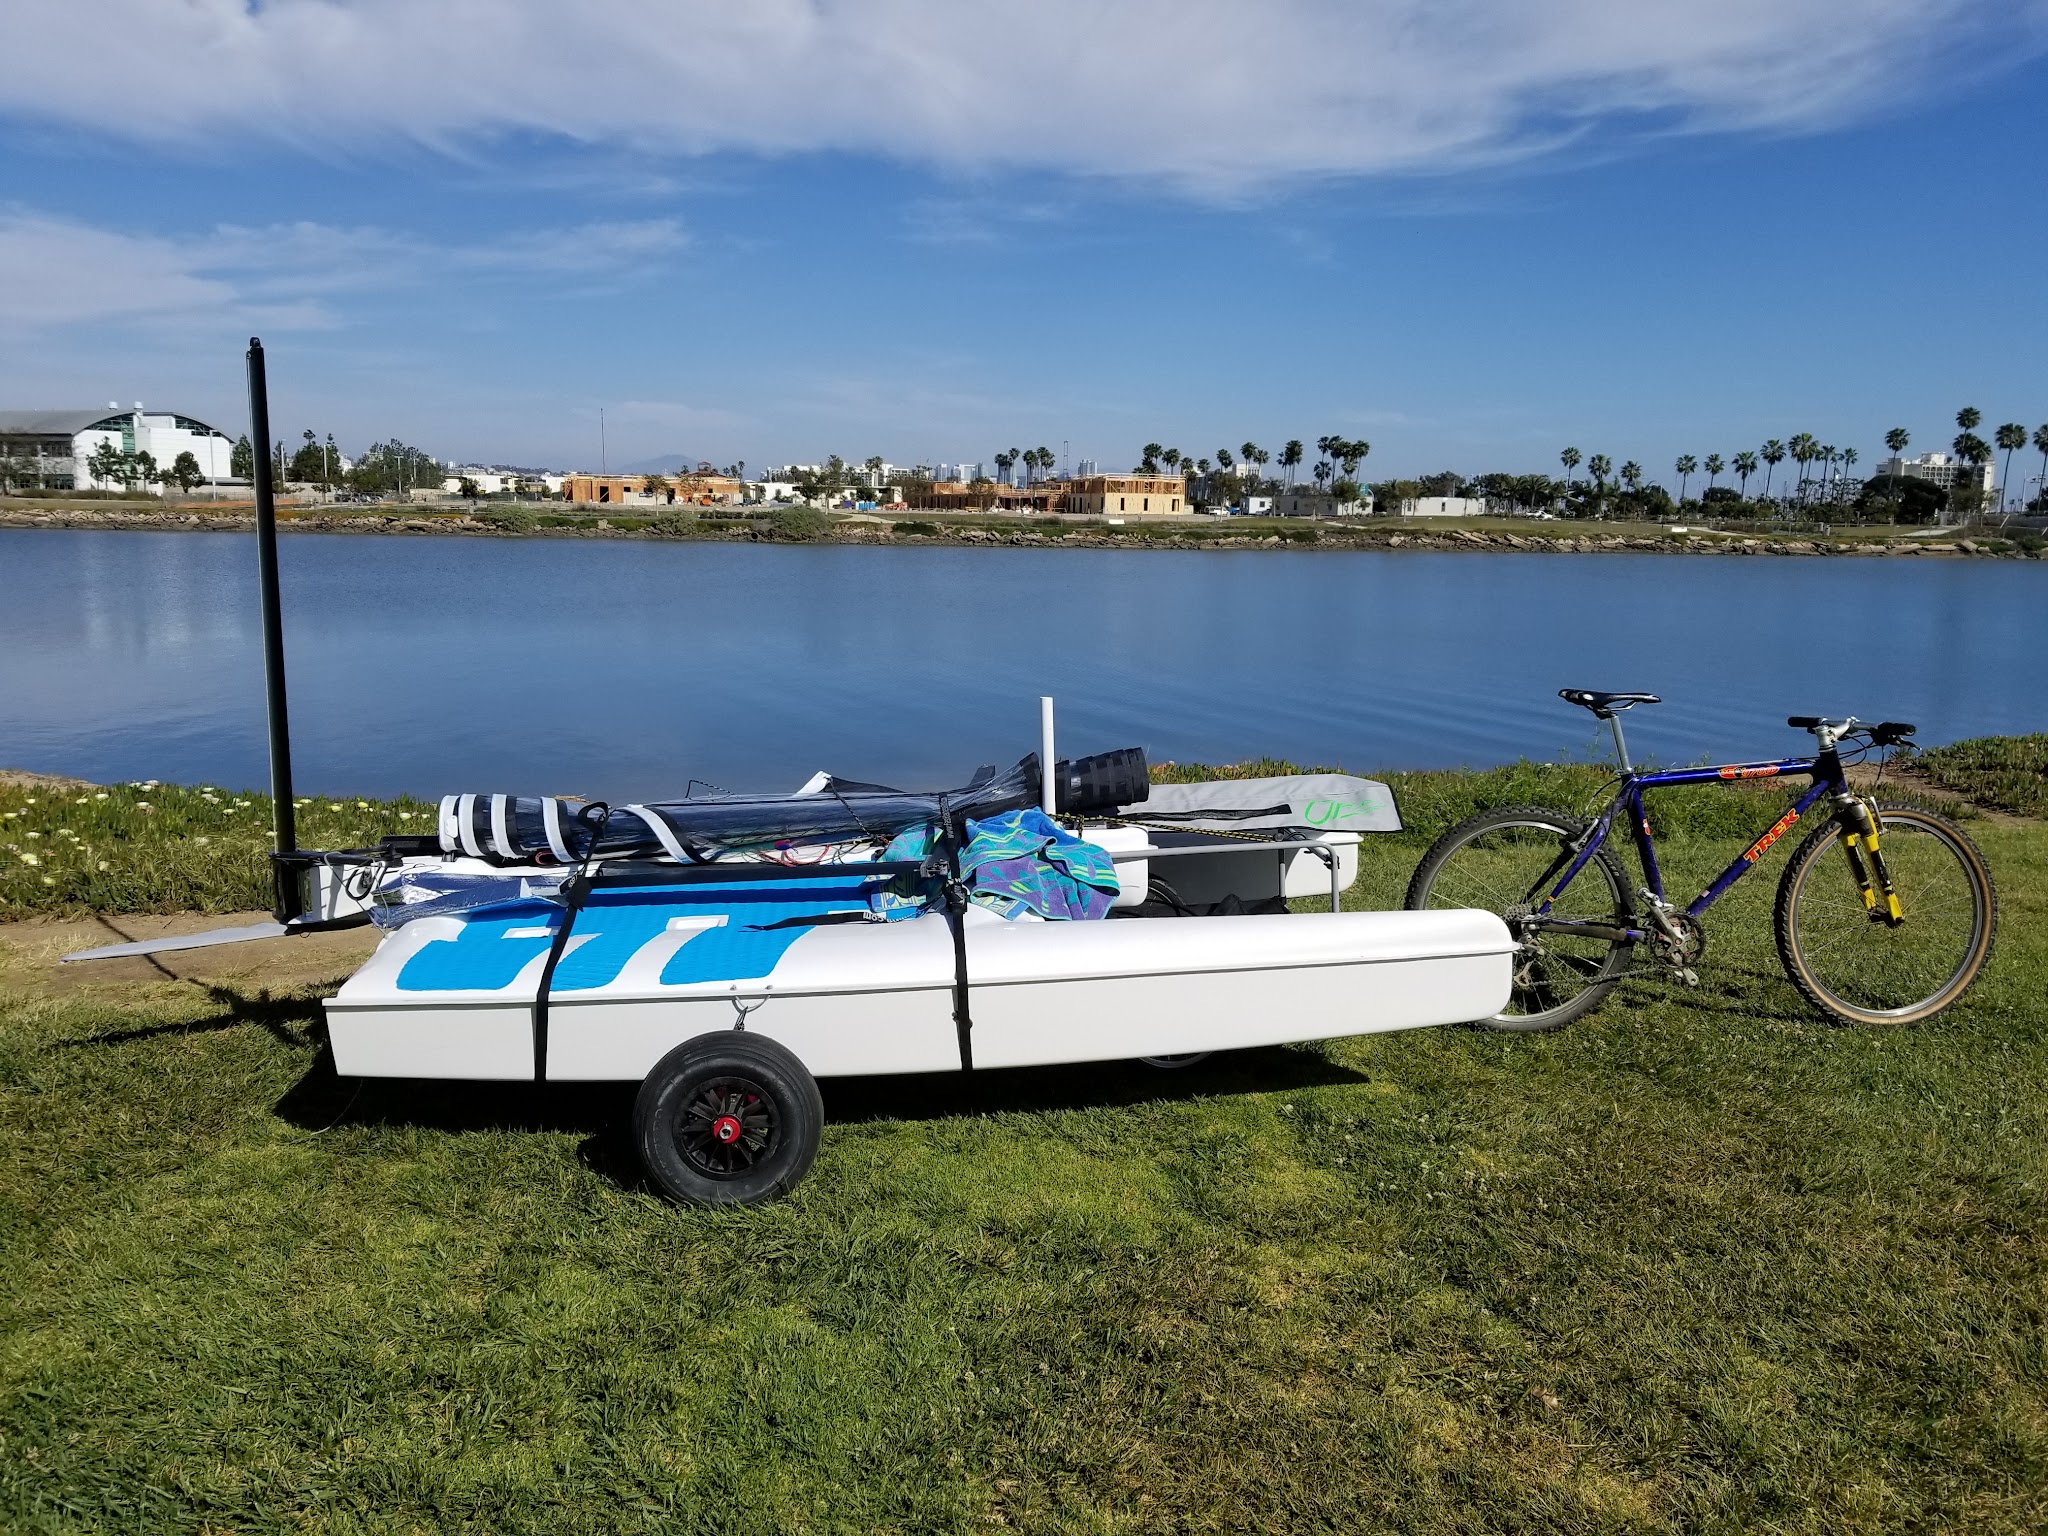
Use the stock beach wheels along with an Aosom Elite Bike Cargo / Luggage Trailer - Yellow / Black from Amazon ($90). I put a piece of 1” PVC pipe down the mast hole and attached both sides of the PVC pipe (top and bottom) to the bike trailer using bungees. Lots of bubble wrap and padding where the boat contacts the trailer and you’re set.
Possible design improvement coming in replacing the fixed wheels on the bike trailer with swivel caster wheels. The middle set of wheels (on the bike trailer) resist turning.
I pull my rig about 1 mile each way to the beach including a small hill over a pedestrian bridge at ~7 MPH. Make sure all tires are fully inflated. Email me if you’d like more info or pics (derek.falconer@gmail.com).
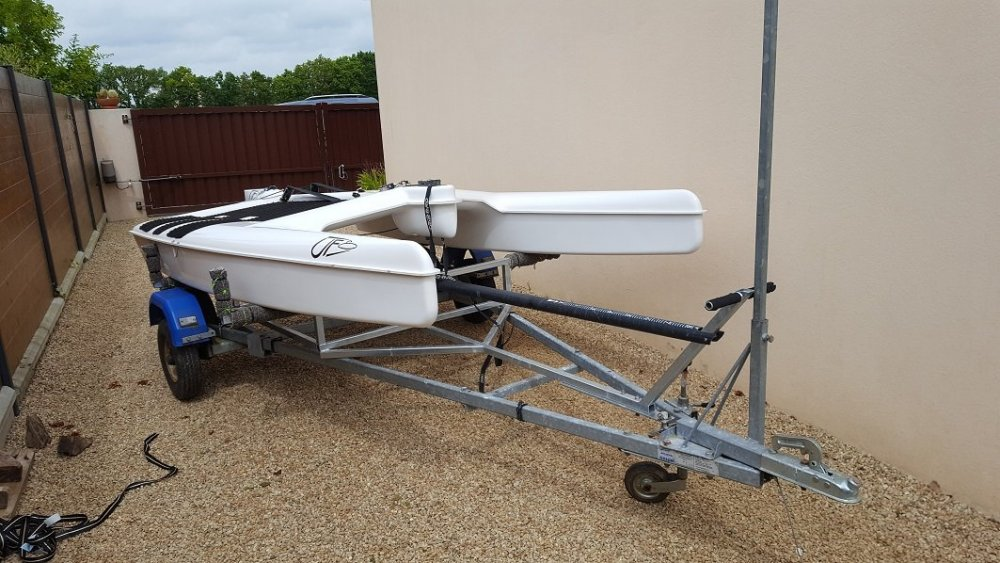
Devoti-One Dinghy Dolly/Trailer Adapted to UFO
The dolly/trailer combo is built by Westmersee
Important Upgrades
Nick at Fulcrum maintains the official list of upgrades. Get in touch with him. The list below is partial...
Main Foil Pin “Box”
From Nick Burroughs:
I've linked a photo album that shows how to switch from the pinboard to gates. You need to line up the center position in the pinboard with the center position in the lower teeth of the new gates system. The boltholes are not in the same place for the two systems. You should additionally know that we've started gluing the lower teeth to the deck plate with Plexus when assembling the gates. You could do the same at home with thickened epoxy to secure the hardware better than through bolts alone.
https://photos.app.goo.gl/YKDvw8nwdKy8nBdP6
Righting Line Setup
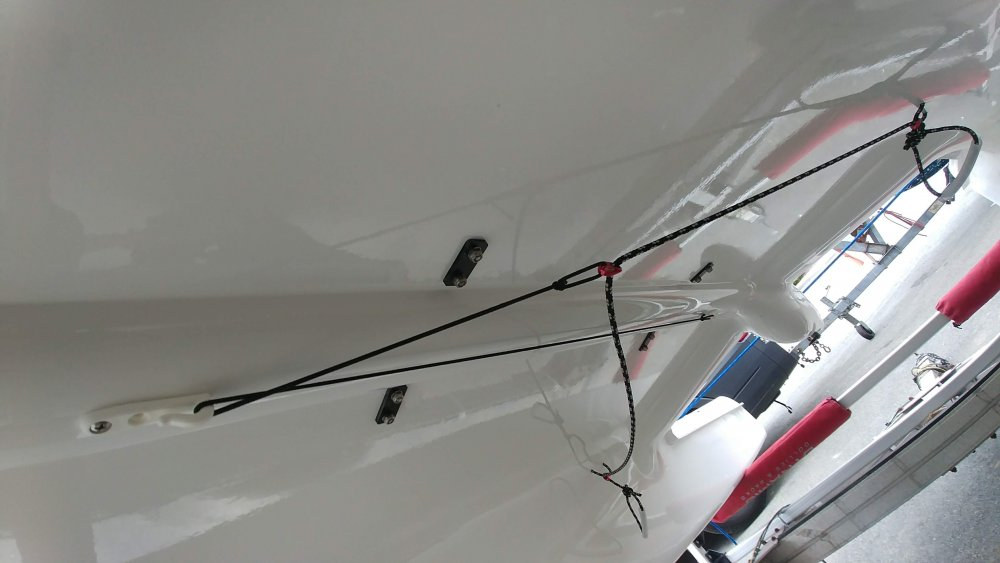
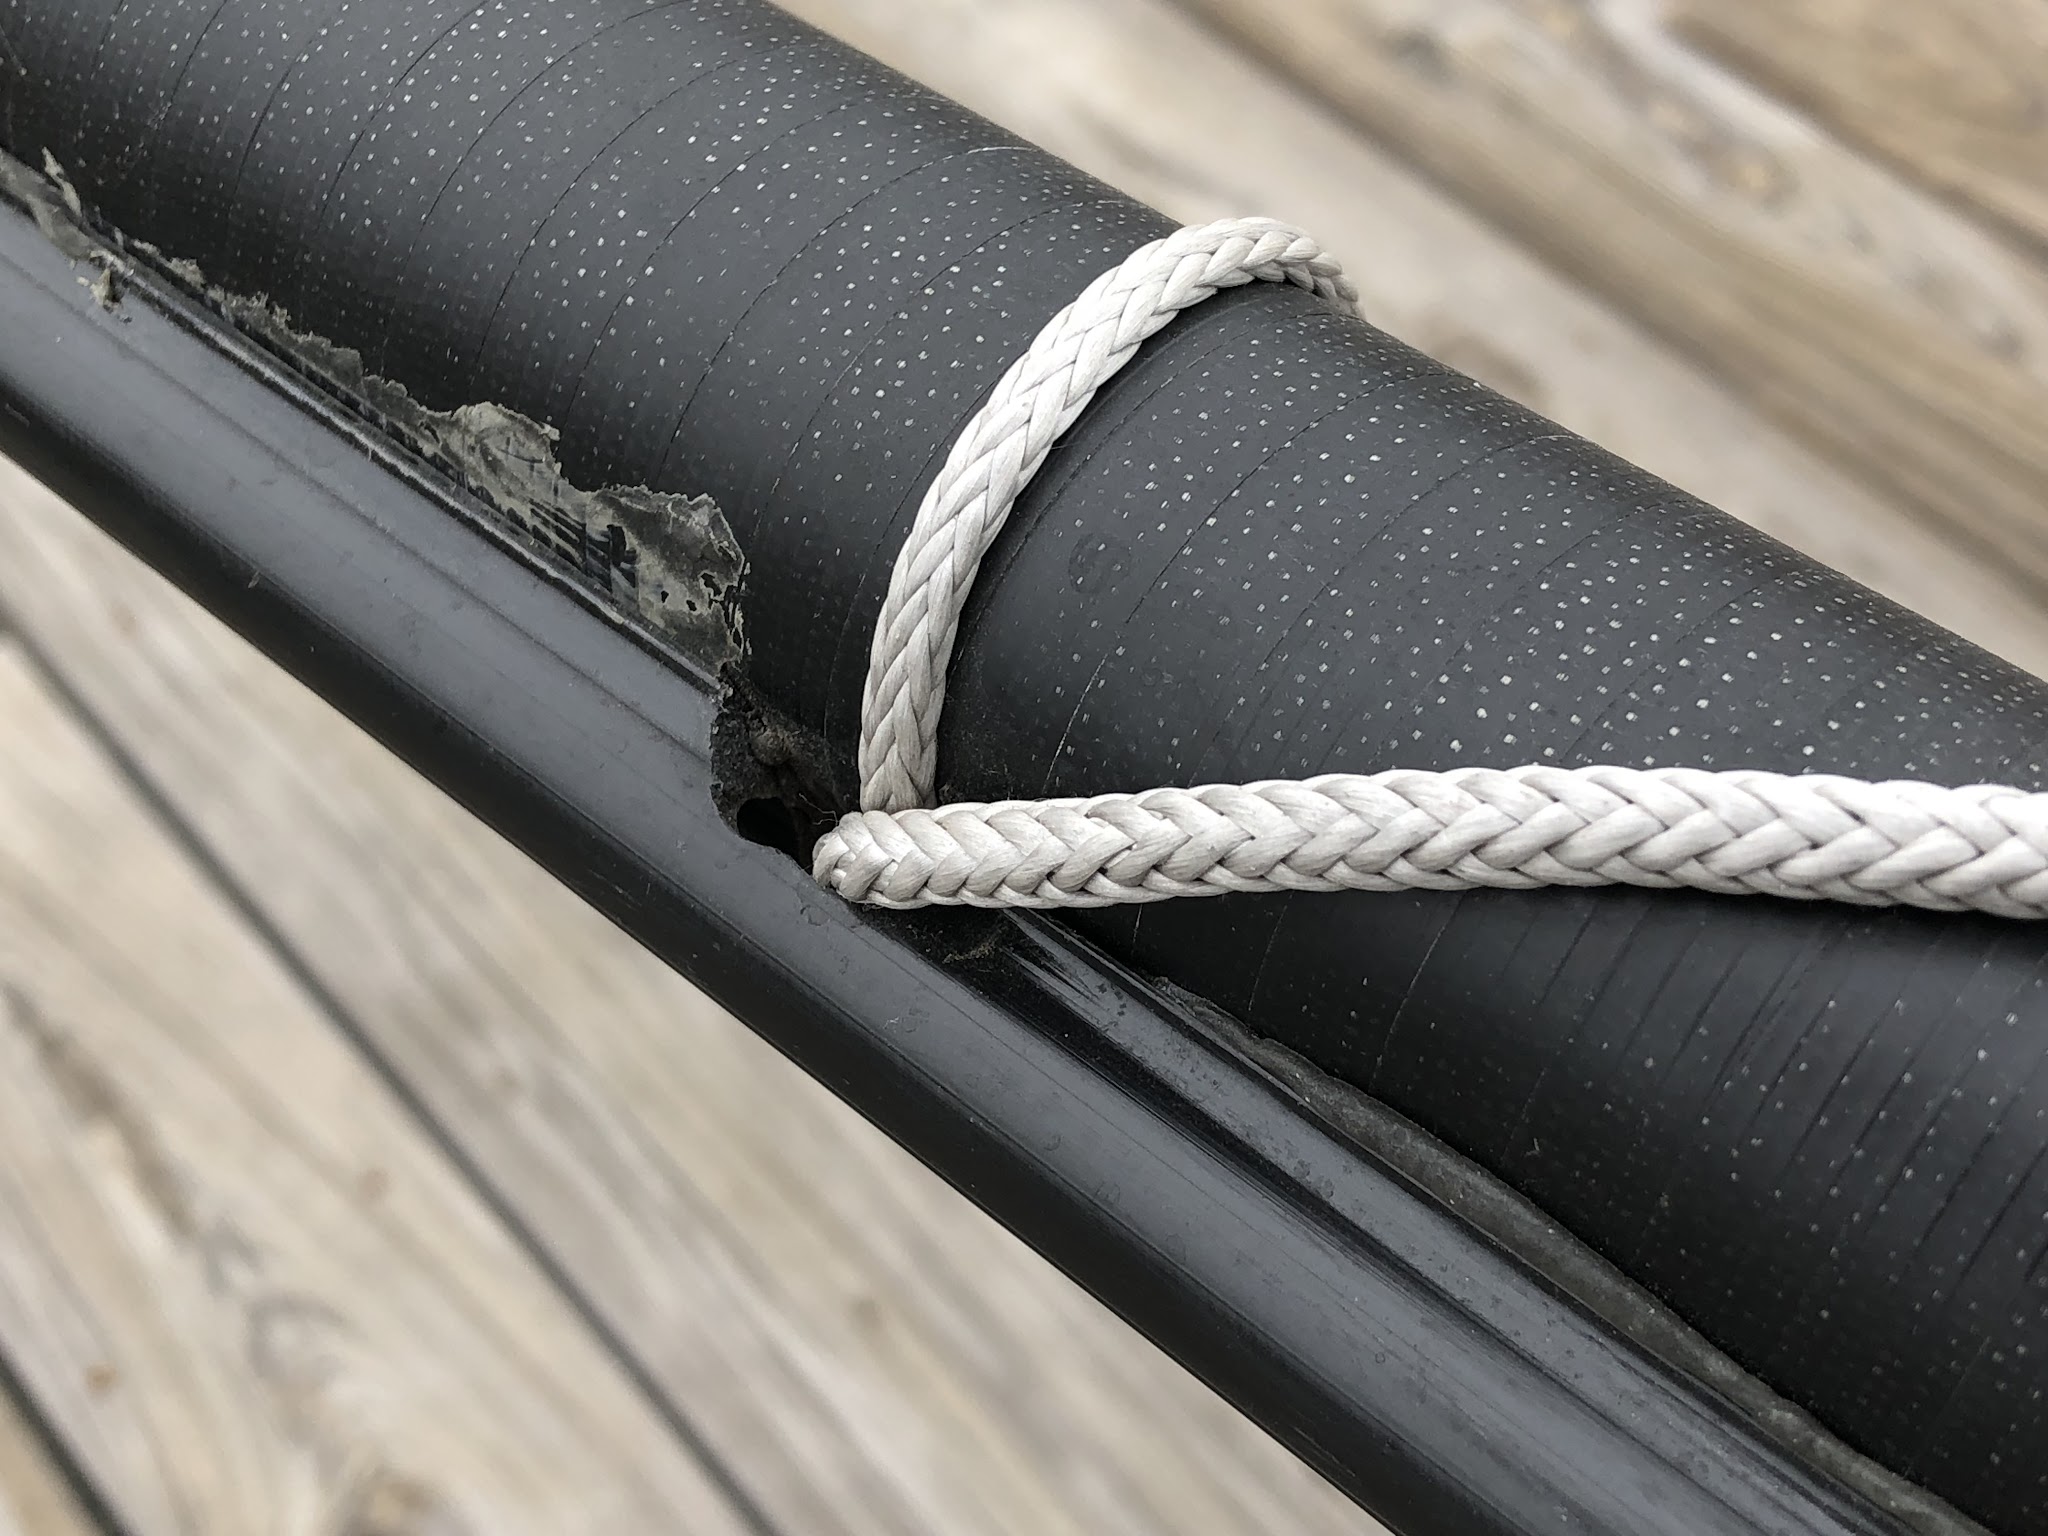
Reinforced Sail Track at Hounds / Shrouds
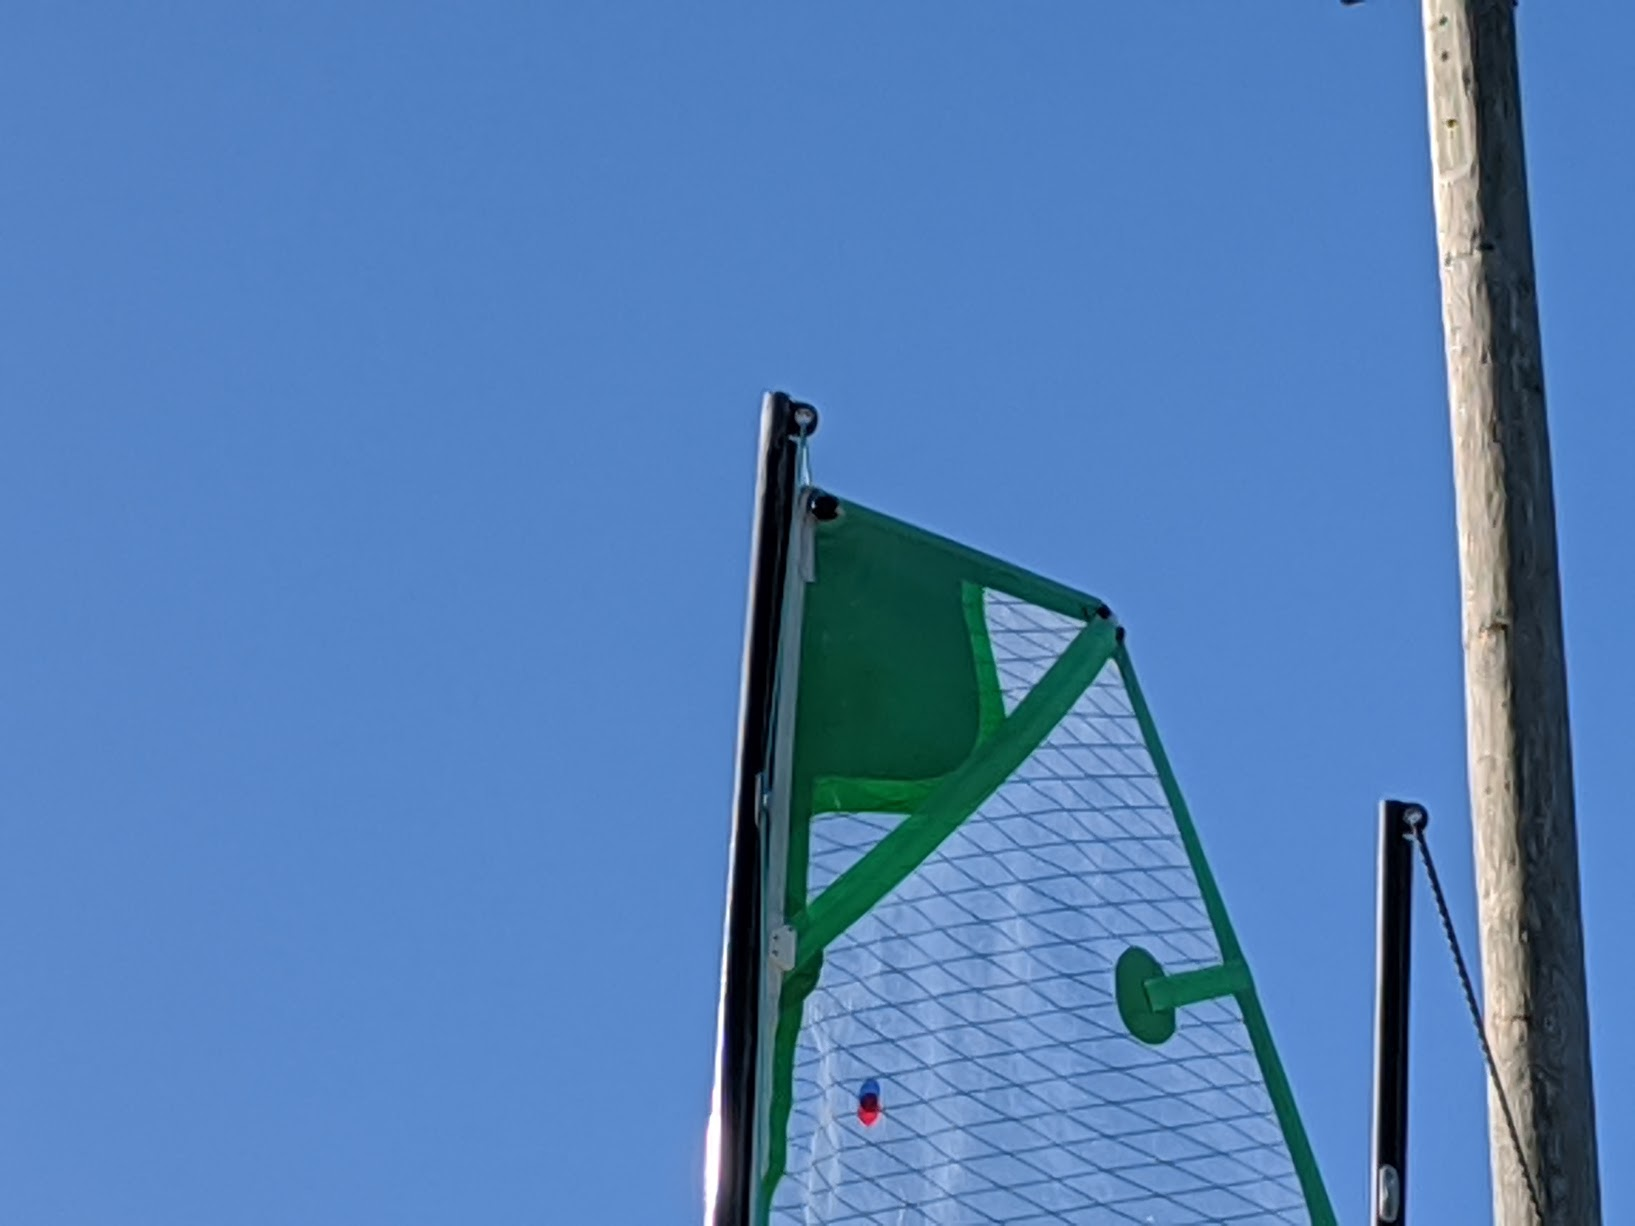
The sail track anchors the shrouds and handles quite a bit of tension Check your hounds connection to ensure it is not popping up the sail track.
This pic shows a sail track in good condition, but it is not reinforced.
Little Fixes and things to watch out for
When you sail your boat a lot, things happen...
Foot batten
Depending on your tacking/gybing technique and body size, the foot batten can break quite often. You can get the official replacement from Fulcrum, or you can get Laser battens (get the “practice” ones to save $), and cut them to length.
Removing a broken batten is difficult. It’s made easier by inserting a batten in parallel with the broken part, so you can jimmy the broken bit against the backing of the other batten.
Boltrope fraying at head of sail
Makes it hard to feed into the track. You can cover the frayed bit with sail tape (other tapes will peel out easily). Once it is too damaged, you can cut the bad part out. The cleaner the cut, the longer it will last.
Snapped battens
Battens can break/snap. You can buy batten stock and cut it to length, or you can splice the battens. Contact Nick for detailed instructions.
Deck fittings pulling out
Some deck fittings get a lot of stress, and can start to pull out. Tighten the screws, if that doesn’t work, see the repair for composite holes listed above.
Mast halyard fitting
It can pull out. Remove mast endcap, re-attach with nuts/bolts, put a little bit of glue on mast end cap.
Deck softening - cracks alongside join lip
If the deck “sinks” or “gives” a little bit in the area where you sit and/or you spot cracks alongside the deck join “lip”, it might be an issue the requires attention. Earlier is better for this - contact Nick @ Fulcrum, he has the right technique for a strong fix.
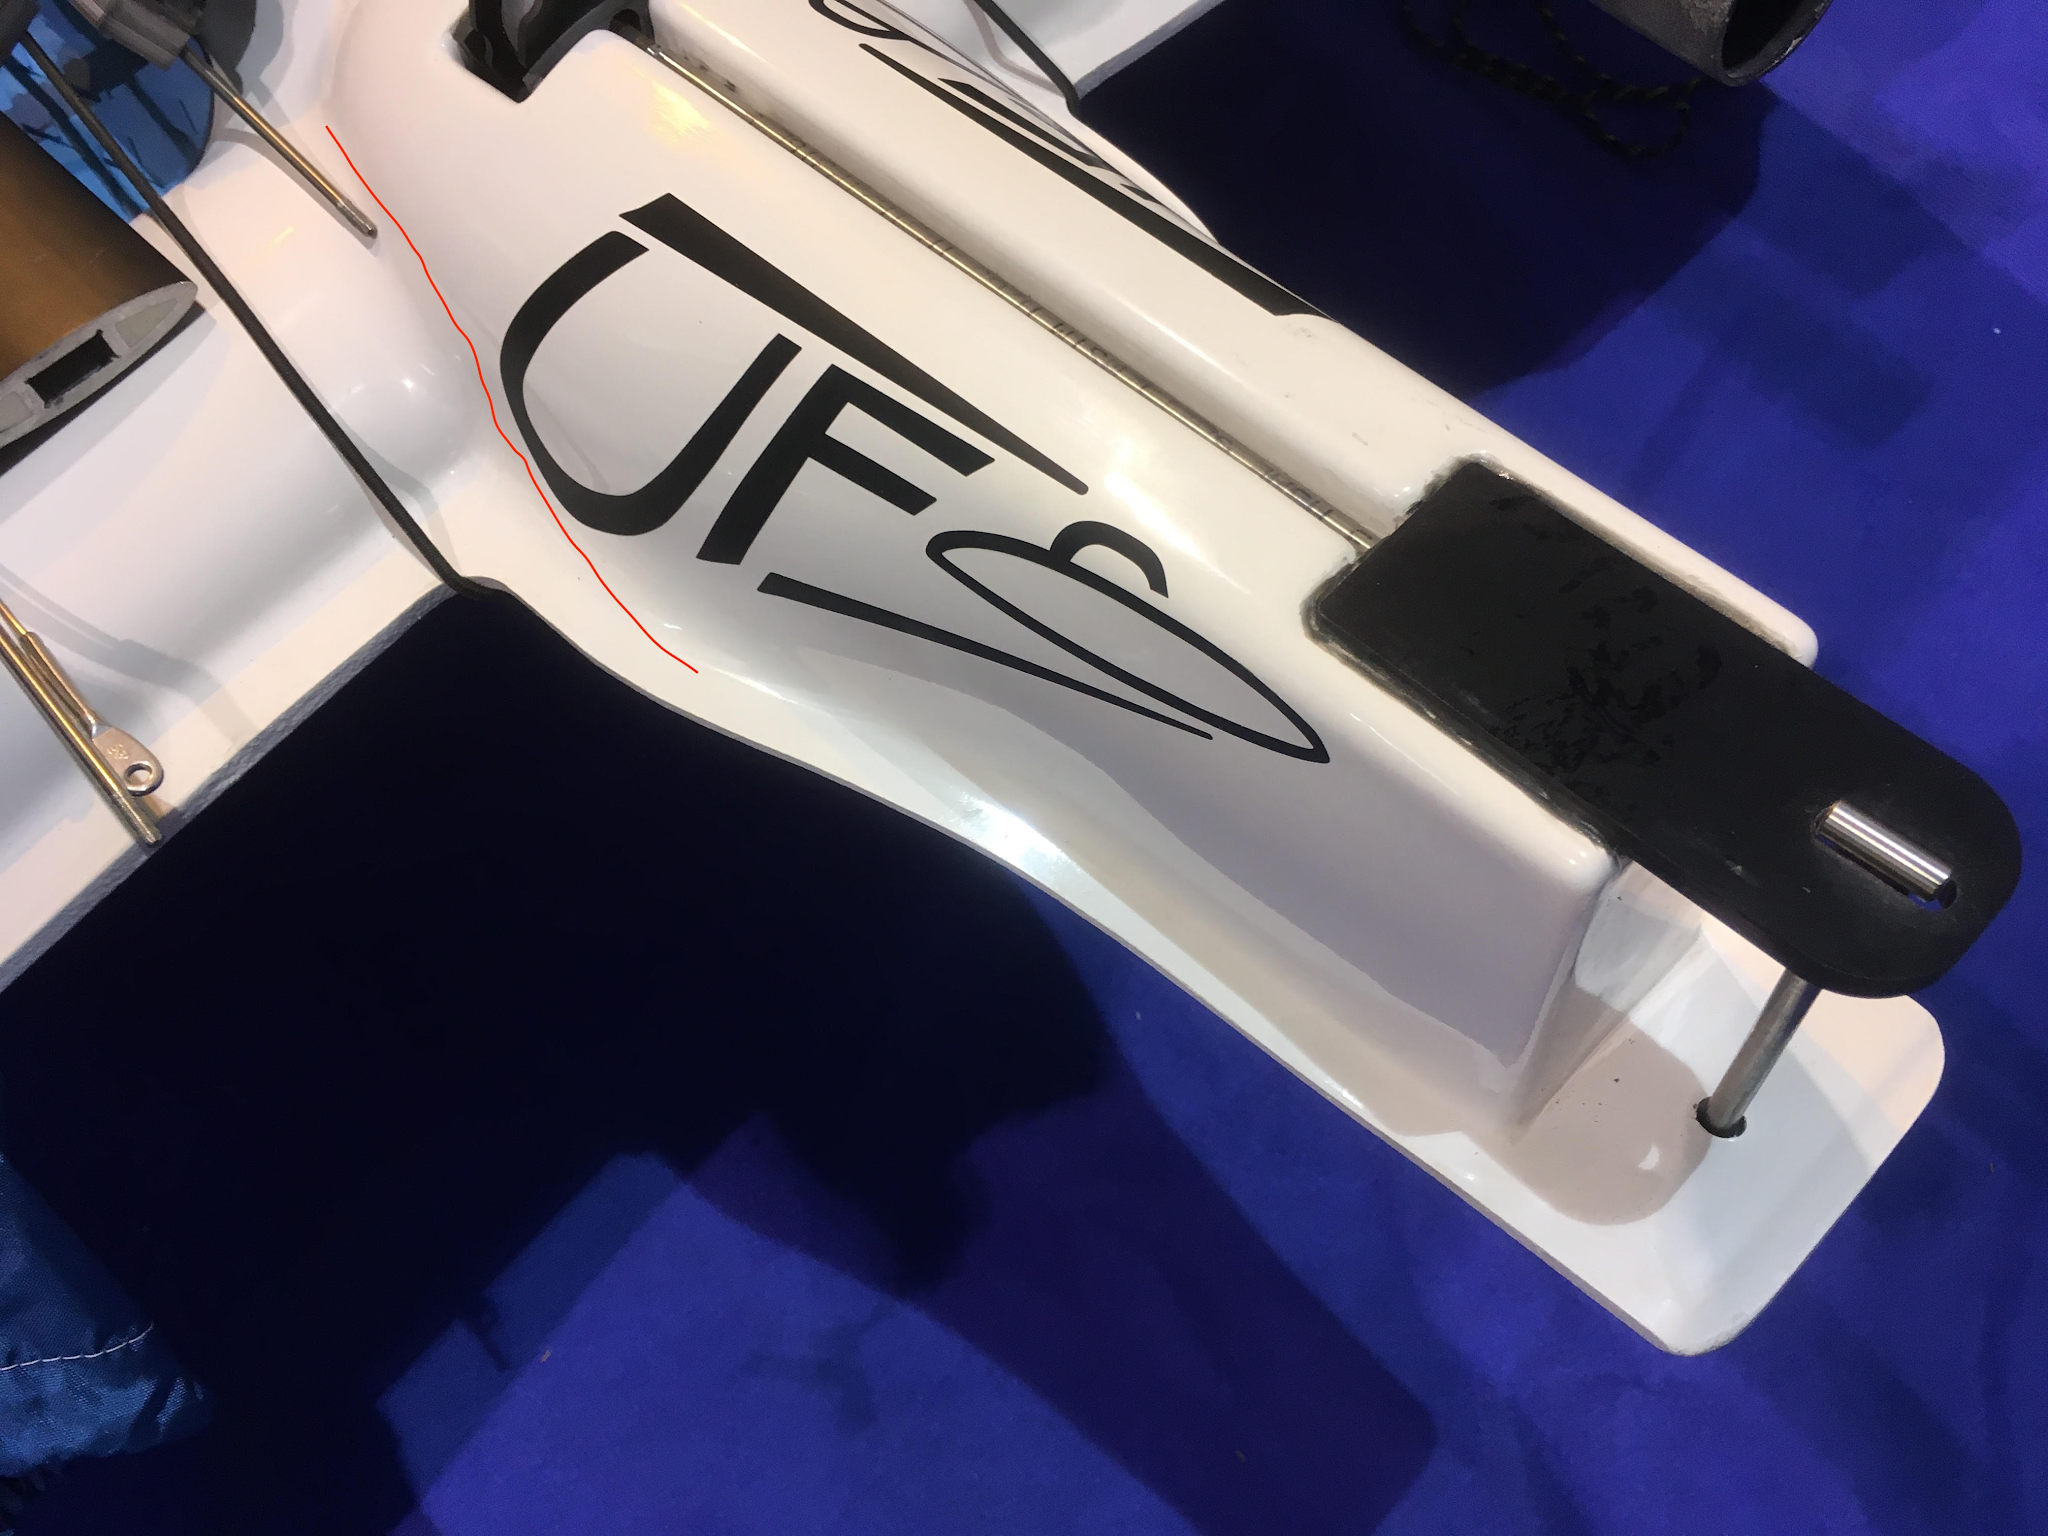
Rudder Gantry hairline cracks are ok
After a bit of sailing, you might spot hairline cracks in the area marked with a red line below. The rudder gantry flexes more than the gelcoat can handle. These cracks are usually only visible when you pull up the boat from the rudder -- or while you are foiling fast. In any case, nothing to worry about with these.
Spare Parts
Stock some cheap parts in your grab-bag, save a day of sailing
Part nr/link | Description | Used for... |
18-8 Stainless Steel Ring-Grip Quick-Release Pin, 1/4" Diameter, 3" Usable Length | Main foil quick release pin | |
Light Duty Dry-Running Nylon Sleeve Bearing Actually this is part runs small, you will have to drill it - no mcmastercarr part is right unfortunately. For the right part, contact Fulcrum. | Rudder pintle bushings (?) | |
Bungee cords w balls | Tie up all sorts of things quick (ie keep halyard tight against mast base). Add friction to rudder foil. Separate the balls to make soft shackles. | |
McMaster 2795T11 Thrust Washer ¼”ID - Acetal | To take up any space between the rudder pitch adjustment wheel and the hull. | |
Glass-Filled Nylon Raised-Head Thumb Screws | Rudder foil hold (on old boats, it needs a tap on rudder stock) | |
Replacement lines
Brand / line | Width | Length | Used for... |
Spectra | 4mm | 50” | Traveller |
3mm | 1ft 4 ½ inch / 42cm Spliced length (ie, you’ll need about 6 inches more) | Hounds Strop: Triple-brummeled with a 2-inch un-tapered bury | |
6mm | Main halyard and gross cunningham | ||
3mm | Cunningham finetune, outhaul | ||
3mm | Shrouds and Shroud Purchase | ||
8mm | Mainsheet |