B&B Boat Building Handbook B&B Yacht Designs, LLC © |

Dear builder,
This document is a WORK IN PROGRESS and is intended as a resource for our builders and anyone interested in learning more about epoxy plywood construction and boat building with a focus on our design philosophy and best practices. We intend to add information to the handbook as we answer questions and in time we hope it will become a useful resource for our builders.
-The B&B Team
Contents:
1.2. How Long does it take to build?
2.1. Quarter Sawn Centerboard and Rudder Blanks
2.2. Scarfing Methods: Making short things longer
2.2.1. Gluing CNC cut finger joints
2.3. Filleting and Taping a Joint
2.3.3. Lay out the Fiberglass Tape
2.3.4. Filling the Weave or use Peel ply
4.3. Stainless Steel Hollowback
1. The Basics
We know there are a lot of choices out there. Give us a call and we would be happy to discuss the nuances of our various models.
1.1. Other Building resources
Videos:
Our Core Sound 15 Construction videos are applicable to many of our designs with lots of good information about the process and techniques used to build one of our sailboat kits.
1.2. How Long does it take to build?
After the major considerations of size, function and æsthetics have been settled and you are pretty sure that you have decided on a specific design, there are probably two questions in your mind. Especially if you are a first time builder you will ask:
1. How much does it cost to build this model?
2. How long does it take to build this model?
These are two deceptively simple questions. The reality is that both of these questions are like the proverbial, “how long is a piece of string”.
Now we know that there are a lot of designers out there who will tack on a dollar and hour figure for every plan. But, that is not quite fair, especially to an inexperienced builder. Those of you who are building their 3rd, 7th or 12th boats know that you can take this information with a wink and a nod and the proverbial pinch of salt. Nor, when they offer these figures, do they generally offer any context for them. Since each designer may have arrived at his/her hours and dollars by a different formula, when looking at the figures, you may be trying to compare apples with oranges or worse!
We want to take an honest approach. One of the problems is that few of our builders (or anyone else's for that matter A.) Keep accurate records of time & money or B.) get back to us with those figures. We, therefore, have to interpolate the information we do have from builders, and add our own experience. To put this into perspective, the costs we get vary by as much as 3X on a small dinghy and building times by up to 7X. While we certainly don’t want to make the process sound longer and more expensive than it really is, we also don’t want to “low-ball” anyone. It is not fair to indicate that a boat can be built for $200.00 when the average cost based on our material recommendations is $800.00.
All of this having been said let us frame the context of estimating costs and hours:
How to estimate costs
All costs are estimated on USA pricing and availability.
Costs do not include your shop expenses, such as electric and heat/cooling or tools, which are a capital investment or expense, rather than a project cost.
Prices are based on retail prices for marine plywood as recommended in the plan. Solid stock is based on the readily available lumber as found at the average hardware/lumber/home improvement center. Epoxy & fiberglass needs are figured at the national retail price per gallon from (B&B) or a nationally advertised and available brand listed in the source list that accompanies the plan. The price does not include your pumps – as these are things that you either have before, or will keep after the project. Incidentals and throw-aways are priced at the “bulk” prices as advertised from the supplier(s) in our source list. These items include brushes, sandpaper, pots etc… Hardware, mast and sails (on sailing models) are priced at the retail prices from B&B, FOB Vandemere.
For larger boats with interior appointments and canvas, these are also costed out at professionally- made prices for canvas and upholstery, and new stoves, lights, hatches, ports etc…. all of "better" to "best" quality. If you can make your own, or have a good maritime flea market around, obviously, it will save a lot of money.
Finishing products can actually represent a large portion of the expense of any boat, and most plan sellers do not include the cost of these products. We suggest you estimate based on higher end marine paints, either enamel or polyurethane (one or two part), plus all of the solvents for the product. As this can vary wildly from brand to brand, this is a broad guide only.
Finishing time is also an area that can vary tremendously. It depends on how much sanding you will have to do to smooth up surfaces (how carefully you built and applied epoxy), and what degree of perfection you are willing/desire/able to pursue. It is not unusual for a "perfectionist" to spend 40 hours building and 100 hours finishing….never being satisfied with their "last coat" until the whole boat looks like a grand piano.
The best way to estimate a price, is to ask for a materials list and price the materials at your own chosen suppliers in your area.
1.3. Working with Epoxy:
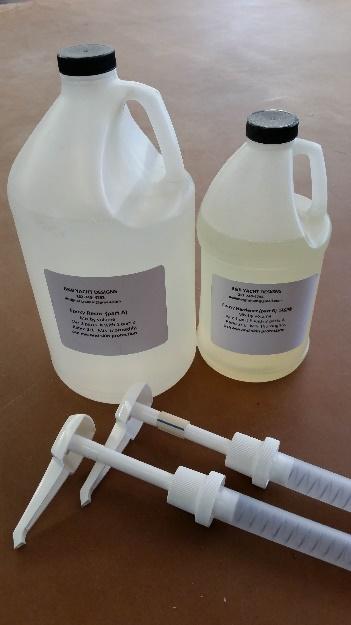
The following applies to all brands of epoxy including B&B Brand 2:1 Epoxy.
Safety
Always wear gloves and old clothing when working with epoxy it is very difficult to remove from fabric. Denatured alcohol is the preferred solvent for cleaning skin of epoxy. Some people notice a smell from epoxy and we always recommend wearing a respirator when using epoxy in an enclosed space.
Mixing
Our epoxy is a 2:1 mix ratio meaning 2 parts resin to 1 part hardener by volume. Our pumps are calibrated using a “stopper sleeve” cut to a precise length which stops the hardener pump stroke at the 1/2 way mark. The pump with the sleeve is for the HARDENER. When mixing, 1 pump of resin and 1 pump (which is actually a half pump) of hardener is combined in a small cup. Mix with a stick until the epoxy appears clear and even (about a minute) then mix for another minute. Poorly mixed epoxy is the principal cause of epoxy not curing properly. If you lose count when pumping epoxy into a mixing cup THROW IT OUT! It is not worth using it on the boat and then having to scrape it all out if it does not cure. Up to about 6 pumps can be dispensed at once for a large coating job but do NOT leave the mixed epoxy in the cup as curing epoxy is exothermic which means that heat is generated as it cures. Spread out the epoxy soon after mixing to prolong the working time.
Coat all the wood
The plywood epoxy building method relies on a barrier coat of epoxy to completely encapsulate the wood from moisture. All surfaces of the boat should be coated with 3 coats of epoxy before finishing. These sealing coats can be applied one after the other within the curing window (not more than 18 hours at room temperature and less at higher temperatures) in order to reduce sanding. Properly coated in epoxy and painted, the wood will be preserved indefinitely.
Overcoat window
Epoxy can be over-coated without sanding if done within 12-18 hours of the last coat at room temperature. The sooner the better, once the last epoxy coat is not sticky to the touch the next coat can be applied. If in doubt wait and then sand the previous coat with 80 grit sandpaper to remove all shiny spots and ensure a good secondary bond. Typically 2 coats can be applied in a day and a third coat the following morning. This sequence means only one round of sanding at the very end is needed before priming and painting.
Thicken epoxy for gluing
Always use cabosil or some thickening agent such as our B&B “special blend” thickener with epoxy whenever gluing or bonding two pieces of wood together. Thickening the epoxy allows it to fill gaps and increase the area of the mating surface which makes for a strong watertight bond. Whenever you glue two pieces together look for the telltale “squeeze-out” of glue around the edges. This ensures a good bond. Add thickeners to mixed epoxy a bit at a time stirring carefully so as not to release it into the air. Continue adding filler until the desired consistency is reached. For fairing a taped seam or low spot we use microspheres which are a lightweight and easy to sand epoxy thickener. Cabosil by comparison is hard to sand which makes it good for gluing.
Prepping for Paint
We recommend washing the cured epoxy surface with soapy water and rinsing with water before beginning to apply any paint system. This helps to remove dust as well as any uncured particles of epoxy that may affect the paint system. Always start with a small sample area to ensure that your paint is compatible with epoxy. We recommend epoxy primers such as Awlgrip 545 and 2 part polyurethane paints due to their long life and durability but they do come with nasty fumes and your work area must be well ventilated or better yet, pull the boat outside and work in open air with a respirator. Single parts paints are a good choice if you do not have the capabilities for spraying paint or don’t want to offend the neighbors.
Working in Hot weather
In hot weather it is even more important not to leave mixed epoxy in the mixing pot any longer than necessary. If your mixing cup begins to get hot to the touch or you see steam coming up out of the pot, just put it down and let it kick off. It has already started to kick and likely is full of hard lumps it may even be smoking with heat as the exothermic reaction runs its course.
Do not attempt to work with epoxy in direct sunlight. Don’t be tempted to speed up cure times by setting your work outside in the sun. Fillets can overheat and crack and plywood outgassing causing hundreds of bubbles to form in wet epoxy coats.
Working in Cold Weather
Working with epoxy in the cold can be frustrating because epoxy must be above about 50 deg in order to kick fully. When we must work in a cold environment, we carefully use heat lamps or heaters to locally warm the area we are working in. Epoxy should be kept warm in the jugs to make dispensing easy and help when mixing as cold epoxy does not mix easily. A heat lamp or block heater can be used to keep epoxy containers warm.
Epoxy resin stored below about 40 deg. F for a period of weeks will crystalize and form a solid layer in the bottom of the jug. This happens with ALL epoxies. The resin can be easily brought back to a homogeneous state by warming it. The easiest way is to put the whole jug in the microwave for about a minute at a time until the resin goes completely clear again. Another method is to immerse the jug in a pot of boiling water until the contents turn completely clear.
2. Building Techniques
2.1. Quarter Sawn Centerboard and Rudder Blanks
Check out this video for a complete end to end guide on cutting and assembling a quarter sawn centerboard or rudder blank from more or less plain sawn boards.
2.2. Scarfing Methods: Making short things longer
2.2.1. Gluing CNC cut finger joints
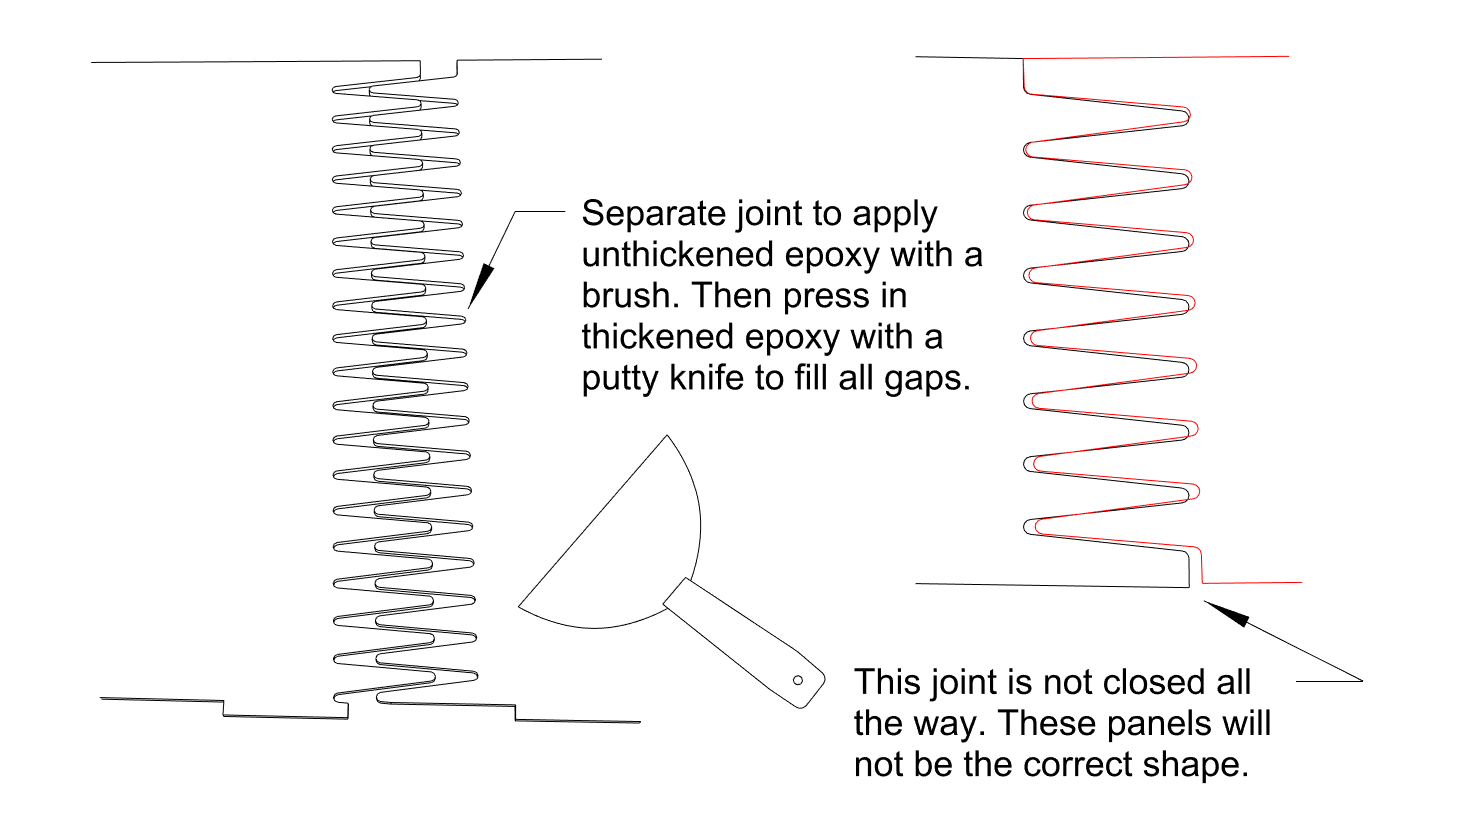
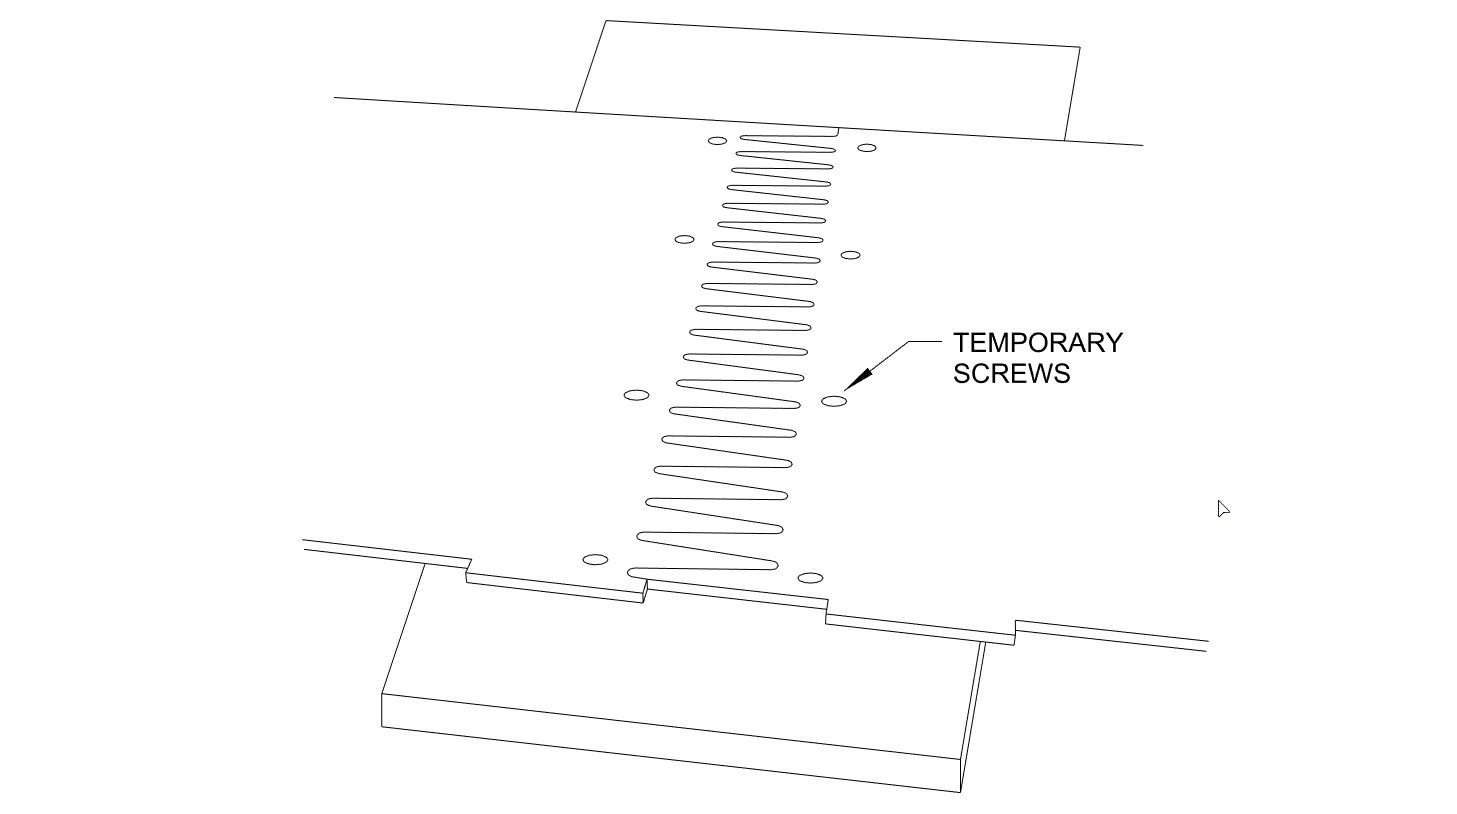
When we need to join a long plywood panel in a cnc cut kit part we employ the finger joint that we developed which is essentially a tapered scarf turned on it’s side with minimal across the grain gluing in order to maximize strength. Check out our album on gluing finger joints for the method we use. Be sure that the fingers align and the joint is pushed all the way closed.
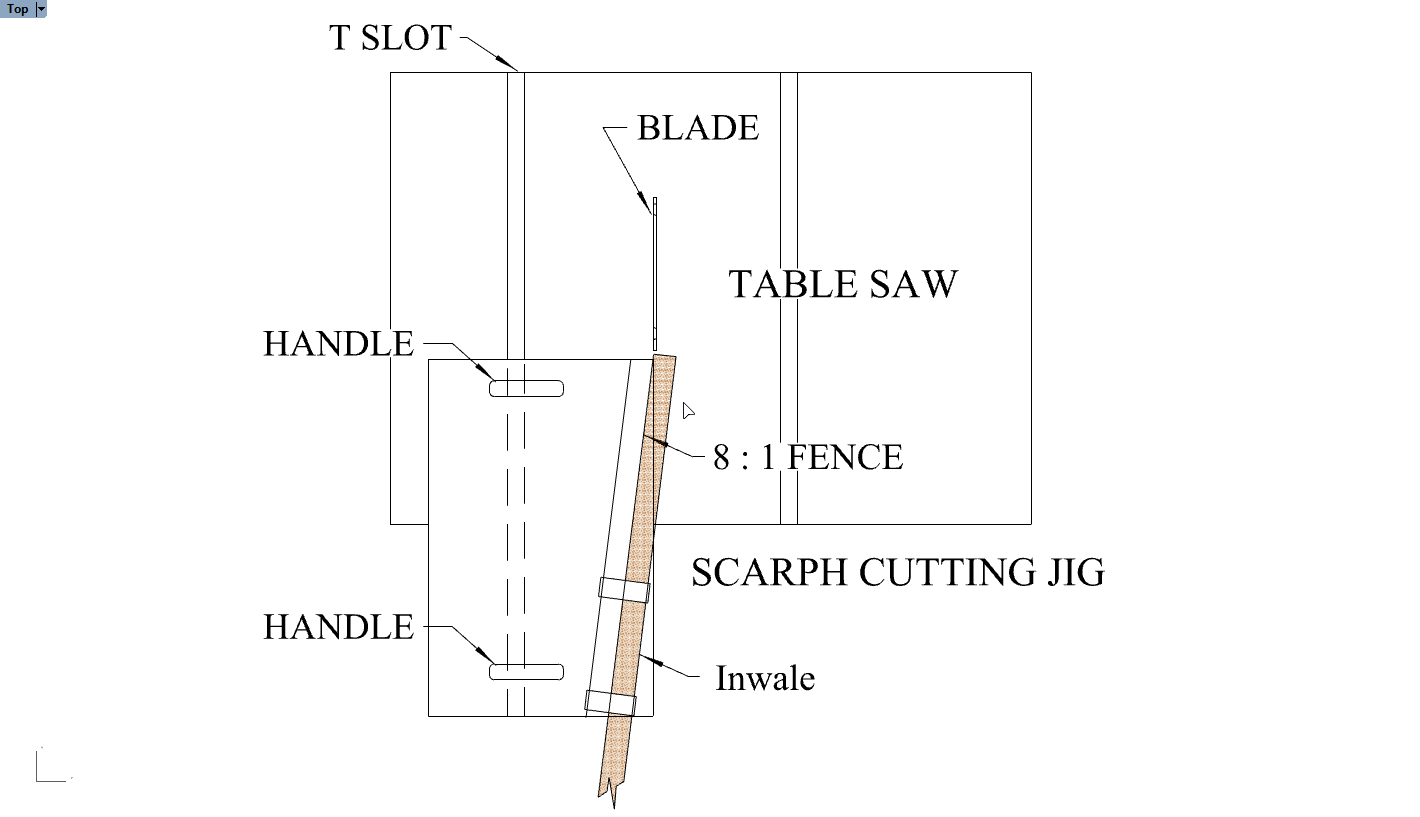
2.2.2. Scarfing solid wood
It is often necessary to 'make short wood longer such as the inwales, gunwales or side stringers. The scarf is the best way to solve this problem. Firstly, anyone with a table saw should absolutely have a “cutoff sled” or crosscut sled. Check out this great writeup by one of our favorite woodworkers Matthias Wandel if you’d like plans to build from (link).
“You can quickly and reliably make perfectly square cuts exactly every time with a crosscut sled. Mine is made from 6mm marine ply but any flat piece of ply will do. The back board is whatever I had at the time that was straight. The runner is hardwood and cut for a good fit to the slot. The trick is to make the sled a bit too long to the right so that you can use the saw to cut the excess off when you run it through the first time so that when you align the pencil line on your lumber to the right hand end of the backboard you will have a perfect cut exactly the right length. In order to actually cut a scarf I have another cleat that I screw to the base with 2 screws with an 8:1 taper when I want to cut scarfs. With the saw and sled properly tuned up with everything square I can cut my scarfs quicker than I can explain it and I can confidently cut and glue every time and know that they will fit together perfectly.” -Graham Byrnes

It is important to properly align your scarf. When we have 2 sets to glue we use them to align each other. Use plastic to prevent both sets from glueing together, clamp them carefully separating them by several scarf lengths, keeping edges flush, you should have true scarfs. You can use a small finish nail tapped into the joint just a bit to dry fit the parts so that when they are glued up and slipping around the nail can find it’s hole and prevent sliding during clamping.
2.3. Filleting and Taping a Joint
The modern plywood hull uses epoxy and fiberglass to join joints together for the hull and component parts. Each type of join requires a slightly different technique in order to achieve the correct balance of necessary strength and cosmetics. The determination of how to construct each of these joints has been made by the designer, and as these joints are engineered and calculated to withstand the loads of the specific model and item, you should not make changes without the consent of the designer. If you change the lay-up for the designated area, you could compromise the integrity of the joint and possibly endanger the boat. Conversely, adding extra materials willy-nilly can equally compromise a boat by making it overweight and unable to perform as intended.
The taped joints of the hull are the most structurally critical of the joints you will be making. These fiberglassed fillets take the place of the heavy keel, keelson, floor and chine members in a traditionally built wooden boat. While these joints will show in some places, the main thrust of this operation is a structurally sound but neat looking joint.
While there are several methods offered by various experts, we most strongly advocate the wet on wet method, which yields a joint, which is chemically bonded. Chemical bonding between the layers of epoxy saturated fiberglass is inherently less likely to delaminate, and renders a structurally intact joint rather than a mechanically bonded joint. The mechanical joint relies entirely on the integrity of the sanding done by the builder, with multiple and variable risk factors that human error can include.
If you work carefully, and follow these instructions carefully, your all-in-one joint will be neat and ready-finished without sanding.
2.3.1. Boat Preparation:
At this point your boat is wired together and the hull is recognizable, albeit still movable.
Depending on the model, you may be glassing either outer seams first or the inner seams first but it is very important to remove any twist in the still flexible hull and check for level fore and aft as well as athwartships. This is important because later on you will likely be installing a bulkhead while assuming the boat is level so it is good practice to keep it level all of the time. Measure carefully fore and aft, athwartships and diagonally as necessary to true the boat completely. Remember that once you apply the epoxy/glass, you cannot change the shape. Fitting out a twisted or warped” boat can be much more difficult. Larger boats will probably be built either over a temporary jig, permanent frames/floors etc.. and will not require turning.
Prior to beginning to glass long runs such as the chines and centerline, particularly on small boats which have no jig; in order to hold the boat in the correct position you may want to “tack” the seams with epoxy – by using dabs of epoxy between ties to hold the boat firmly the day before.
Epoxying is a job, which you will need to do without interruption, so plan a time when you will not be interrupted by phones, meals etc…Based on the time available, set out a section of hull to be joined. Divide your seam areas into manageable sections with obvious stopping points; for example: starboard chine from forward to center bulkhead, center seam from bow to forward bulkhead etc… Have your taping product at hand; pre-cut strips if you are cutting yourself, and cut to lengths appropriate for the area. Have your epoxy at hand, mixing pumps, containers, stirrers, gloves, plastic etc. The boat should be clean and free of dust. It is not necessary to sand bare plywood prior to coating or filleting unless there is already epoxy on the surface other than small tack welds.
Roll out the fiberglass tape and lay it in the joints dry fitting and cutting all of the pieces of fiberglass to fit. This prevents contaminating the roll of fiberglass with wet epoxy. Overlapping the glass tape in the corners is fine but too many layers can cause the glass not to lay flat creating air bubbles. Butting the ends of the glass strips together at the corners is sufficient for strength.
2.3.2. Making the Fillet:
The biggest mistake that amateurs make is trying to work too large a section and making up too large a batch of epoxy. Again we recommend you make small manageable batches. Once epoxy starts to thicken in the container, the amateur tries to quickly smear it on so as not to lose it…the result is usually a mess…that requires hours of sanding. Start with no more than a 1-2 pump (1.5 – 3 ounce) mixture. As you practice and become adept you will learn how fast you can comfortably go along a seam. (It will most likely be a lot slower than you are probably expecting!) And remember that you will take longer to do sections that have obstructions to work around (bulkheads etc…)
Make up a mixture of peanut butter consistency epoxy using your colloidal silica/wood flour. With a filleting stick correctly radiused for the size of the joint, lay a fillet evenly along a section of the joint. Smooth and clean the edges of this fillet NOW while they are wet. With this method your fillet does not need to be quite perfect, but you will certainly want to make them as smooth and neat as possible. Fillet size depends on the plywood you are joining. Typically for 6mm plywood which is very common for small boats we use a 3/4” or 19mm radius. There are many online articles with charts for fillet size but in all cases the purpose of the fillet is to provide a smooth transition for the glass fibers from one surface to the next.
2.3.3. Lay out the Fiberglass Tape
You will next be applying the fiberglass tape to the uncured fillet but first we like to “wet out” the joint with unthickened epoxy. Mix up a batch of “neat” epoxy (that is mixed but not thickened) and use a paint brush to coat the wood on either side of the fillet and over the fillet carefully so as not to disturb it. You can wait a few hours to do this step if you like. You can then pre-wet your glass strip or simply lay it right down on top of your now filleted and wet joint. The purpose of this is to help to wet the wood out so it does not have to soak epoxy out of the glass while you are trying to wet it out with epoxy. Lay your dry fiberglass tape into the joint. It should “stick” to the epoxy making this a good method for both flat horizontal but also vertical bulkhead joints. Brush on additional epoxy on top of the tape until the glass is fully translucent.
Check back in a few minutes that you don’t have an unnecessary amount of epoxy over the joints. Too much and the fiberglass can float in it. You should still be able to see the weave of the fiberglass at this stage. If you see glossy mirror smooth puddles of epoxy try to soak them up with a brush and scrape it off into a waste container.
There are usually a few places (especially in corners) that pull air under the glass and create an air bubble no matter how many times you smooth them out. Come back to your work in a few hours when the epoxy is starting to get tacky and you mash the air bubbles out for good.
2.3.4. Filling the Weave or use Peel ply
It is necessary to fill in the weave of the fiberglass if you intend to paint this area or if you need to make secondary bonds to it (like bulkheads) because you cannot sand this fiberglass “as is” without just sanding into the glass fibers and weakening the joint. When the filleted and fiberglassed joint is firm, but not cured (in about 6 hours) coat it with epoxy again with a brush. You may need to repeat this step again until the surface is glossy and smooth especially if the joint is vertical and you can’t apply a very thick coat.
A even better way to finish is to lay Peel Ply™*, or equivalent, over the wet tape. Peel Ply™ is a nylon fabric epoxy release product. It stops air and contaminants from reaching the surface of a laminate while it is drying. Additionally it leaves the surface smooth and finished. It is often available from your epoxy supplier. For a cheaper version of peel ply you can use nylon dress liner material.
The advantage of this method is that after the peel ply is removed you end up with a smooth surface that requires no sanding. Because the air cannot reach the surface you cannot get an amine blush, and as a bonus you save an extra step of filling the weave.
When using peel ply you have to deal with air bubbles and this can cause great frustration if you are trying to use it in a curved joint or one with intersecting corners. We recommend using it only on relatively flat and straight sections where it is easy to lay down and not asked to do any complicated bends. You will need a bit of excess epoxy over the tape to make peel ply work. If you don’t have enough epoxy on top of the glass the peel ply cannot make the surface smooth because it pulls some epoxy up with surface tension in order to do this. You can however add epoxy on-top of the peel ply by dabbing it with a brush and it will go through. Just check for white spots indicating the area is too dry.
Once the epoxy is cured, peel off the peel ply and If you have done this correctly, you now have a very neat, structurally strong joint, which will only require a little rough-up sanding at finishing time so that your finish product will adhere.
2.3.5. Tips and Pointers:
Painted or Bright:
If you are going to be painting over the seam, you do not need to worry about the color of the fillet. If, you plan on a bright (clear) finish for any area, you will want to use some of your wood flour. This is the fine wood dust collected in your electric sander bag - or purchased from your epoxy supplier. You can color the seam to match the boat's wood. It does not take very much and will dry darker than it looks in the mixing cup- you might want to make a few experiments for texture color and then record your proportions of epoxy:cabosil:wood flour. It may be a good idea to mix your wood flour and cabosil together in the proper proportion for the whole job. Measured mixes make it easier to keep even coloration. Wood flour makes colloidal silica thickened epoxy easier to sand smooth. B&B among other places, sell a colloidal silica-wood flour blend.
Work smarter not harder:
There is a great temptation in making fillets to "get on with the job"…putting on gobs of epoxy and quickly running your filleting tool over it. You get around the boat fast and you really feel like you are accomplishing a great deal in the day's work. Structurally, there may be nothing wrong with this approach, but then again slipshod work could compromise this important building step. But don't sit on your laurels too quickly – thinking that you have accomplished a lot. First of all, the rough work will probably end up with "white spots" in the fiberglass. These are dry, drained areas – which, besides being unsightly, are structural defects. When you try to tame such a rough seam into compliance, you will learn the hardest lesson of epoxy work - and the one we keep repeating, and we will make it your mantra: The sanding is very hard, it is not fun and it will take more time than you saved in your initial rush. It will never look as nice as a well done joint - and the unhappiness you will feel during the sanding - and maybe forever after looking at the rough seam, lasts a lot longer than the euphoria you felt when you first finished your seams so quickly!
2.4. Making Patterns
Making patterns to the “as built” boat is easy and even fun to do. Our favorite method for templating is to use 2" wide strips of cardboard or ripped up door-skin plywood and a hot glue gun. Cut or break pieces to a length appropriate for any curved edges and join together with spots of hot glue. Add some diagonals for stiffness. You have a perfect fitting template in just a few minutes.
This method is used especially for “tops” such as shown below a bunk or seat top. For boats built from plans this is the preferred method for cutting seat tops as it ensures a perfect fit. Our Spindrift dinghy plans do not give dimensions for the seat tops for this reason.
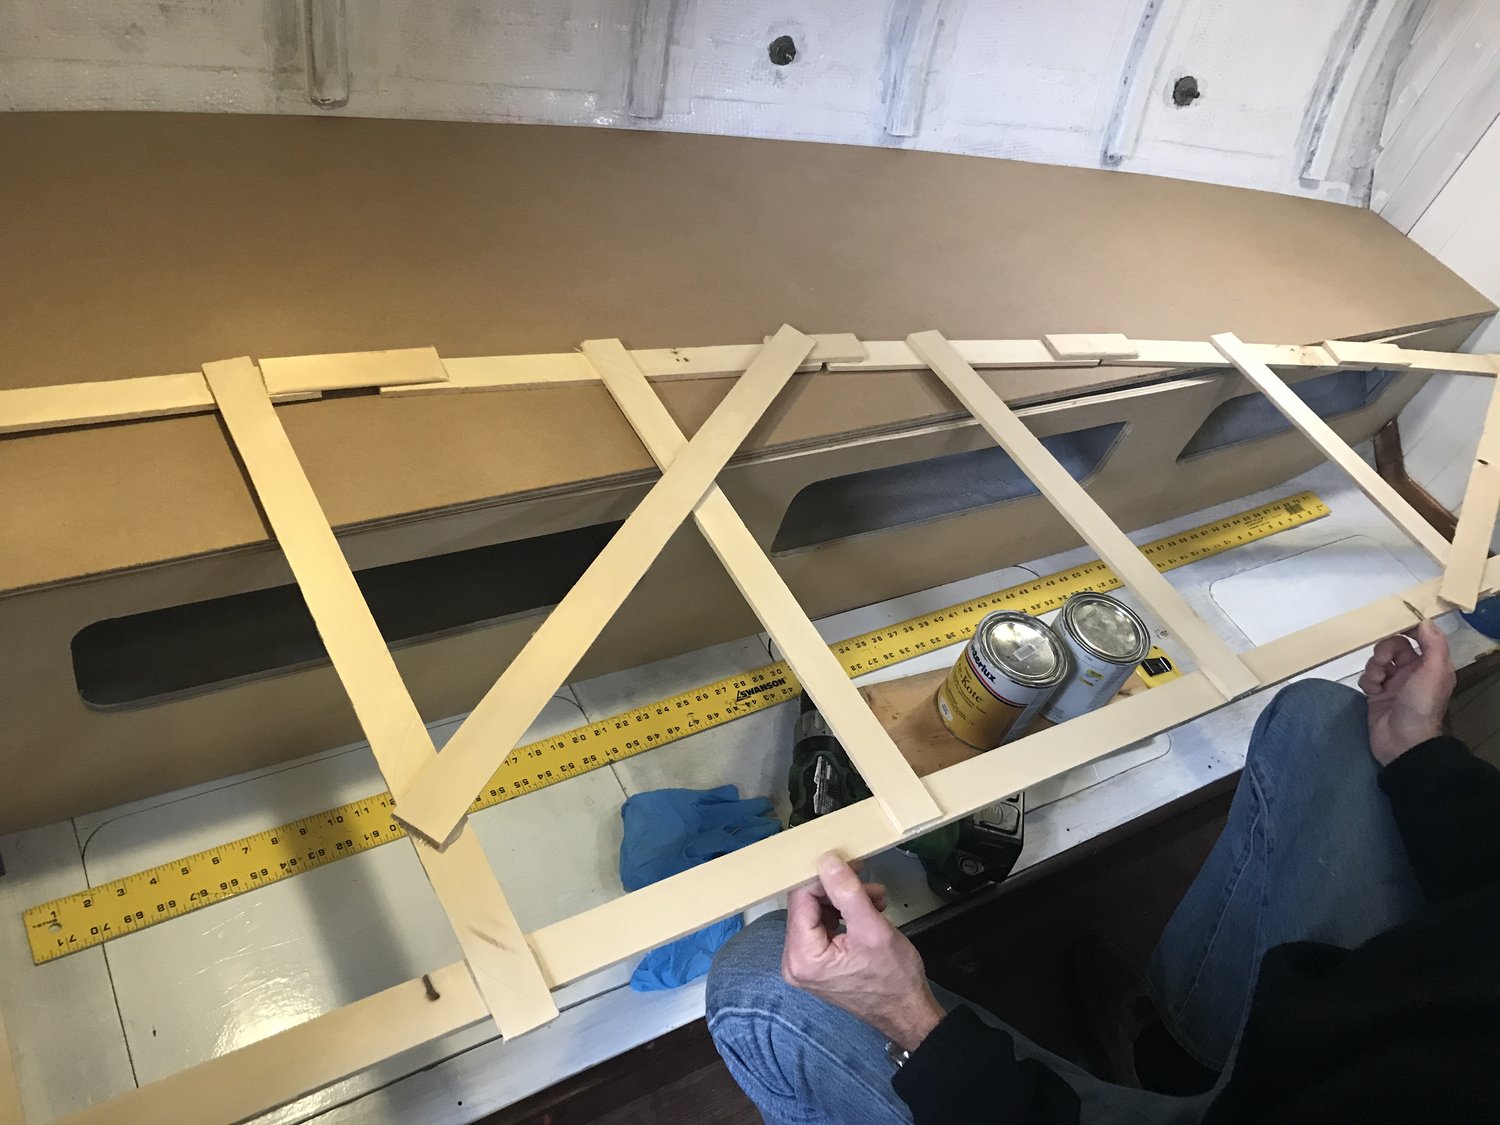
A picture of this method. Link (source unknown).
3. Rigging
3.1. Masts and Spars
3.1.1. Mast assembly
Our free standing multi piece masts are constructed from tubular aluminum. This requires that we add collars to bring up the diameter of the smaller tube to meet the inner diameter of the tube below in most cases. In this video from our CS-15 Series we show the process of sanding and fitting these collars to fit and assembling the mast sections.
Track ramps with glass:
https://youtu.be/MiTKRlCRQq4?t=1288.
3.2. Sails
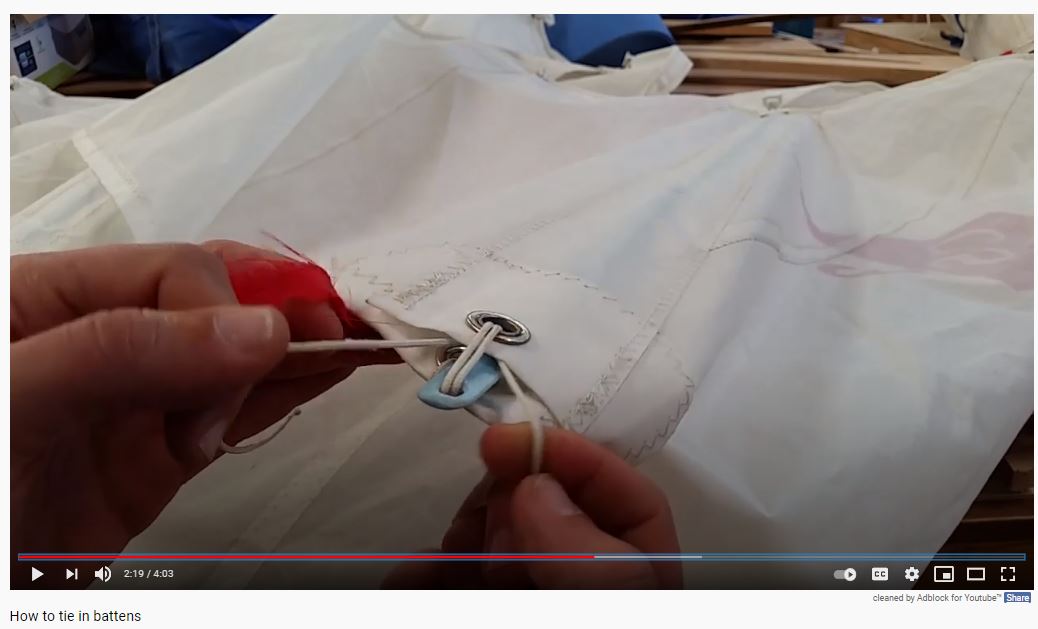
Tying in battens
If your sails have two grommets in the end of the batten pocket use this method for installing the batten with a piece of cordage. We have made a short youtube video walking you through it. How to tie in battens.
3.3. Rudder
3.2.1. Gudgeons and Pintles
A rudder cheek doubler is used with most of our rudder designs which provides stiffness for the lower half of the rudder. This means that the lower half of the rudder cheek is thicker and therefore requires a wider pintle than the top of the rudder cheeks. In this case we simply bend the lower pintle manually to fit. It is easier to do with a small vise but strong hands can do the job. There is enough material in the tangs as the existing bend remains in the same location with the first bolt hole through the cheek spacer and the second (aft) hole inside the rudder space with countersunk bolts through from the inside out. Care should be taken that the strap does not bend at the bolt hole where it is weaker. Here is a build thread which also discusses this.
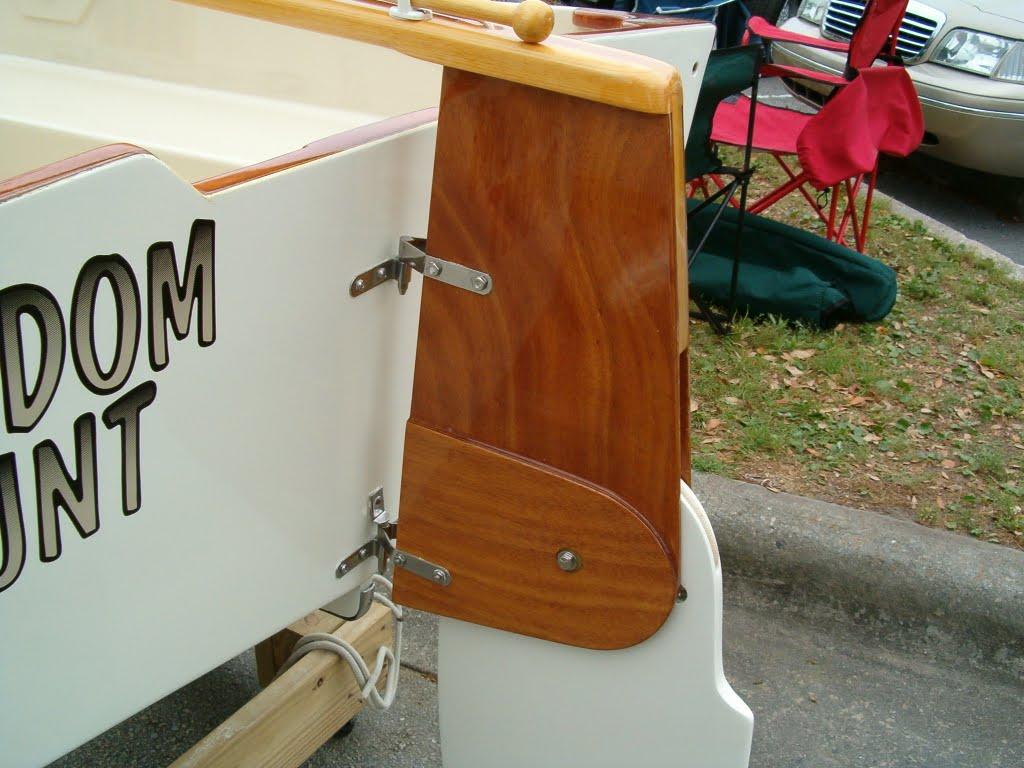
A Spindrift rudder with doubler on bottom.
Note this rudder blade has been installed backwards!!!
4. Finishing
4.1. Painting and Finishing
Once the boat is encapsulated and sanded to an 80 grit finish, the hull is waterproof and ready for final finishing. There are many ways to finish the hull but it must be protected from the UV light of the sun with either paint or varnish or the epoxy will break down after just a few months of use depending on exposure.
Varnishing highlights the natural beauty of the wood but it must be cared for and reapplied annually depending on its exposure to the sun or the epoxy will go unprotected. A good quality two part polyurethane paint can last for decades in the sun without ever needing to be recoated and it is the recommended finish for this reason.
A two part polyurethane paint is a hard glossy coating that resists stains and mildew and retains its gloss for many years. There are many brands such as Awlgrip, Devoe, and Alexseal that can be found online for home builders. These paints should be applied outdoors with plenty of ventilation and a respirator. There are water based, two part paint, alternatives such as System Three LPU that are also very good if you are sensitive to paint fumes. It may be tempting to buy a can of cheap one part exterior paint from the hardware store but experience has shown that such paints mildew and stain, and do not hold up as well after the first few years of use making a complete overhaul an inevitability.
One part boat paints are getting better and better so if you are not comfortable with a two part polyurethane we suggest you purchase a high quality single part coating designed to be used on boats.
Unless you have experience with the paint you choose, it is good practice to test it out on a section of cured epoxy to make sure there is no unexpected reaction. In rare cases, the chemicals in certain paints react with the epoxy coating and prevent the paint from fully hardening.
There is nothing wrong with applying paint directly to your sealed and sanded hull, however if you desire a glossy smooth finish on the outside you may be disappointed with the results. Any imperfection will show through the paint and will be accentuated by the gloss. If a glossy finish is desired from a two part polyurethane coating, it is common practice to first fair the hull and paint with a primer. A two part “high build” epoxy primer such as Awlgrip 545 is the best to prepare the surface for the top coat. Additionally, the fiberglass tape on the outside of the hull can be faired in first using epoxy thickened with a fairing filler such as microspheres and a putty knife to blend it into the hull sides. The epoxy primer which is applied after the fairing of the fiberglass tape is easily sanded and used to fair any imperfections in the epoxy coating and provide an even consistent surface for the top coat. It is typically sanded to about a 320 grit finish before the top coat is applied.
Two part polyurethane paint can be applied using the “roll and tip” method with a foam roller (not a nap roller) and a foam brush. Roll the paint on VERY thin and then pop any bubbles by lightly wiping the surface with the foam brush. Allow a few hours between coats for the paint to skin over before applying a second or third coat depending on color coverage. There are many tutorials and guides available online and on youtube for painting boats using two part polyurethane paints.
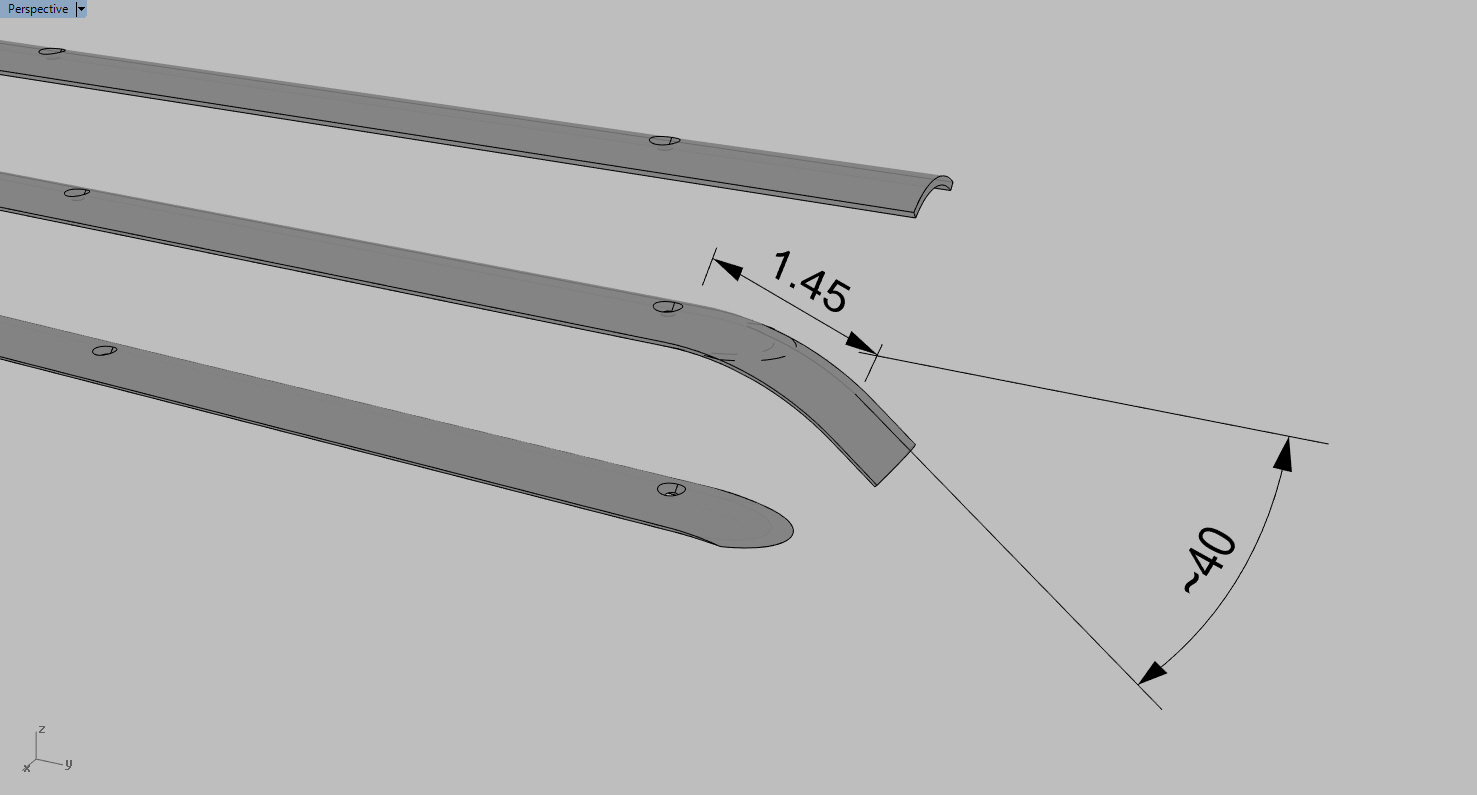
4.2. Rub Rails
4.3. Stainless Steel Hollowback
Stainless steel hollowback is a great way to finish your wooden gunwale and provides a lot of protection when laying against a dock piling. For boats over 12’ we use 3/4” wide hollow back on the gunwales and keel and typically switch to 1/2” wide for the stem of the boat if you choose to put stainless steel on the stem. There are a few things to watch out for when used over wooden gunwales.
Sharp edges beware
The inside edges of the rolled hollowback are often sharp and if you tighten the screws too tight you can crack the epoxy coating on your gunwale. This is a common way that a wooden gunwale gets water damage over time. Furthermore when you bang into a dock, the same is likely to happen. This is the downside to the hollowback, the back is HOLLOW. But it is far cheaper and lighter than solid back stainless so we put up with it. To prevent this from happening the gunwale should be rounded on the outside face to a radius to match the inside radius of the hollow back so that it provides support. You can also grind the inside edges down a bit
Finishing the ends
The ends of hollowback are ugly and need rounding over so they don’t scratch you or catch things. This is a good method to finish hollowack ends. Bend the end down just beyond a screw being careful not to bend it on the hole which it will want to since it is a weaker spot. Then “slice” it off in line with the inside edges with a cutoff wheel. This produces a nicely rounded end that blends into the surface. Note that you need to waste some off the end in order to get the bend so you may have to waste the very first hole or add a new hole after making this homemade end.

4.4. Plastic Rubrails
We have made quite a few rub rails from starboard plastic (UHMW) ripped into strips which obviously does not rot and is also about the same weight or slightly lighter than using a combination of a 3/4” wide wooden gunwale and a piece of 3/4” hollowback. It can also be drilled into for tying off things like sun shades or dodger edges or dot fasteners for a boat cover.
How to sail a Cat Ketch
Here was Graham's advice for sailing the CS 17 upwind on a sporty day. I had the winds that day at 20, maybe 25 mph. They were also gusty with variable direction and waves in the 0 to 2- or 3-foot range. So there was plenty of opportunity to play the gusts, the puffs and the waves.
1. Tighten the snotters to flatten and depower the sails. (I had done this).
2. Lower the sails as much as you can get away with, to reduce the heeling force. (I had double-reefed both main and mizzen, but see below).
3. Raise the centerboard so that it rakes to about 45 degrees aft, to raise the center of lateral resistance, and also reduce the heeling force. [Graham then notes: "You do need to keep up some speed to make up for the smaller centerboard area."] (I had never even given this a thought. I understand now what he's saying, since I was heeling a lot, probably often 40 degrees. I say that I try to sail the boat flat, but I wasn't managing to do so that day (see also below). I think part of what Graham is saying is that you're going to trade some leeway for progress. I'm eager to try this tweak.)
4. The worst thing you can do is try to pinch, because the waves will stop you. (I'm sure I was often pinching, and I know the waves were stopping me. Later in the day, in a different part of the lake, the wind was the same but the water was flat and I scooted upwind, tho on broader tacks than 45 degrees, just as Graham's envisions.)
5. To avoid pinching, sheet a little further out than normal but not too much and try to hold her flat and full. [Graham doesn't specify, but I suspect he foresees a fair amount of hiking here.] (I played with the sheet and tried keeping the boat flat, but I suspect I didn't do enough of this and was -- ironically enough -- underpowered. See next.
6. Graham's first reef is just the main. If he still cannot hold her up he will reef the mizzen. "I [i.e., Graham] like a fair amount of weather helm in these conditions. If you take away too much power, you will be slow in the lulls. Rather than feather too much in the puffs you are better to ease the main for a few seconds and bring it back on quickly. If you have speed you can come up for the bigger waves as long as you fall back on course right away." (As I mentioned, I tried playing the sheet some, but I more often was holding the sheet and trying to head up in puffs. I'm eager to try it the other way around: hold course and ease. And I'm also now convinced I should have left the mizzen at one reef, rather than double reefed at that point. Although it was blowing, it wasn't survival.)
As Graham notes, all of this can be tiring, especially solo. But he adds that "the CS 17 has a high angle of positive stability, which means that she is forgiving in gusty conditions, but sailing at large angles of heel is slow."
A couple more notes: The Scamp has water ballast, which adds 300 (500?) pounds to her weight and certainly helps her carry on through chop. And, when I finally got frustrated with my sailing ability and turned on the 2.5 hp Suzuki, the CS just drove straight to wind like nobody's business, at 5 mph or even more (vs flat calm top end of 6.5 mph). So I was very impressed with that. And I stayed dry, too.