Creating a Jupyter/Spark Server on Amazon Elastic MapReduce
Step 1.1. Sign up for Amazon AWS Educate
Register for Amazon Web Services Educate at https://aws.amazon.com/education/awseducate/. Use your .upenn.edu email address to receive up to $100 in usage credits (depending on whether you’ve used AWS for other courses).
Step 1.2. Spin up an Elastic MapReduce Cluster
Now:
- Open aws.amazon.com in your browser, log in, find the category called Analytics and choose EMR (which is Elastic MapReduce). Change your location (next to your name) to use N. Virginia.
- Choose Create cluster.
- Click on Go to advanced options (by the top label, “Create Cluster - Quick Options”) since we want a more complex cluster.
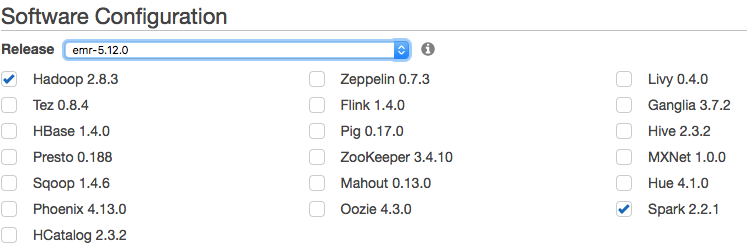
- Choose the following software, which is what we’ll be using:
- Paste the following into the box under "Software Configuration", "Edit software settings (optional)."
[
{
"Classification": "spark-env",
"Configurations": [
{
"Classification": "export",
"Properties": {
"PYSPARK_PYTHON": "/usr/bin/python3"
}
}
]
}
] - Hit Next.
Step 1.2.1 Choose Your Cluster Nodes and Costs
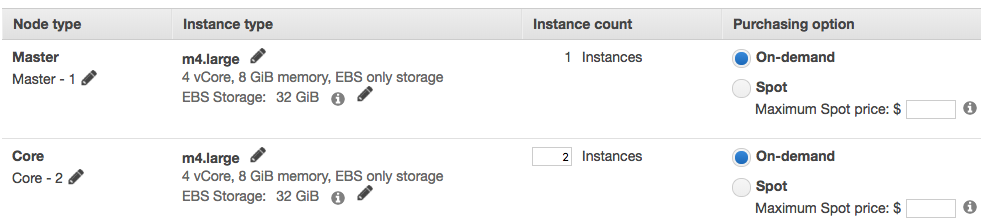
- Determine how many compute nodes you need, similar to the screenshot below. You can remove the “Task” nodes and just settle on Core (there should be at least 2) and Master (there needs to be at least 1). You should probably choose m4.large or preferably m4.xlarge nodes; you may provision for more nodes, but beware the costs.
- Click Next. Name the cluster CIS545-Jupyter. Uncheck Debugging.
Step 1.2.2. Set EMR to Launch a Jupyter Server
- Now you’ll need to run a script to install Jupyter Notebook on your AWS cluster.
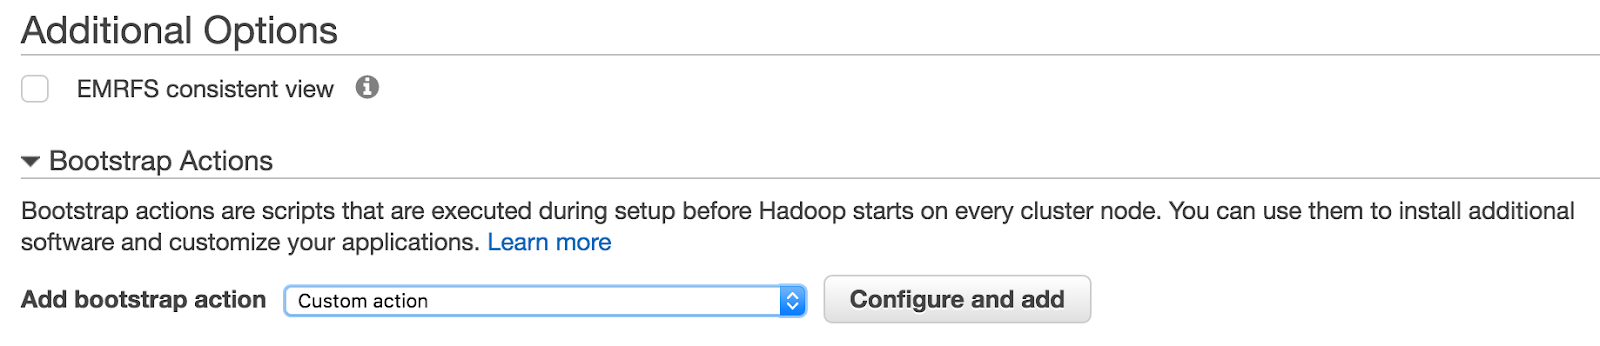
Expand Bootstrap Actions at the bottom (click on the triangle).
Add a custom bootstrap action that is a Custom action: - Click Configure and add. Then fill in the details:
Name: install_jupyter
Script location: s3://aws-bigdata-blog/artifacts/aws-blog-emr-jupyter/install-jupyter-emr5.sh
Optional arguments:
--toree --ds-packages --python-packages ggplot nilearn --cached-install - Click on Add, then Next. Under Security Options, select or create a new keypair. If the keypair is new, please save the .pem file in ~.
- Click Create cluster.
Step 1.2.3. Set up Firewall Rules
Next you need to grant limited access to your Elastic MapReduce cluster. You’ll want to be very conservative so no one can hack your cluster. Here we will just provide access to the ssh secure shell.
- Point your Web browser to console.aws.amazon.com, log in, choose EMR, and wait for the cluster to be ready. This will take multiple minutes, so please be patient.
- When it’s ready, click on the triangle next to the cluster, then on View cluster details. This should show details of the cluster. The “public” name of your Jupyter server will be shown at the top, e.g.:
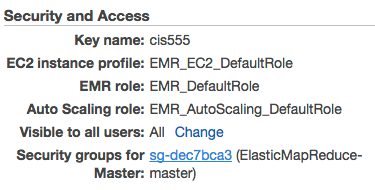
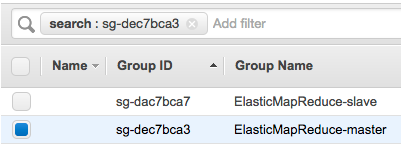
- In the lower right-hand side you should see Security groups for Master: sg-??????? (ElasticMapReduce-Master). Click on the blue “sg-????” link.
- Click on the check box by “ElasticMapReduce-master”:
- Below, click on the Inbound tab and the Edit button. Go to the bottom and hit Add Rule. Change the left-hand menu to “SSH” and change “Custom” to “My IP.”
- Hit Save. If you log in from another site, you may need to repeat the process.


Step 1.2.4 Set up a “Tunnel” for Your Browser
Copy the .pem file (we’ll assume it’s cis545.pem) from your EC2 keypair setup, and save it in your ~/Jupyter directory. This will be used to encrypt the channel to your EMR Master node. Suppose, as in the above screenshots, your node is ec2-204-236-245-106.compute-1.amazonaws.com.
On Mac OS, Windows with Cygwin, or Linux:
- Open a Terminal window and cd to ~/Jupyter.
- Run chmod 600 cis545.pem
- Run ssh -i cis545.pem -N -D 8157 hadoop@ec2-204-236-245-106.compute-1.amazonaws.com
Or on Windows, install MSI (‘Windows Installer’) from here. This will provide the services PuTTYgen and Putty. Then, as per Amazon’s instructions that we’ve stolen and selectively edited...
- Start PuTTYgen (for example, from the Start menu, choose All Programs > PuTTY > PuTTYgen).
- Under Type of key to generate, select SSH-2 RSA.
- Choose Load. By default, PuTTYgen displays only files with the extension .ppk. To locate your cis545.pem file, select the option to Display files of all types.
- Select your cis545.pem, and then choose Open. Choose OK to dismiss the confirmation dialog box. Choose Save private key to save the key in the format that PuTTY can use. PuTTYgen displays a warning about saving the key without a passphrase. Choose Yes and save the key as “cis545.ppk”.
- Start PuTTY from the Windows Start Menu programs list or by double-clicking putty.exe.
- If necessary, in the Category list, choose Session.
- In the Host Name field, type hadoop@ec2-204-236-245-106.compute-1.amazonaws.com
- In the Category list, expand Connection > SSH, and then choose Auth.
- For Private key file for authentication, choose Browse and select the cis545.ppk file that you generated.
- In the Category list, expand Connection > SSH, and then choose Tunnels.
- In the Source port field, type 8157.
- Leave the Destination field blank.
- Select the Dynamic and Auto options.
- Press Add then Open.
- Choose Yes to dismiss the PuTTY security alert.

In either case, leave the window open (even if you don’t see anything happening). Now when your computer “talks” to port 8157 this gets sent to a machine on Amazon.
Step 1.2.5. Set up a Web Proxy
Now we want your browser to automatically forward requests to our Amazon server, through this “tunnel.” (Note that for Mac OS X, one can use SecurePipes; see the comments on Piazza post @395 by Mingyang Li for details.)
For this we’ll use the Chrome browser (sorry, Edge / Safari / Firefox fans).
- Launch Chrome.
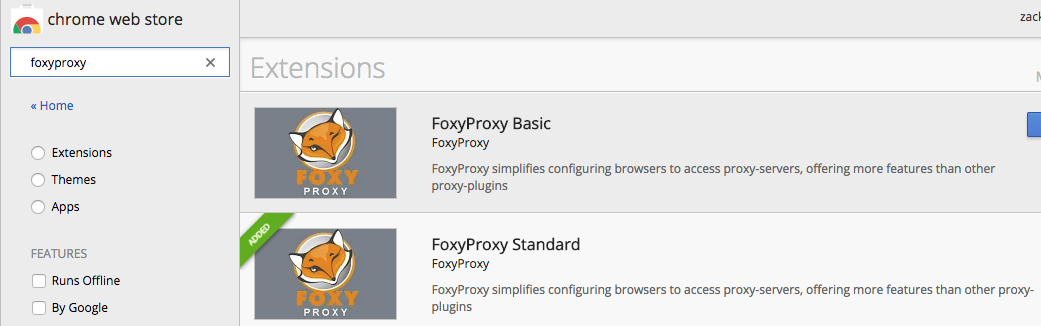
- Go to the menu on the upper right of the browser, choose More Tools > Extensions.
- Go to the bottom of the list and choose Get more extensions. In the Chrome Web Store, type “FoxyProxy” into the search box:
- Next to “FoxyProxy Standard”, choose “Add to Chrome.”
- Download foxyproxy.xml by right-clicking and hitting “Save as…”. Remember where you save it, for Step 8.
- Now find the orange icon for FoxyProxy in your Chrome toolbar, right next to the menu:
- Click on it and choose Options.
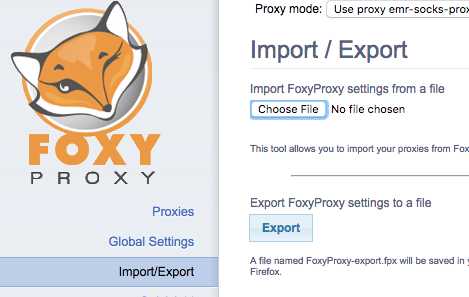
- Click on Import/Export, then Choose File, then select the foxyproxy.xml you downloaded. Choose “Add” in the dialog that pops up.
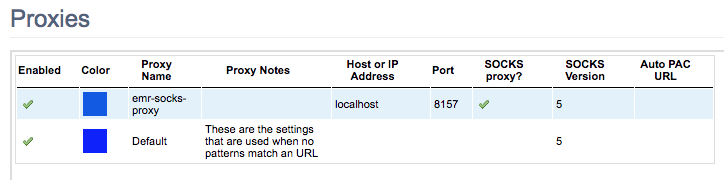
- Once you are done, if you click back on Proxies you should see the new settings:
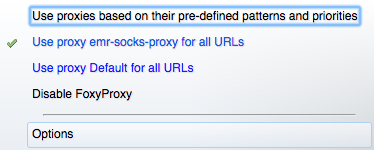
- Close the browser tab with FoxyProxy. Click on the orange FoxyProxy icon again, and in the menu choose “Use proxies based on their pre-defined patterns and priorities”.
- Now type into your browser the public address of your EMR cluster followed by port 8888, e.g., ec2-204-236-245-106.compute-1.amazonaws.com:8888
- This should send your browser to a Jupyter console. If it says “There is no internet connection”, check that your tunnel from the previous step is still open.


You are ready to go! Just please remember two things:
- Whatever you save on Jupyter on the EMR cluster will go away if the cluster goes down or is terminated. You should always back up your updates by downloading the Python Notebooks from Jupyter (File|Download as).
- You are being billed by the hour for your cluster nodes. It takes 15-45 minutes to “spin up” a cluster, so you shouldn’t shut it off on a whim. But once you are done with an assignment, you should probably go to the AWS Console and terminate the cluster. You can follow this document to launch a new cluster at another point.