Section 5 - State
Storing Information in State
- state is where information is stored within a component.
There are a few differences between props and state. First, state is changeable, whereas props are not. Second, a state belongs to a component, whereas props belong to other components. This article gives a more in-depth explanation of the differences between state and props.
The differences can be confusing, so I encourage you to not worry about them too much and dive right into the code, because getting hands-on is the best way to learn.
- Just as everyone first learns how to code by writing “Hello World”, everyone who learns React has to build a click counter!
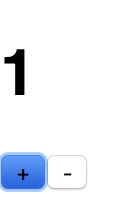
- Our click counter application should look something like this:

The number increments every time the “+” button is clicked, and decrements every time the “-” button is clicked.
- Throughout the process, you will learn to create a state and modify it with functions.
- Let’s go back to App.js and clear up everything again to start fresh:
import React, { Component } from 'react';
class App extends Component {
render() {
return (
);
}
}
export default App;
- Let’s first create a state. We can add it before the render function like so:
class App extends Component {
state = {
count: 0
}
render() {
return (
);
}
}
- This defines the state, with a property “count” that is initialized to the value 0. Nice! Now, similar to props, “count” is now available in this.state.count.
- Next, let’s write some JSX in our render function like so:
render() {
return (
<div>
<h1>{this.state.count}</h1>
<button>+</button>
<button>-</button>
</div>
);
}
- Here we created one <h1> and two <button> elements, and wrapped them all in a <div> element. Notice how we can access “count” by reading from this.state.count.
- We have the basic skeleton code ready, now it’s time to figure out how to modify our state!
- The first thing to know is that the setState() function is used to, well, set states! The function is available in all React components. We can use it by accessing this.setState().
- The setState() function either takes in an object, or a function.
- setState() takes in an object when the new state does not depend on the old state. If we want to set our count to 999 no matter what, we could write:
this.setState({
count: 999
})
- This is perfectly fine in some situations, unfortunately this is not helpful in our case, since we want to increment or decrement “count” based on the previous “count”.
So instead, we could pass in an arrow function like so:
this.setState((prevState) => {
return {count: prevState.count + 1}
});
The arrow function receives a parameter that contains the previous state, which we have named “prevState” here. It then returns a new state object with the new “count” value.
- Knowing that we can access the state by this.state, you might be tempted to write something like:
this.setState({
count: this.state.count + 1
})
Or
this.state.count += 1
- They are both WRONG! Like pineapples on pizzas! Read this article if you want to know why.
- With those details out of the way, let’s actually start writing the functions! We could write an incrementCount() and a decrementCount() function like so:
class App extends Component {
state = {
count: 0
}
incrementCount(){
this.setState((prevState) => {
return {count: prevState.count + 1}
});
}
decrementCount(){
this.setState((prevState) => {
return {count: prevState.count - 1}
});
}
render() {
...
}
}
- The appropriate function will be called when one of the buttons is clicked. Let’s hook up the functions to the buttons like so:
class App extends Component {
…
render() {
return (
<div>
<h1>{this.state.count}</h1>
<button onClick={this.incrementCount}>+</button>
<button onClick={this.decrementCount}>-</button>
</div>
);
}
}
- Here we passed the functions to an event called “onClick”. The functions incrementCount() and decrementCount() are called event handlers, because they are called when an event, in this case onClick, occurs. Here is a list of different events.
- We’re done! Let’s test our application!
- Let’s click on one of the buttons, and voila… what!?
Uncaught TypeError: Cannot read property 'setState' of undefined
- Let’s think about what went wrong. The this keyword is somehow undefined, therefore we won’t be able to access setState. Why is this undefined? It is because the value of this is determined by who is calling the function. When this is used inside the class, such as inside the render() function, this is referring to the class object. However, the event handlers are called by some other functions from react-dom, therefore this will become undefined.
- In order to fix the value of this, we can make use of a function called bind(). It takes in one argument, and it can be called on any function. It returns a new function with the this keyword set to the input argument.
- Let’s change our callback functions like so:
render() {
return (
<div>
<h1>{this.state.count}</h1>
<button onClick={this.incrementCount.bind(this)}>+</button>
<button onClick={this.decrementCount.bind(this)}>-</button>
</div>
);
}
Now everything should work!
- To summarize, let’s break down what’s happening in this.incrementCount.bind(this). The first this refers to the class object, in which we can access the incrementCount() function. In order to set the this inside incrementCount() to a specific value, we have to call the bind() function on it. We pass this to bind() because this outside incrementCount() is the desired value (referring to the class object) that we want this to be inside the incrementCount() function!
- It is complex, even for experienced coders. Take some time to read through the last part again if you need to.
Summary
In this section, we learnt about React state. We learnt to create and update state by creating a click counter. We also learnt about writing event handlers, and why we have to call .bind() on the event handler before passing it to onClick.
I hereby declare that you have now learnt all the basics of React! You should be proud of yourself and give yourself a pat on the back!
In the next section, we’ll talk about advanced state manipulation.
Final Code
Here is the code for this section.