
ClinicAid Ontario - Getting Started Guide
Setting up your provider record
Connecting your account to the MC EDT system
1) Doing a demographic import of patient records from a previous system
2) Adding a patient record from the Manage Patients section
3) Creating a patient record from the Create Invoice page
1) Completing the patient information section
2) Completing the provider information section
3) Adding line items with appropriate service codes, fee modifiers, and diagnostic codes
4) Adding any additional information to the claim
5) Saving and submitting your claims
Contacts and additional resources
Welcome to ClinicAid
Thanks for signing up for ClinicAid! We hope our web-based medical billing software will enable you to bill the Ontario Ministry of Health and Long-Term Care (MOHLTC) quickly and easily!
Now that you’ve signed up, you should have already received your login details via email to access your brand new ClinicAid account. In order to start setting up your account for billing, you’ll need to log in. Go to the clinicaid.ca homepage and click on the Login button in the top right-hand corner. Enter your email and password on the login page and hit the Get Started button to access your account.
We recommend using Mozilla Firefox or Google Chrome for any of your ClinicAid activities as these are the browsers that will ensure the best ClinicAid experience. We don’t advise using Safari or Internet Explorer for your ClinicAid billing purposes.
Once you’ve logged in with your email and password, you will reach your Dashboard which should show three empty sections (Invoices Requiring Action, Billing Opportunities, and Unsubmitted Invoices) when you first start out. You’ll need to set up your account in order to begin creating and submitting your bills properly through Ontario’s Medical Claims Electronic Data Transfer (MC EDT) system. This is a step-by-step written guide to how to do just that! Please feel free to view our video tutorial that also goes over these instructions.
Setting up your provider record
The first thing you’ll need to do in order to complete your account setup is to create a provider record. If you’ve already been in touch with one of our support reps, this step may already be partially or fully completed for you.
In case you haven’t had your provider record(s) set up yet, here is what you’ll need to do.
Step 1: From the left-hand side menu, click on the Admin section.
Step 2: Click on Providers.
Step 3: Click on the green “Add Provider” button.
Step 4: Complete the provider information, including:
- First and Last Name: the physician’s name
- Provider Billing Number: the physician’s 6 digit practitioner ID, as registered with the MOHLTC, also known as an OHIP number.
- Claims Office: submitted claims will be sent to one of the specifically designated claims offices in Ontario. These offices were previously based on geographical location, but recent changes to assignment procedures may have affected your claims office location. If you’re unsure which claims office you belong to, the best way to confirm is to give the OHIP Service Support Centre a call at 800-262-6524 or to email them at SSContactCentre.MOH@ontario.ca.
- Visit Location*: the Visit Location, also know as “Master Number”, is generally required for services provided in larger health facilities such as hospitals and extended care centres. This is a 4 digit code that identifies the specific facility. In ClinicAid, Visit Location is a lookup field which can be typed into to search for the correct code. Simply type in the name of the hospital and select the correct facility from the search results that appear in the list. If you are not providing services at a hospital, you can enter the code 0000 - No Location*: If you leave this field blank, your claims with have this location (0000) set by default.
- Group Number: to be completed only if you are using a group billing number for your claim submission payments. This is generally applicable to practitioners who work at clinics with multiple practitioners on staff where the clinic is receiving payment from the Ministry and is then responsible for paying out each physician.
- Specialty: a two digit code that identifies your specialty (e.g. 00 - Family Practice and practice in General, 19 - Psychiatry, etc.). This field is also searchable and can be typed into if you’re unsure of your specialty’s code.
- Service Location Indicator (SLI)*: a 3 letter code that specifies where in a hospital or care centre (Visit Location) the service was performed. There are currently 8 options to choose from, as well as the default option, 3821 - Not Applicable. If you leave this field blank, your claims will autocomplete with the 3821 SLI code.
*Please note: A physician may work at multiple locations. The information saved in the provider record will be the default information that will appear on all the claims created using that particular provider, unless modified for each individual claim. It is also possible to leave this information blank and to complete it per bill using the Advanced tab when creating an invoice or with the use of default invoices (invoice templates).
Override MUID (Override GoSecure Credentials For This Provider checkbox): this is a special setting used to set up the connection between ClinicAid and OHIP’s Medical Claims Electronic Data Transfer system. Checking this box when setting up or editing a provider’s record allows the user to override the global GO Secure details that are set in the Admin section of ClinicAid for the entire account.
GO Secure credentials are required in order to connect the ClinicAid account directly to OHIP’s MC EDT submission system. This indicator should be used in situations where there are multiple physicians using one ClinicAid account, but some or all have their own individual GOSecure credentials that they are using for their particular claims.
Clicking the checkbox will display 3 additional fields for the GO Secure Username, the GO Secure Password, and the MUID (Provider ID or Group Number) which can be saved to the provider’s record. You can set up this connection on the global ClinicAid account level by following these instructions.
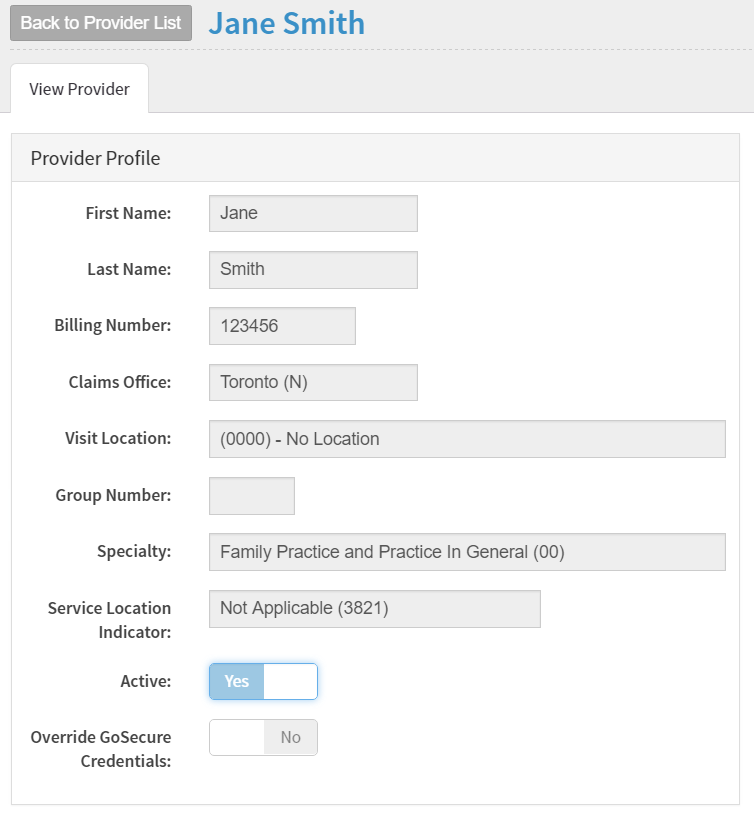
Step 5: Click the blue “Create provider” button in order to save the record. Once you’ve completed all of the fields and saved the record, you should see a new provider displayed in the account. You can view the record by clicking the name of the provider or the little grey eye button on the right. You can make edits to the record by clicking the name of the provider and selecting edit, or by clicking the blue pencil icon on the right. Providers can be set to “inactive” if needed.
A completed provider record should look something like this:
You’ll need to set up separate provider records for each of the physicians the billing will be done for using this ClinicAid account.
Connecting your account to the MC EDT system
ClinicAid is built to connect directly to the MC EDT system that is used for electronic claims submissions. However, in order to connect the two, you will require a GO Secure account that is set up for MC EDT submission.
If you are not yet set up for submitting through the MC EDT system, you will need to complete that procedure before being able to submit your bills in ClinicAid. You should have received a letter in the mail with instructions on how to get an MC EDT account. If you haven’t received a letter, please contact the OHIP Service Support Centre at 800-262-6524 or via email at SSContactCentre.MOH@ontario.ca to get your account started.
If you already have your GO Secure account set up with your username and password, you can input this information in the Admin section of ClinicAid under the Manage GO Secure tab. You will need your:
- MUID: your provider ID (OHIP number) or your group number if billing through a group.
- Login: the email address or GO Secure ID that you use to log into the MC EDT system via the GO Secure site.
- Password: the password that you use to log into the MC EDT system via the GO Secure site.
Once you have saved this information into this section, you will see a “pending validation” message. Our system runs a validation approximately every 10 minutes to make sure that it can connect to the MC EDT system with the details you’ve entered. When the validation has run, you should see an updated message in either green or red letting you know that the information you entered is either valid or invalid. If your information is valid, you are ready to start submitting claims through ClinicAid!
Please note: It is also possible to submit claims through a designee (someone you designate to submit your claims for you). There are additional steps to assigning a designee to your GO Secure account that you’ll need to complete before the person is able to submit claims for you. This is especially applicable for physicians who would like to use a billing agent for their OHIP claims submissions.
Adding your first patients
In order to create and submit claims, you will need to link them to a patient’s personal health number (PHN). This means that you will need to create patient demographic records in ClinicAid with your patients’ details before beginning to submit claims.
There are three ways to add new patients into your ClinicAid account, outlined below.
1) Doing a demographic import of patient records from a previous system
If you were billing through a different software previous to getting a ClinicAid account, it may be possible to import your patient data directly into ClinicAid so that you don’t have to manually enter each patient record into the system. We will need a copy of your data in a comma-separated value (CSV) format (generally an Excel spreadsheet-type format will work).
If you don’t have direct access to your patient data, you will need to ask your current or previous billing software provider for the export or, if the data is on a server within your office, we may be able to access it remotely.
Contact a ClinicAid support rep if you’d like to find out more about doing an import of your data.
2) Adding a patient record from the Manage Patients section
You can add individual patient records by navigating to the Manage Patients section in the left-hand side menu. This will probably be the most efficient way to add a batch of patients when you first begin using your new ClinicAid account.
Step 1: In the Manage Patients section, you will see two options for creating a new patient record:
Option 1: Click the green “Add Patient” button to open up the complete patient demographic form which will allow you to fill out all of the patient’s details.
Option 2: Click the green “Quick Patient” button to open up a shortened version of the complete patient demographic form. You can set which fields to display by default on this form in the Preferences > Settings > Patient Quick Forms section.
Step 2: Select whichever of the two options is best suited to your practice and begin entering the patient’s details. OHIP requires all claims to contain the following basic patient information in order for them to be processed properly:
- Health Number: 10 digit personal health number of the patient, as seen on their healthcare card.
- Version code: the version code of the patient’s healthcare card, found on cards that have replaced a lost, stolen, or destroyed card. The version code is generally just a one or two letter code found in the bottom right corner of the health card.
Nothing else is required by OHIP, unless billing for an out-of-province patient*, but the ClinicAid system will also ask you to complete the following in order for the patient record to be set up correctly:
- First and last name: enter the name of the patient.
- Healthcare Type: the issuing province or territory that the patient is covered under. This field must be set as the correct province or territory for out-of-province patients.
- Birthdate: although this is not mandatory to complete, ClinicAid will give an Acknowledgement message to ensure the user is aware that, if this isn’t completed, it may affect certain invoice values in ClinicAid.
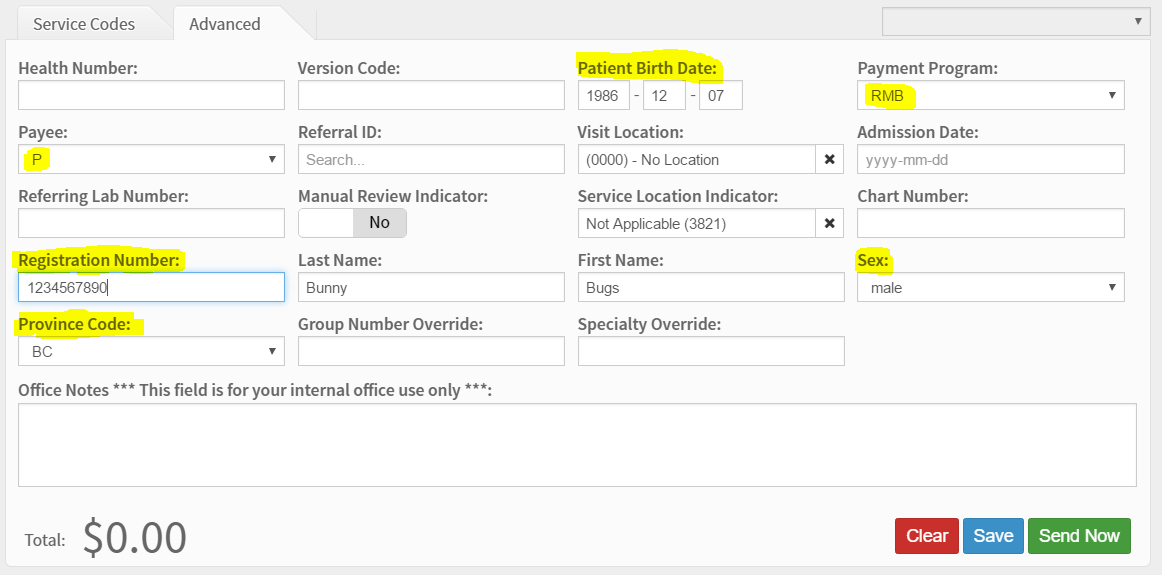
*Please note: For Reciprocal Medical Billing (RMB), also known as out-of-province claims, certain additional information must be included and the format of the bill will change slightly. Most of this information is automatically completed in ClinicAid based on the information saved into the patient’s record.
A date of birth must also be included in out-of-province patient records, as must their gender, in order for the Ontario Ministry of Health to process the claim correctly through the national Reciprocal Medical Billing System. A claim for an out-of-province patient should look similar to the image below when viewing the Advanced tab on the Create Invoice screen.
Step 3: Click the blue “Create patient” button to save the record once you have added the desired amount of information.
You can continue adding patient records by repeating this process.
3) Creating a patient record from the Create Invoice page
You can also create patient records directly from the Create Invoice screen. This method will be particularly useful once you already have your patient files set up and are adding new patients as you are doing the billing for them. It is also especially useful for physicians that don’t have regular patients.
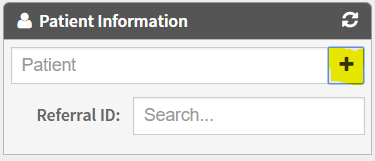
When you click on the Create Invoice section in the left-hand menu, your cursor will automatically be in the Patient field. This field is a search that you can type patient names or PHNs into in order to pull up their patient record easily when creating an invoice. However, if the patient doesn’t already exist in your system, you will need to add them following these steps:
Step 1: Click on the + icon next to the patient field in order to open up the “Add a new patient” quick form.
Step 2: Complete all of the desired patient information.
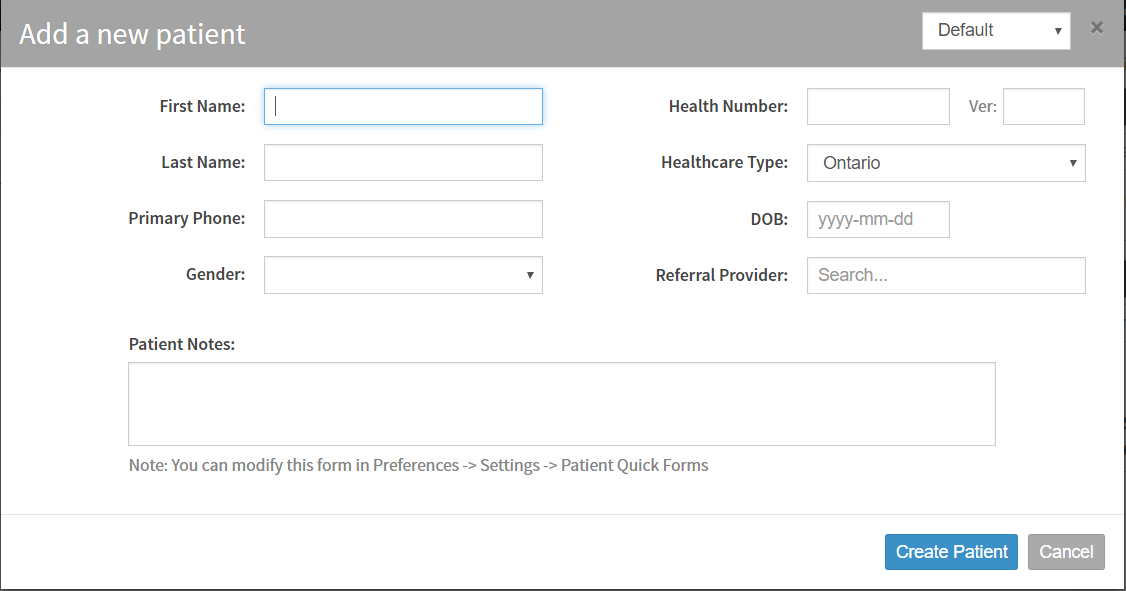
Step 3: Click the blue “Create patient” button in order to save the record. This patient’s record will now join your other records in the Manage Patients section and will be searchable for future billing.
Once you’ve added patient records to your ClinicAid account, you’re ready to start creating invoices!
Creating your first invoices
There are 5 main sections to complete in order to create and submit your Ontario Health Insurance Plan (OHIP) claims properly. They are as follows:
1) Completing the patient information section
Step 1: Select the patient you wish to bill for. This field acts as a search so if the patient already exists in your account, simply search for them by name or PHN. If the patient does not yet exist, add the patient record following the instructions above.
Step 2: Once the patient is selected, their information should prefill in the Patient Information section of the invoice.
Step 3: Add a Referral ID if the patient was referred to you by another physician. This field acts as a search so you can begin typing the referral physician’s name or practitioner ID. If they don’t appear in the search results, you can simply type in the practitioner ID if you know it, or you can add the provider as a custom referral provider by going to the Admin section in the left-hand side menu, opening the Referral Providers tab, and adding a new referral provider.
2) Completing the provider information section
If you’ve set a default provider* in your account, (especially useful for sole practitioners), the Provider Information section should already be prefilled. Otherwise, simply begin typing the name of the physician or select them from the list that appears.
*To set a default provider, click the Edit icon next to the Default Provider setting (found at the top right of the screen next to your account information) and select the provider’s name you wish to set as the default provider in the account.

To save, click the checkmark. Once this is saved, your new invoices will have the provider information section prefilled with this provider’s details.

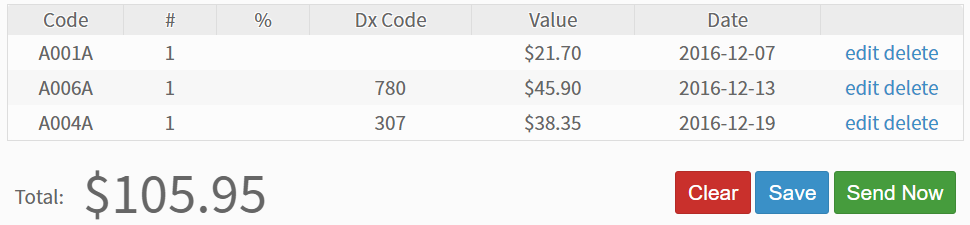
3) Adding line items with appropriate service codes, fee modifiers, and diagnostic codes
All claims submitted to OHIP will require a service code. Fee amounts may be modified using either the multiplier and percentage fields, or using the Override Fee field. Some service codes also require a diagnostic code.
The service codes and diagnostic codes fields are searchable by code or by description so typing numbers or letters in these fields will automatically display search results. Codes can be selected from the search results or typed in.
In order to complete a line item, follow these steps:
Step 1: input the appropriate service code. Service codes generally consist of 5 characters and follow this format: A001A. You can search for a code by number or description. For longer descriptions, use your mouse to hover over the short descriptions displayed in order to see the full text.
Step 2: complete the multiplier and percentage increase fields, if applicable. If the fee amount claimed is different than the fee amount shown, you can indicate how much you’d like to claim for by using the Override Fee field.
Step 3: input the appropriate diagnostic code, if applicable. You can search for the code by the number or the word.
Step 4: select the service date. By default, the service date is set to today’s date. In order to select a service date in the past, use the calendar feature.
Step 5: click the black “Add” button to add the line item to the invoice.
You can add as many line items as you’d like for a particular patient. They will be assessed by OHIP based on the service code and service date.
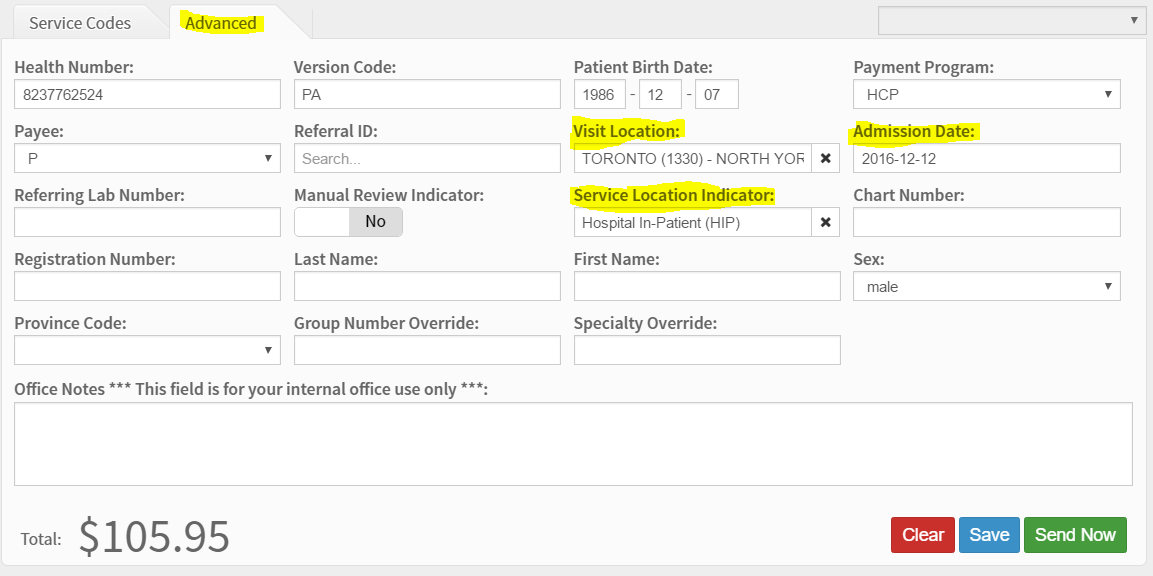
4) Adding any additional information to the claim
Any other information that may be required in a claim, such as hospital admission date, can be set in the Advanced tab on the invoice creation page. This is where specific claim information for a particular claim, such as visit location, service location indicator, and more can also be changed in case it differs from the default provider information.
Patients that are seen in the hospital will require an admission date which can be completed either in the patient’s record as a default admission date or can be completed in the Advanced tab when creating the invoice. They will also require the visit location to be set to the appropriate code (searchable by typing the name of the hospital in the field) and may also require a specific Service Location Indicator (SLI code) to be set (also searchable).
5) Saving and submitting your claims
Once you’ve completed all of the necessary information on your claim, you are ready to send it in! You can submit the claim immediately by clicking the green “Send Now” button at the bottom of the invoice, but we recommend saving the claim by clicking the blue “Save” button instead. Saving your claims will allow you to do one final review before sending them off in a larger batch.
To send off your batch of saved claims, go to the Manage Invoices section. The “New” status (first tab) will display your new, unsubmitted claims which you can then send in a batch by checking the top checkbox (next to Service Date). This will select all of the claims visible on the page and, once you click the green “Send” button that appears after checking the items, they will be sent to OHIP’s MC EDT system.
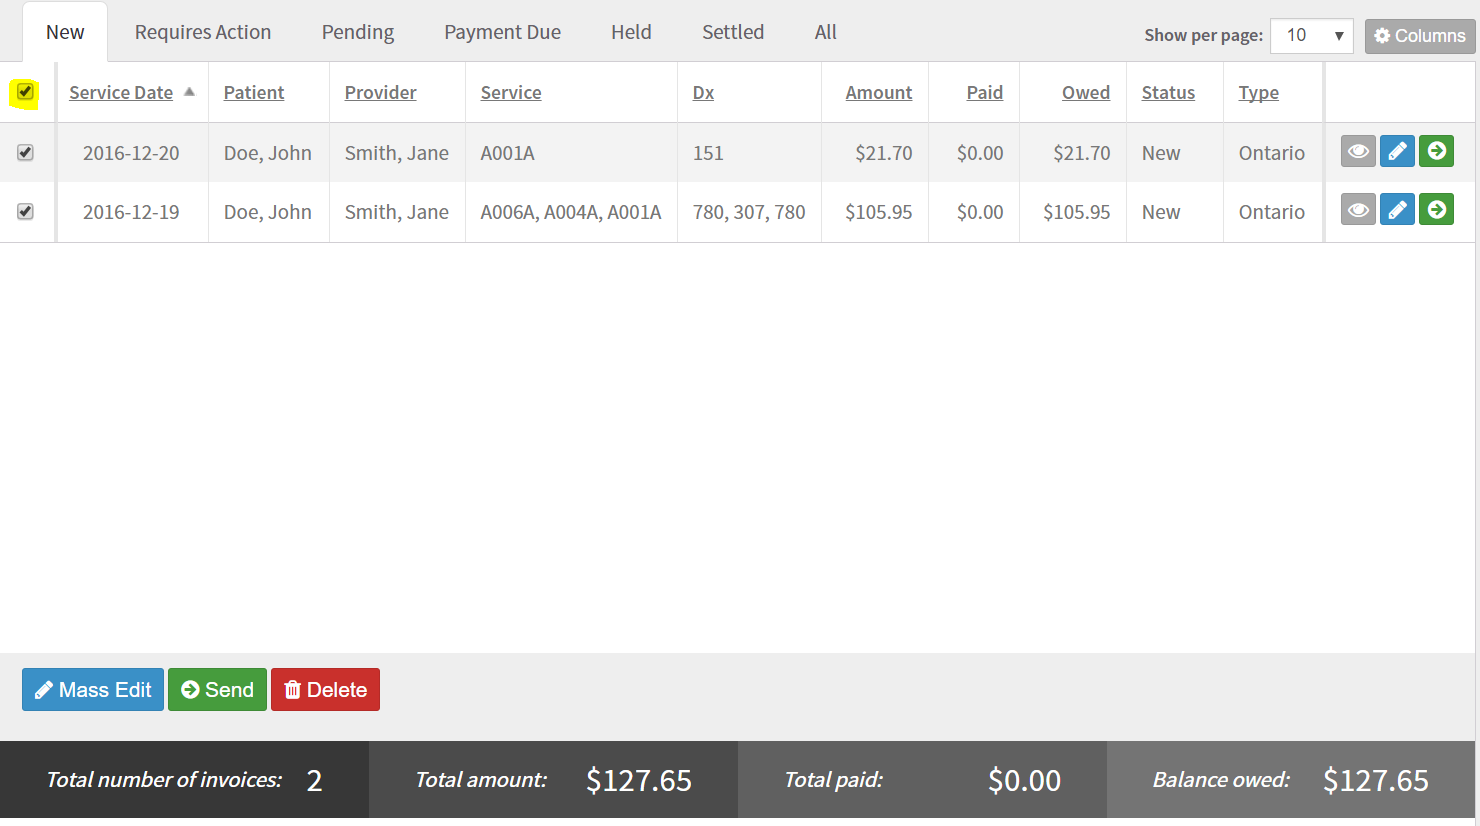
In order to send more claims than just the 10 visible by default, you can change the amount of items per page using the dropdown at the top of the screen.
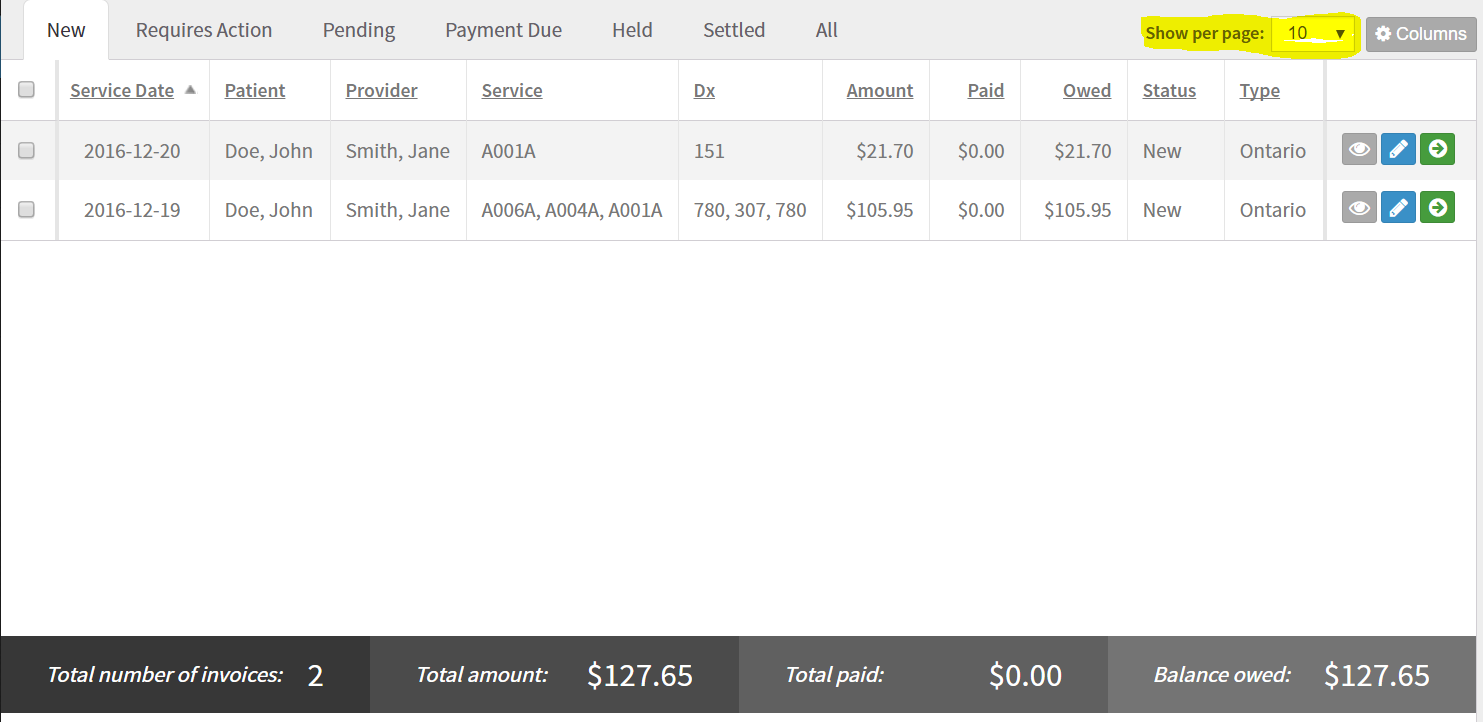
You can also send just a few claims in by selecting them using the checkboxes, or you can send claims in individually by clicking the green arrow button at the end of each claim line.
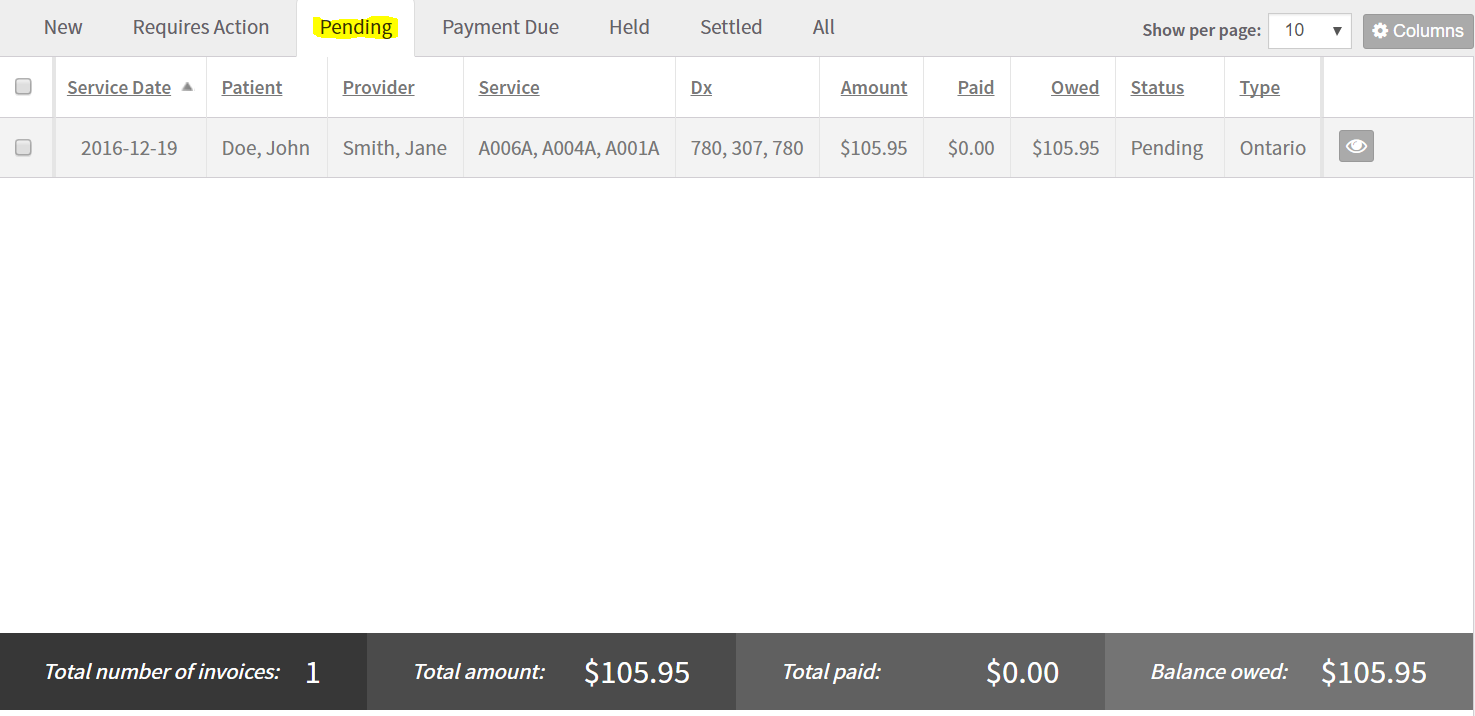
Once claims have been sent, they will move into the Pending tab until they are assessed by OHIP and sent back with updated statuses. You will not be able to edit claims that are pending until you receive a response from OHIP on them.
Within 24-48 hours of sending claims in for assessment, we will receive the initial response file back from OHIP with updates to claims that have incorrect version codes, invalid PHNs, and other basic errors. These claims will then appear on the Dashboard under “Invoices Requiring Action” and will also be displayed in the “Requires Action” tab in the Manage Invoices section. You can go back to edit any of these claims and resend them in order to be assessed.
OHIP Billing Cycle
The billing cycle in Ontario is approximately a month long and follows this general pattern:
- the 18th of each month: official cut-off is around the 18th of every month* at 5:00 p.m. EST. This is a soft cut-off which means that any claims received in the following few days will often still be accepted and processed for assessment, if time and volume permits. Otherwise, they will be assessed during the next billing cycle.
- the beginning of each month, generally by the 7th: your official remittance advice (RA) list is received and uploaded directly into your ClinicAid account at the beginning of each month (usually between the 5th and the 7th). This will update your claim statuses to show whether claims have been paid in full, underpaid, or rejected. You can view the various statuses in the Manage Invoices section.
- the 15th business day of each month: claims sent in before cut-off will be assessed and paid out by the 15th business day of the following month.
*Cut-off maybe be moved to a different date because of holidays or other factors. An updated schedule of OHIP cut-off dates is available on the MOHLTC website, as well as on our ClinicAid blog.
ClinicAid will automatically update the statuses of your claims in the system as soon as we receive the remittance advice list back from the MC EDT system. Your claims will either be settled (accepted and paid in full) or will require action (rejected or underpaid). You can view the various statuses in the Manage Invoices section. Rejected or underpaid claims will also be displayed on the Dashboard in your Invoices Requiring Action section.
Invoices requiring action will have this status until you edit them to “fix” the issue displayed by the rejection reason and code, or until you manually settle the claims to acknowledge and accept rejected or underpaid claims based on their rejection reason and code.
You can submit claims as often as you’d like and you can use ClinicAid’s handy features, such as favourites lists and default invoice templates (set up in the Preferences section of the left-hand menu), to streamline your submission process.
For help with setup or questions about how ClinicAid’s medical billing software works, you can contact us and one of our support representatives will help you as soon as possible. We also have a video tutorial which you can follow along with in order to set up your account.
Contacts and additional resources
Please visit ClinicAid’s Customer Support Portal to find additional resources to help you familiarize yourself with your new account. There, you’ll find links to our tutorial videos, as well as FAQs and written guides to help you become a ClinicAid billing pro in no time! You can also visit our blog for updates and more relevant information about ClinicAid. Feel free to contact us with any other questions you may have.
For questions about registration, Go Secure setup, and specific billing questions about how to claim for certain services or questions about rejected or underpaid claims, it is best to contact the Ontario Service Support Centre at 1-800-262-6524 or at SSContactCentre.MOH@ontario.ca. They will generally ask for the patient’s health number, service code and the date of service in order to look up the claim in their system. Claims that have been assessed will also have a claim number which you can find in the Transaction History of the invoice when viewing it. You can also contact your specific claims office directly for questions about claims.
Other useful resources include the Online Resource Manual for Physicians (for information about the various aspects of being a practitioner in Ontario), the Schedule of Benefits (for specific procedures lists and fee amounts), and the OHIP Forms section (for copies of the relevant forms required for practitioners in Ontario).
We hope this guide has helped you familiarize yourself with your ClinicAid account. Please let us know if you have any questions and happy billing!